
1. Introduction
This instruction manual provides detailed guidance for the proper setup, operation, and maintenance of your National RC-200 FM/AM 2-Band Electronic Digital Clock Radio. Please read this manual thoroughly before using the product to ensure safe and efficient operation. This unit combines a high-precision electronic digital clock with an FM/AM radio, offering convenient timekeeping and audio entertainment.
2. Product Overview
Familiarize yourself with the various components and controls of your RC-200 clock radio.
2.1 Front Panel
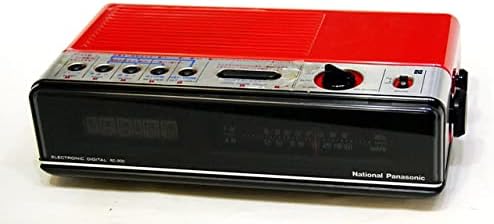
The front panel features the digital time display, which illuminates in green fluorescent characters. Above the display, a silver control panel houses buttons for setting the time, alarm, and sleep functions, along with the radio tuning knob and band selector. The speaker grille is located on the right side of the front panel.
2.2 Rear Panel
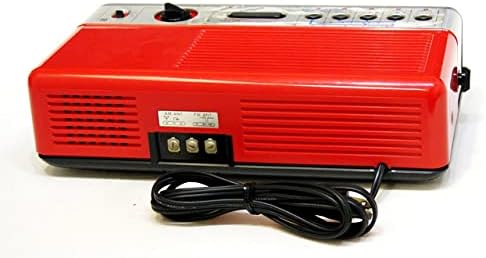
The rear panel includes the attached AC power cord, terminals for connecting external FM/AM antennas, and a label indicating model information and electrical specifications. The power frequency selector switch (50Hz/60Hz) is located on the bottom of the unit.
3. Setup
3.1 Power Connection
- Power Frequency Selection: Locate the 50Hz/60Hz switch on the bottom of the unit. Set it according to the power frequency of your region. Incorrect setting may affect time accuracy.
- Connect to Power: Plug the AC power cord into a standard AC 100V wall outlet.
3.2 Antenna Connection
- FM Antenna: The unit has a built-in FM antenna. For improved reception, connect an external FM antenna to the designated FM antenna terminal on the rear panel.
- AM Antenna: The unit has a built-in AM antenna. For improved reception, connect an external AM antenna to the designated AM antenna terminal on the rear panel.
3.3 Initial Clock Setting
Upon first power-up or after a prolonged power outage, the clock display may show an incorrect time or a power outage indicator. Refer to the operating instructions for setting the correct time.
4. Operating Instructions
4.1 Radio Tuning
- Select Band: Use the FM/AM band selector switch to choose your desired radio band.
- Tune Station: Rotate the tuning knob to select a radio station. Adjust for the clearest reception.
4.2 Clock Functions
- Setting Time: Use the dedicated time setting buttons (e.g., Hour, Minute) to adjust the current time. The high-precision electronic clock ensures accuracy.
- Second Adjustment: The unit allows for second-level adjustment for precise time synchronization.
- Display Brightness: Adjust the brightness of the green fluorescent display to your preference using the brightness control.
4.3 Alarm Function
- Set Alarm Time: Use the alarm setting buttons to set your desired wake-up time.
- Alarm Sound: The alarm features a gentle 'piyo-piyo' sound.
- Activate Alarm: Ensure the alarm function is enabled after setting the time.
4.4 Sleep Timer
The sleep timer allows you to set a duration (from 0 to 59 minutes) after which the radio will automatically turn off. This is useful for falling asleep to music or talk radio.
4.5 Snooze Function
When the alarm sounds, pressing the snooze button will temporarily silence the alarm for approximately 9 minutes before it sounds again.
5. Maintenance
- Cleaning: Wipe the unit with a soft, dry cloth. For stubborn dirt, use a cloth lightly dampened with water and a mild detergent, then wipe dry. Do not use abrasive cleaners or solvents.
- Placement: Place the unit on a stable, flat surface away from direct sunlight, heat sources, and excessive moisture. Ensure adequate ventilation.
- Power Cord: Regularly inspect the power cord for any damage. If damaged, discontinue use and seek professional repair.
6. Troubleshooting
- Clock Display is Incorrect or Flashing: If the power supply is interrupted, the clock display may show an incorrect time or a power outage indicator. Reset the time as per the operating instructions.
- Poor Radio Reception: Adjust the position of the unit or connect an external antenna to improve signal reception. Ensure the FM/AM band selector is set correctly.
- No Sound: Check the volume level. Ensure the unit is not in sleep mode or alarm-only mode.
7. Specifications
| Feature | Specification |
|---|---|
| Receiving Frequency Range | FM: 76-90MHz, AM: 525-1,605kHz |
| Intermediate Frequency | FM: 10.7MHz, AM: 455kHz |
| Receiving Sensitivity | FM: 2μV/50mW, AM: 100μV/50mW |
| Integrated Circuits (IC) | 2 pieces |
| Transistors | 10 pieces |
| Practical Maximum Output | 1W (EIAJ/AC) |
| Speaker | 10cm PM Dynamic Speaker (8Ω) |
| Terminals | Earphone Terminal (8Ω), FM/AM External Antenna Terminals |
| Power Source | AC 100V, 50/60Hz (Switchable) |
| Power Consumption | 8.5W |
| External Dimensions (W×H×D) | 314mm × 90mm × 165mm |
| Weight | 1.8 kg |
| Tuner Type | AM, FM |
| Product Features | Waterproof/Drip-proof (as per manufacturer's specification) |
8. Warranty and Support
For detailed information regarding warranty coverage, service, or technical support, please contact the manufacturer directly. Keep your purchase receipt as proof of purchase.


