
BOBLOV L02
BOBLOV L02 Mini Camera
User Manual
1. Introduction
Thank you for choosing the BOBLOV L02 Mini Camera. This compact and versatile device is designed for various recording needs, offering 1080p Full HD video, infrared night vision, and a 125-degree wide-angle lens. Its small size and durable design make it ideal for capturing moments on the go, whether for outdoor sports, meetings, or personal security. This manual provides detailed instructions on how to set up, operate, and maintain your L02 Mini Camera to ensure optimal performance.
2. Package Contents
- BOBLOV L02 Mini Camera
- Shoulder Clip
- Back Clip
- USB Charging Cable (Type-C)
- User Manual
3. Product Overview

Figure 3.1: Front and side view of the BOBLOV L02 Mini Camera, showcasing its compact design and integrated clip.

Figure 3.2: Detailed view of the BOBLOV L02 Mini Camera with key controls and ports labeled for easy identification.
Controls and Indicators:
- Video/Power Button: Used to power the device on/off and initiate video recording.
- Photo Button: Used to capture still images.
- Audio Button: Used to start/stop audio-only recording.
- Night Vision Switch: Manual switch to activate/deactivate infrared night vision.
- Type-C Port: For charging and data transfer.
- Card Slot: For inserting the TF (MicroSD) memory card.
- Indicator Lights: Provide status feedback (e.g., charging, recording, low battery).
4. Setup
4.1 Charging the Battery
Before first use, fully charge the camera. Connect the camera to a USB power adapter (not included) or a computer using the provided Type-C USB cable. The indicator light will show charging status and turn off when fully charged. A full charge provides approximately 4 hours of recording time.

Figure 4.1: The BOBLOV L02 Mini Camera connected via its Type-C USB port for charging, demonstrating its ability to record while charging.
4.2 Inserting the Memory Card
The L02 Mini Camera supports TF (MicroSD) cards from 8GB up to 256GB (high-speed card recommended, not included). Ensure the camera is powered off before inserting or removing the memory card. Gently insert the card into the card slot until it clicks into place.

Figure 4.2: Step 1 of the operation guide, illustrating the insertion of a TF card into the camera's memory card slot.
4.3 Attaching the Clips
The camera comes with two interchangeable clips: a shoulder clip and a back clip. Choose the appropriate clip for your intended use. Use the provided tool to attach or remove the clips by aligning them with the camera's mounting points and securing them firmly.
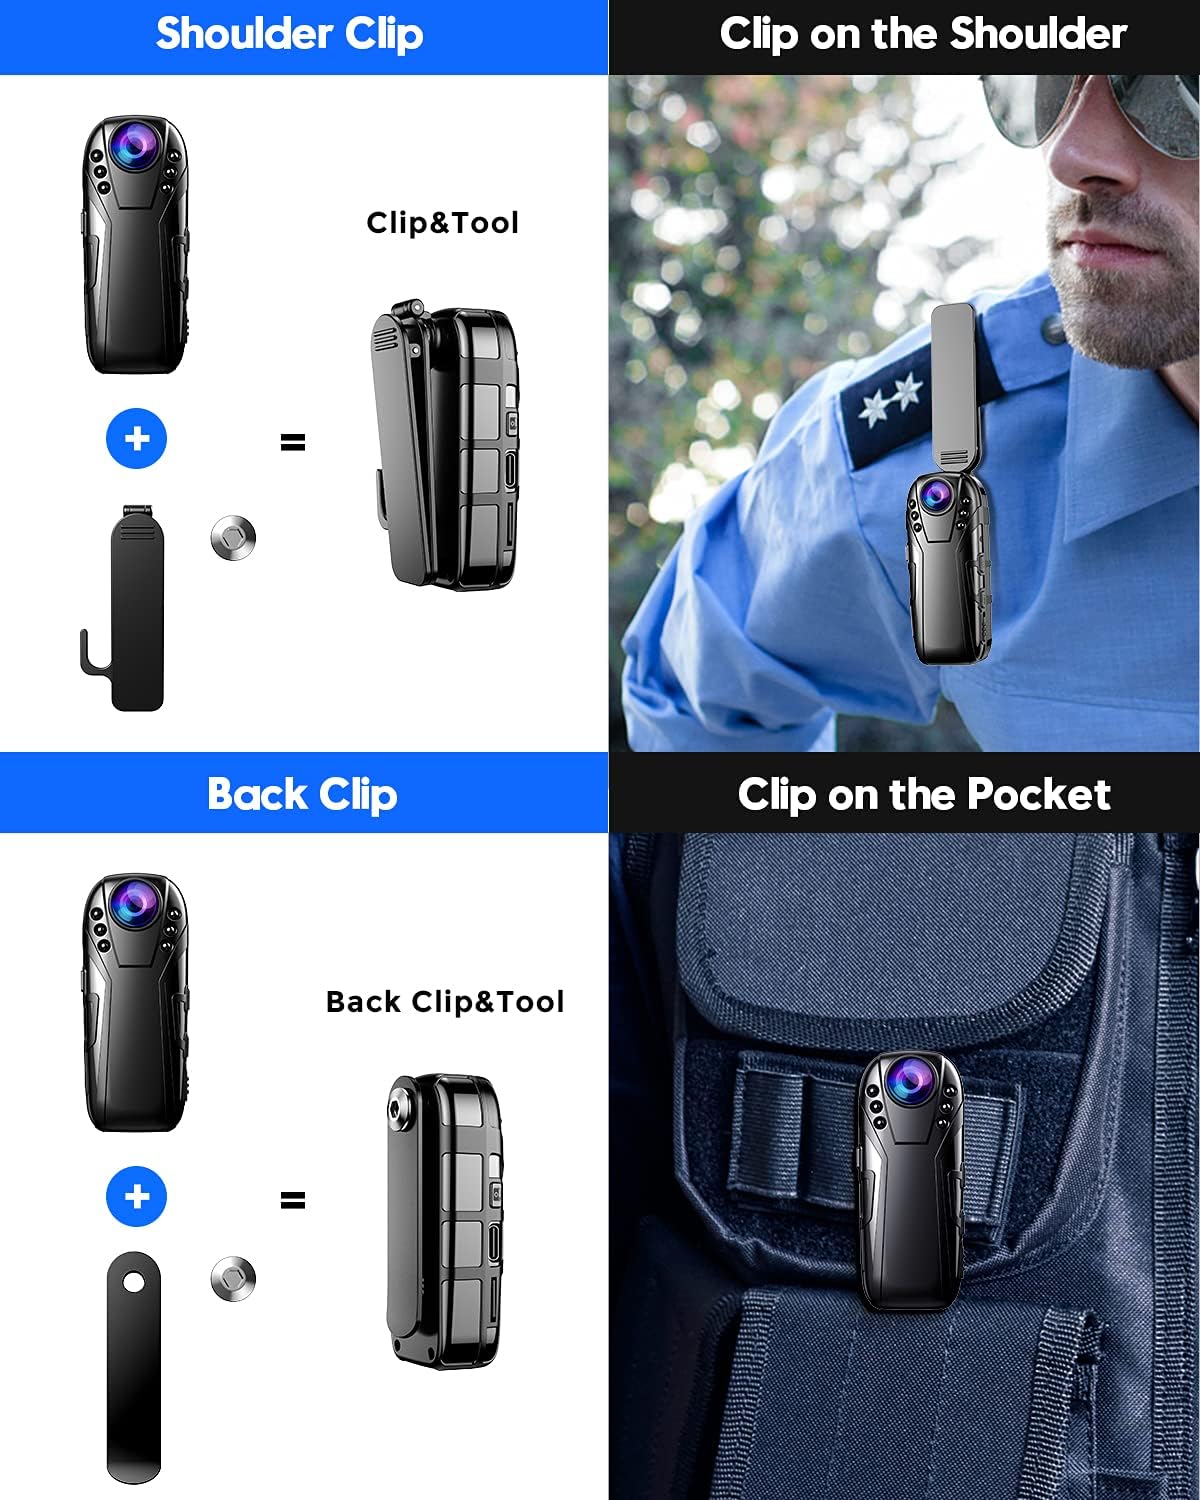
Figure 4.3: Visual guide demonstrating the attachment of both the shoulder clip and the back clip to the camera, along with examples of how they can be worn.
5. Operating Instructions
5.1 Power On/Off
- To Power On: Press and hold the Video/Power button until the indicator light turns on.
- To Power Off: Press and hold the Video/Power button until the indicator light turns off.
5.2 Video Recording
- With the camera powered on, press the Video/Power button once to start video recording. The indicator light will flash to indicate recording is in progress.
- Press the Video/Power button again to stop recording. The indicator light will stop flashing.
- The camera supports 1080p resolution and features a 125-degree wide-angle lens for broader coverage.
5.3 Audio Recording
- Press the Audio button once to start audio-only recording.
- Press the Audio button again to stop audio recording.
5.4 Photo Capture
- Press the Photo button once to capture a still image.
5.5 Night Vision
The L02 Mini Camera is equipped with infrared night vision for clear recording in low-light conditions. Use the manual Night Vision Switch to activate or deactivate this feature. The camera has six night vision lights to ensure high-definition images even at night.

Figure 5.1: Illustrates the difference between day and night recording capabilities, highlighting the manual night vision switch on the camera.
5.6 Loop Recording
When the memory card is full, the camera will automatically overwrite the oldest files to continue recording. This ensures continuous recording without manual intervention.

Figure 5.2: A visual representation of the loop recording feature, where new recordings automatically replace the oldest files when storage is full.
5.7 Timestamp
The camera automatically adds a timestamp to your recordings, providing accurate date and time information for your footage.
5.8 Connecting to a Computer
To view or transfer files, connect the camera to your computer using the provided Type-C USB cable. The camera will appear as a removable disk, allowing you to access and manage your recorded videos and photos directly.
6. Maintenance
- Cleaning: Use a soft, dry cloth to clean the camera body. For the lens, use a specialized lens cleaning cloth and solution. Avoid using harsh chemicals or abrasive materials.
- Storage: Store the camera in a cool, dry place away from direct sunlight and extreme temperatures. If storing for extended periods, ensure the battery is partially charged (around 50%) to prolong its lifespan.
- Memory Card: Periodically format the memory card to maintain optimal performance and prevent data corruption. Back up important files before formatting.
7. Troubleshooting
| Problem | Possible Cause | Solution |
|---|---|---|
| Camera does not power on. | Low battery; Camera frozen. | Charge the camera fully. If unresponsive, try resetting by pressing and holding the power button for 10-15 seconds. |
| Cannot record video/photo. | No memory card; Memory card full; Memory card error. | Insert a TF card. Transfer files to free up space or replace the card. Format the card (backup data first). |
| Poor video quality. | Dirty lens; Low light conditions (night vision off). | Clean the camera lens. Activate night vision in low light. |
| Computer does not recognize camera. | Faulty USB cable; Driver issue; Camera not in data transfer mode. | Try a different USB cable or USB port. Ensure the camera is powered on and connected correctly. |
8. Specifications
| Feature | Detail |
|---|---|
| Model | L02 |
| Brand | BOBLOV |
| Video Resolution | 1080p Full HD |
| Lens Angle | 125-degree Wide Angle |
| Night Vision | Infrared with 6 lights (manual switch) |
| Battery Capacity | 1500mAh |
| Recording Time | Approx. 4 hours (fully charged) |
| Storage | Supports 8-256GB TF (MicroSD) card (not included) |
| Dimensions | 81mm x 34mm x 22mm (3.19in x 1.34in x 0.87in) |
| Weight | 62.7g (2.2oz) |
| Color | Black |
9. Warranty and Support
BOBLOV products are designed for reliability and performance. For warranty information, technical support, or any inquiries regarding your L02 Mini Camera, please refer to the contact information provided on the product packaging or the official BOBLOV website. Please retain your proof of purchase for warranty claims.
Ask a question about this manual
Ask about setup, troubleshooting, compatibility, parts, safety, or missing instructions. Manuals+ will review the question and use this page’s manual context to help answer it.