
1. Introduction
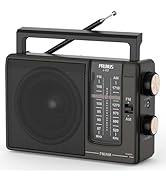
The PRUNUS J-166 Portable AM/FM Radio is a compact and lightweight device designed for reliable audio reception. It features excellent signal reception, clear sound quality, and is battery-operated for portability and emergency use. This manual provides detailed instructions for setup, operation, and maintenance of your radio.
2. What's in the Box
- PRUNUS J-166 Portable AM/FM Radio
- Lanyard
- Owner's Manual
- Quick Start Guide
3. Product Overview
The PRUNUS J-166 radio is engineered for simplicity and performance. Key features include:
- Portable Design: Compact size (2.7 x 5 x 1.1 inches) and light weight (4.2 oz without batteries) make it easy to carry in a pocket or clip to clothing using the integrated back clip. A lanyard is also included for secure carrying.
- Easy to Use: Simple controls with a tuning knob, volume knob, and band/power switch. The tuning indicator light assists in finding stations.
- Excellent Signal Reception: Equipped with a 16.5-inch long, 360° adjustable antenna and an advanced DSP chip for strong reception of FM (87-108 MHz) and AM (520-1730 kHz) frequencies.
- Perfect Sound Quality: Features a built-in magnetic speaker for clear audio. A 3.5mm earphone jack allows for private listening.
- Convenient Indicators: A red battery indicator light signals low battery, and a green tuning indicator light illuminates when a station is successfully tuned.

4. Setup
4.1 Battery Installation
The PRUNUS J-166 radio requires two (2) AA batteries (not included). To install:
- Locate the battery compartment cover on the back of the radio.
- Slide the cover open in the direction indicated by the arrow.
- Insert two AA batteries, ensuring correct polarity (+ and -) as marked inside the compartment.
- Close the battery compartment cover securely until it clicks into place.
4.2 Antenna Extension
For optimal FM reception, extend the telescopic antenna fully. For AM reception, the internal antenna is generally sufficient, but adjusting the radio's orientation may improve signal strength.
5. Operating Instructions
5.1 Power On/Off and Band Selection
Locate the three-position slide switch on the side of the radio:
- Slide to "FM" to turn on the radio and select FM band.
- Slide to "AM" to turn on the radio and select AM band.
- Slide to "OFF" to turn off the radio.

5.2 Tuning to a Station
Use the tuning wheel on the side of the radio to scan through frequencies. The green "TUNE" indicator light will illuminate when a strong signal is detected, indicating a clear station.

5.3 Volume Control
Adjust the volume by sliding the volume control wheel up (+) or down (-) on the side of the radio.
5.4 Headphone Usage
For private listening, plug any standard 3.5mm headphones (not included) into the earphone jack located on the side of the radio.

5.5 Using the Back Clip and Lanyard
The radio features a built-in back clip for attaching it to a belt or pocket. The included lanyard can be attached to the designated loop for carrying around your wrist or neck, enhancing portability.

6. Maintenance
- Cleaning: Wipe the radio with a soft, dry cloth. Do not use liquid cleaners or abrasive materials.
- Battery Care: Remove batteries if the radio will not be used for an extended period to prevent leakage.
- Storage: Store the radio in a cool, dry place away from direct sunlight and extreme temperatures.
7. Troubleshooting
| Problem | Possible Cause | Solution |
|---|---|---|
| No sound/Radio not turning on | Batteries are dead or incorrectly installed. | Replace batteries with new AA batteries, ensuring correct polarity. |
| Poor reception/Static | Antenna not extended (FM) or radio orientation (AM). Weak signal in the area. | Fully extend the telescopic antenna for FM. Rotate the radio for better AM reception. Try tuning to a different station. |
| Tuning light not illuminating | No strong signal found. | Continue adjusting the tuning knob until a clear station is found and the light illuminates. |
8. Specifications
| Feature | Detail |
|---|---|
| Model Number | J-166 |
| Product Dimensions | 2.7 x 1.1 x 5 inches |
| Item Weight | 5.1 ounces (without batteries) |
| Power Source | 2 AA batteries (not included) |
| Radio Bands Supported | AM/FM |
| FM Frequency Range | 87-108 MHz |
| AM Frequency Range | 520-1730 kHz |
| Connectivity Technology | Auxiliary (3.5mm headphone jack) |
| Special Features | Portable, Dust Resistant, Lightweight, Built-In AM Antenna, Shockproof, Back Clip, Lanyard |
| Manufacturer | PRUNUS |
| Country of Origin | China |
9. Warranty and Support
PRUNUS is a trusted brand committed to product quality and customer satisfaction since 2016. For any questions, concerns, or support needs regarding your PRUNUS J-166 radio, please contact our customer support team. We offer 24/7 customer support to assist you.
Please refer to the official PRUNUS website or your purchase platform for specific warranty details and contact information.


