
1. Introduction
Thank you for choosing the JULIAQUA Aquarium Heater. This device is designed to maintain a stable and optimal temperature in your aquarium, ensuring a healthy environment for your aquatic life. This manual provides essential information for the safe and effective use of your heater. Please read it thoroughly before installation and operation.
2. Safety Instructions
- Always unplug the heater from the power outlet before performing any maintenance, water changes, or handling the heater in the aquarium.
- Ensure the heater is fully submerged in water before plugging it in. Operating the heater out of water can cause damage to the unit and pose a fire hazard.
- Do not bury the heater in the substrate.
- Check the heater for any damage (cracks, frayed wires) before each use. Do not use if damaged.
- The controller unit is NOT waterproof. Keep it dry and away from water splashes.
- Keep out of reach of children and pets.
- Ensure the power outlet is suitable for the heater's voltage (AC220-240V, 50-60Hz).
- Avoid touching the heater directly after it has been operating, as it can be hot. Allow it to cool down in the water before removal.
3. Product Overview
The JULIAQUA Aquarium Heater features a compact design with an external temperature controller and a digital display for easy temperature monitoring and adjustment. It is suitable for both freshwater and saltwater aquariums.
3.1 Components
- Heater Unit: Submersible heating element with integrated digital display.
- Controller: External unit with a button for temperature adjustment.
- Power Cable: Connects the heater to the power source.
- Suction Cups: For securing the heater unit inside the aquarium.
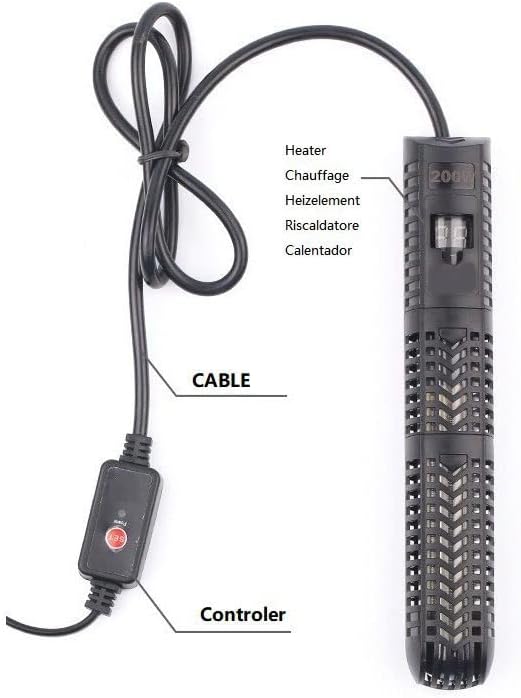
Image 3.1: Overview of the JULIAQUA Aquarium Heater components, including the heater unit, power cable, and external controller.
3.2 Key Features
- Adjustable Temperature: Precise temperature setting range of 18-34°C (63-94°F).
- Automatic Operation: Heater automatically turns on and off to maintain the set temperature, optimizing energy consumption.
- Digital Display: Shows both the current water temperature and the target temperature.
- Over-Temperature Protection: Built-in safety feature to prevent overheating.
- Durable Construction: Made with thickened quartz glass for high temperature and corrosion resistance.
- Versatile Use: Suitable for freshwater, saltwater, and turtle tanks.

Image 3.2: Detail of the thickened quartz glass, highlighting its robust and corrosion-resistant material.
4. Specifications
The JULIAQUA Aquarium Heater is available in various wattages to suit different aquarium sizes. The model Y5-50W is designed for aquariums up to 50 liters.

Image 4.1: Visual representation of different JULIAQUA heater models (50W, 100W, 200W, 300W, 500W) and their corresponding dimensions.
| Feature | Detail |
|---|---|
| Model Number | Y5-50W |
| Power | 50 Watt |
| Voltage | AC220-240V, 50-60Hz |
| Temperature Range | 18-34°C (63-94°F) |
| Recommended Aquarium Capacity (50W) | 8-50 Liters (approx. 2-12 Gallons) |
| Heater Dimensions (50W) | 30 x 165 mm (1.18 x 6.50 inches) |
| Cable Length (50W) | 1.15 m (3.77 ft) |
| Material | Thickened Quartz Glass |
| Compatibility | Freshwater, Saltwater, Turtle Tanks |
| Color | Black |

Image 4.2: Detailed specifications table for various wattage models, including recommended water volume, size, cable length, and temperature range for both EU and US versions.
5. Setup and Installation
Proper installation is crucial for the heater's performance and safety.
- Unpack and Inspect: Carefully remove the heater from its packaging. Inspect the unit and cable for any signs of damage. Do not proceed with installation if any damage is found.
- Placement in Aquarium: The heater must be fully submerged in water. For optimal accuracy, position the heater horizontally near the water outlet or in an area with good water circulation. This ensures even heat distribution and accurate temperature readings.

Image 5.1: Example of the heater installed in an aquarium, showing the submersible unit and the external controller being adjusted.
- Secure with Suction Cups: Use the provided suction cups to firmly attach the heater unit to the inside wall of your aquarium.
- Controller Placement: Position the external controller in a dry location, away from water. Remember, the controller is not waterproof.
- Power Connection: Once the heater is securely installed and fully submerged, plug the power cable into a suitable electrical outlet.

Image 5.2: Visual guide for correct (horizontal or vertical, fully submerged) and incorrect (partially submerged, buried in substrate) heater placement.
6. Operation
Operating your JULIAQUA Aquarium Heater is straightforward.
- Power On: After plugging in, the digital display on the heater unit will light up, showing the current water temperature.
- Set Temperature: Press the button on the external controller to adjust the target temperature. Each press will cycle through the available temperature settings. The display will briefly show the target temperature you are setting.
- Automatic Heating: The heater will automatically activate when the water temperature falls below the set target and will turn off once the target temperature is reached. This ensures consistent temperature and energy efficiency.
- Temperature Monitoring: The display continuously shows the current water temperature.
Important Note on Temperature Perception: The human body temperature is approximately 36°C (98.6°F). If the set aquarium temperature is below this (e.g., 25°C / 77°F), the water will feel cool to the touch. This does not indicate a malfunction. Always rely on the heater's digital display for accurate temperature readings.
7. Maintenance
Regular maintenance helps prolong the life of your aquarium heater.
- Cleaning: Periodically unplug the heater and gently wipe the heater unit to remove algae or mineral deposits. Use a soft cloth or sponge. Do not use abrasive cleaners.
- Inspection: During cleaning, re-inspect the heater unit and power cable for any signs of wear, damage, or cracks.
- Controller Care: Ensure the external controller remains dry at all times.
8. Troubleshooting
If you encounter issues with your JULIAQUA Aquarium Heater, refer to the following common problems and solutions:
| Problem | Possible Cause | Solution |
|---|---|---|
| Heater not warming water | Heater not plugged in; set temperature too low; insufficient wattage for tank size; poor water circulation. | Ensure power is connected. Increase set temperature. Verify heater wattage matches tank volume (refer to specifications). Improve water circulation around the heater. |
| Display shows error codes (E1, E2, 04) | Internal sensor error or malfunction. | To attempt recovery: Press and hold the controller button for 20 seconds until a number flashes (e.g., 66). Then, quickly press the button three times. Wait 2 seconds for the display to return to normal. If the flashing number was 66, the setting should change to 69. If 67, change to 70, etc. If the error persists, contact customer support. |
| Heater turns off too quickly | Set temperature reached; sensor reading inaccurate due to poor placement. | This is normal operation if the set temperature is reached. Ensure the heater is placed in an area with good water flow for accurate readings. |
| Heater not turning off | Water temperature not reaching set point; faulty sensor. | Check if the set temperature is achievable given ambient conditions and heater wattage. If the water temperature exceeds the set point and the heater remains on, unplug immediately and contact support. |

Image 8.1: Example of an error code (E1) displayed on the heater unit, indicating a potential issue.
9. Warranty and Support
The JULIAQUA Aquarium Heater comes with a one-year warranty from the date of purchase. This warranty covers manufacturing defects under normal use.
If you have any questions, concerns, or require assistance with your product, please do not hesitate to contact JULIAQUA customer support through the Amazon messaging system. Please provide your order number and a detailed description of the issue for prompt assistance.