
1. Introduction
This manual provides detailed instructions for the assembly, operation, and maintenance of the KIMEX 015-1624 Quad Monitor Desk Mount. This product is designed to support four computer monitors ranging from 17 to 32 inches, with VESA compatibility of 75x75mm or 100x100mm, and a maximum weight capacity of 8 kg per screen. It offers flexible mounting options (desk clamp or grommet) and adjustable screen positioning for an optimized workspace.

Figure 1: The KIMEX 015-1624 Quad Monitor Desk Mount with four monitors installed, demonstrating its full configuration and space-saving design.
2. Safety Information
Please read all instructions carefully before assembly and installation. If you do not understand these instructions or have doubts about the safety of the installation, contact a qualified installer. Improper assembly or installation may cause damage or serious injury.
- Ensure the mounting surface can safely support the combined weight of the mount and all attached equipment.
- Do not exceed the maximum weight capacity of 8 kg per screen.
- Use only the provided hardware. Do not use damaged or missing parts.
- Keep children away during assembly. Small parts may be a choking hazard.
- Periodically check that the mount is secure and stable.
3. Package Contents
Verify that all components are present and undamaged before proceeding with assembly.
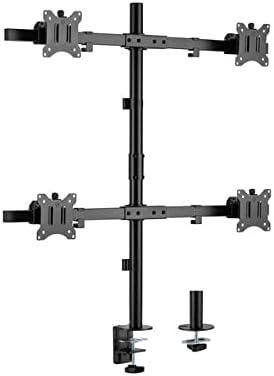
Figure 2: Overview of the KIMEX 015-1624 Quad Monitor Desk Mount components, including the main pole, monitor arms, VESA plates, and the desk clamp/grommet mounting options.
- Main Pole (x1)
- Monitor Arms (x2, each supporting two monitors)
- VESA Plates (x4)
- Desk Clamp Assembly (x1)
- Grommet Mount Assembly (x1)
- Hardware Kit (screws, washers, Allen keys)
4. Setup and Installation
The KIMEX 015-1624 offers two installation methods: desk clamp or grommet mount.
4.1. Choose Mounting Method
Determine whether to use the desk clamp for attaching to the edge of a desk or the grommet mount for installation through a desk hole.

Figure 3: The KIMEX 015-1624 Quad Monitor Desk Mount assembled with its main pole and monitor arms, ready for monitor attachment.
4.2. Desk Clamp Installation
- Attach the desk clamp assembly to the bottom of the main pole using the provided screws.
- Position the clamp on the edge of your desk and tighten the knob until the mount is secure.
4.3. Grommet Mount Installation
- If your desk has a grommet hole, insert the grommet mount assembly through the hole.
- Secure the grommet mount from underneath the desk using the provided plate and nut.
- Attach the main pole to the grommet mount.
4.4. Attaching Monitor Arms and VESA Plates
- Slide the monitor arms onto the main pole at your desired heights. Secure them with the locking mechanisms.
- Attach the VESA plates to the back of each monitor using the appropriate screws from the hardware kit. Ensure the screws are tightened securely but do not overtighten.
- Slide the monitors (with VESA plates attached) onto the monitor arms. Ensure they click into place or are secured with the provided locking screws.
5. Operating and Adjustments
The KIMEX 015-1624 mount offers various adjustment options for optimal viewing.

Figure 4: The KIMEX 015-1624 Quad Monitor Desk Mount from a slightly angled view, highlighting the adjustable monitor arms and VESA mounting points.
- Height Adjustment: Loosen the locking mechanism on the main pole to slide the monitor arms up or down. Retighten to secure.
- Tilt Adjustment: Monitors can be tilted up to 45 degrees. Use the tilt knob or screw on the VESA plate to adjust the angle.
- Swivel Adjustment: The monitor arms can swivel 360 degrees around the main pole. Individual monitors can also swivel horizontally.
- Rotation: Monitors can be rotated from landscape to portrait orientation (360 degrees) without removing them from the mount.
5.1. Cable Management
Utilize the integrated cable management clips or channels on the monitor arms and main pole to route and organize your cables for a tidy workspace.

Figure 5: A side view of the KIMEX 015-1624 Quad Monitor Desk Mount, illustrating the robust construction of the arms and the main pole.
6. Maintenance
Regular maintenance ensures the longevity and safe operation of your monitor mount.
- Cleaning: Wipe the mount with a soft, damp cloth. Avoid abrasive cleaners or solvents.
- Fastener Check: Periodically check all screws and bolts to ensure they are tight. Retighten if necessary.
- Weight Capacity: Do not add monitors that exceed the specified weight or size limits.
7. Troubleshooting
| Problem | Possible Cause | Solution |
|---|---|---|
| Mount is unstable/wobbly. | Mounting clamp/grommet not tightened sufficiently. | Ensure the desk clamp or grommet bolt is fully tightened. Check desk stability. |
| Monitors sag or tilt downwards. | Tilt mechanism not tight enough; monitor weight exceeds capacity. | Tighten the tilt adjustment screw/knob. Verify monitor weight is within 8 kg limit. |
| Monitors cannot be attached to VESA plate. | Incorrect VESA pattern; wrong screws used. | Confirm monitor VESA pattern is 75x75mm or 100x100mm. Use correct screws from hardware kit. |
8. Specifications
- Model: KIMEX 015-1624
- Screen Size Compatibility: 17 - 32 inches
- VESA Compatibility: 75x75mm, 100x100mm
- Weight Capacity: 8 kg (17.6 lbs) per screen
- Mounting Options: Desk Clamp, Grommet Mount
- Adjustments: Height, Tilt (45°), Swivel (360°), Rotation (360°)
- Material: Steel
- Color: Black
- Product Weight: 7.5 kg
9. Warranty and Support
For warranty information or technical support, please refer to the manufacturer's official website or contact their customer service department. Keep your purchase receipt for warranty claims.
Manufacturer: KIMEX
Country of Origin: France