
Introduction
This manual provides detailed instructions for the installation, operation, and maintenance of your Gravity D910BT Double Din Car Stereo Receiver. The D910BT features a 6.2-inch HD touchscreen, Bluetooth connectivity, DVD/CD/MP3/FM/USB/SD playback, and compatibility with a backup camera. Please read this manual thoroughly before using the device to ensure proper function and safety.

Figure 1: Front view of the Gravity D910BT Car Stereo Receiver and included remote control.
Setup and Installation
Proper installation is crucial for optimal performance. It is recommended that installation be performed by a qualified professional.
Wiring Connections
Ensure all power, ground, speaker, and accessory wires are connected correctly according to your vehicle's wiring diagram and the receiver's included wiring harness. Incorrect wiring can cause damage to the unit or vehicle.
- Power (Yellow): Connect to constant 12V power.
- Accessory (Red): Connect to switched 12V power (ignition).
- Ground (Black): Connect to a clean chassis ground.
- Speaker Wires: Connect to corresponding vehicle speakers (Front Left, Front Right, Rear Left, Rear Right). Ensure correct polarity.
- Antenna: Connect the vehicle's radio antenna.
- Parking Brake (Light Green): Connect to the parking brake circuit for video playback safety.
- Reverse Gear (Brown): Connect to the reverse light circuit for automatic backup camera display.
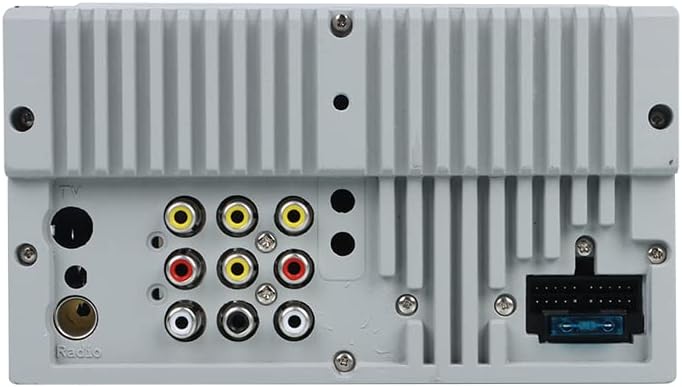
Figure 2: Rear view of the receiver, highlighting connection ports for power, speakers, and auxiliary inputs/outputs.
Backup Camera Installation
The D910BT supports a backup camera. Connect the camera's video output to the "Camera In" RCA port on the receiver. Connect the camera's power to the vehicle's reverse lights and the receiver's reverse trigger wire (Brown) to the same circuit. This will automatically display the camera feed when the vehicle is in reverse.

Figure 3: Example of a compatible backup camera, often integrated into a license plate frame.
Operating Instructions
Basic Controls
- Power Button: Press to turn the unit on/off.
- Volume Knob: Rotate to adjust volume. Press to mute/unmute.
- MENU Button: Access the main menu or return to the previous screen.
- BAND Button: Switch between radio bands (FM1, FM2, FM3, AM1, AM2).
- Touchscreen: Navigate menus and control functions by touching the screen icons.
- Remote Control: Use the provided remote for convenient operation of various functions.
Radio Operation (AM/FM)
- From the main menu, select the "Radio" icon.
- Press the BAND button to cycle through FM1, FM2, FM3, AM1, AM2.
- Use the << and >> buttons on the screen or remote to manually tune frequencies.
- Press and hold << or >> for automatic seek tuning.
- To save a station, tune to the desired frequency, then press and hold one of the preset number buttons (1-6) on the screen until you hear a beep.
Disc Playback (DVD/CD)
- Insert a DVD or CD into the disc slot. The unit will automatically switch to Disc mode.
- If it does not switch, select the "Disc" icon from the main menu.
- Use the on-screen controls or remote to play, pause, skip tracks/chapters, and access disc menus.
- Ensure the parking brake is engaged to view video content.
USB/SD Playback
- Insert a USB drive into the USB port or an SD card into the SD slot.
- Select the "USB" or "SD" icon from the main menu.
- Browse files and folders on the device using the touchscreen.
- Supported formats include MP3, WMA, AVI, MP4, etc.
Bluetooth Operation
- Pairing:
- From the main menu, select the "Bluetooth" icon.
- On your mobile device, enable Bluetooth and search for available devices.
- Select "D910BT" from the list.
- Enter the pairing code (usually "0000" or "1234") if prompted.
- Once paired, the unit will display "Connected".
- Hands-Free Calling:
- Use the on-screen dial pad or phonebook (if synced) to make calls.
- Press the "Answer" or "Reject" icons on the screen for incoming calls.
- Audio will be routed through the car speakers, and the built-in microphone will capture your voice.
- Audio Streaming (A2DP):
- Once paired, play music on your mobile device.
- The audio will stream wirelessly to the D910BT.
- Use the on-screen controls or remote to play/pause and skip tracks.
Audio Settings and Equalizer
Access the audio settings menu to adjust sound preferences. The D910BT features an 8-band equalizer for fine-tuning audio output. You can also adjust balance, fader, and subwoofer levels.
Maintenance
- Screen Cleaning: Use a soft, lint-free cloth to gently wipe the touchscreen. Do not use abrasive cleaners or solvents.
- Disc Slot: Keep the disc slot free of debris. Avoid inserting bent or damaged discs.
- General Care: Avoid exposing the unit to extreme temperatures, direct sunlight for prolonged periods, or excessive moisture.
Troubleshooting
| Problem | Possible Cause | Solution |
|---|---|---|
| No Power | Blown fuse; incorrect wiring; loose connection. | Check vehicle fuses and the unit's fuse. Verify power and ground connections. Ensure accessory wire is receiving power. |
| No Sound | Volume too low; mute activated; incorrect speaker wiring; amplifier issues. | Increase volume. Check if mute is active. Verify speaker connections. If using an external amplifier, check its power and connections. |
| Bluetooth Not Connecting | Device not in pairing mode; incorrect pairing code; interference. | Ensure Bluetooth is enabled on both devices and the D910BT is in pairing mode. Re-enter pairing code. Try pairing in a different location. |
| Disc Error | Dirty, scratched, or incompatible disc. | Clean the disc. Try a different disc. Ensure the disc format is supported (DVD, CD, MP3 CD). |
| Backup Camera Not Displaying | Incorrect wiring; camera not powered; reverse trigger not connected. | Verify camera video input and power connections. Ensure the reverse trigger wire is correctly connected and receiving signal when in reverse. |
Specifications
| Model Number | D910BT |
| Display Size | 6.2 inches |
| Connectivity | Bluetooth, USB |
| Special Features | Equalizer, Touchscreen, Multicolor Illumination, Steering Wheel Control Ready |
| Compatible Devices | Smartphone, Speaker |
| Supported Media | DVD, CD, MP3, USB, SD |
| Output Power | 200 Watts |
| Surround Sound Configuration | 4.0 Channel |
| Video Encoding | H.264, H.265/HEVC |
Warranty and Support
For warranty information and technical support, please refer to the warranty card included with your product or visit the official Gravity website. Keep your purchase receipt as proof of purchase for warranty claims.
Manufacturer: Gravity