1. Introduction
Thank you for purchasing the RCA RCWR7V AM/FM Weather Alert Radio. This device is designed to keep you informed of important weather events through NOAA weather alerts, while also providing standard AM/FM radio functionality and a digital alarm clock. Please read this manual thoroughly before operating the unit to ensure proper use and to maximize its features.
2. Safety Information
To ensure safe operation and prevent damage, please observe the following precautions:
- Do not expose the unit to rain, moisture, or extreme temperatures.
- Avoid placing the unit near heat sources such as radiators, heat registers, stoves, or other apparatus (including amplifiers) that produce heat.
- Clean only with a dry cloth.
- Do not block any ventilation openings.
- Use only attachments/accessories specified by the manufacturer.
- Unplug this apparatus during lightning storms or when unused for long periods of time.
- Refer all servicing to qualified service personnel.
3. Package Contents
Verify that all items are present in your package:
- RCA RCWR7V AM/FM Weather Alert Radio
- User Manual
- AC Power Adapter
Note: AAA batteries for backup power are sold separately.
4. Product Features
- NOAA weather alerts for severe events (tornadoes, floods, hurricanes, earthquakes).
- Automatic alerts for immediate notification.
- Digital clock with alarm and snooze functions.
- AM/FM radio tuner.
- Built-in headphone jack for private listening.
- AC power compatible for continuous use.
- Battery powered for protection against power outages and portability (4 x AAA batteries, sold separately).

Figure 4.1: Instant Weather Alerts Feature. This image shows the radio with icons representing various weather events it can alert you to, including tornadoes, floods, hurricanes, and earthquakes.
5. Controls and Display
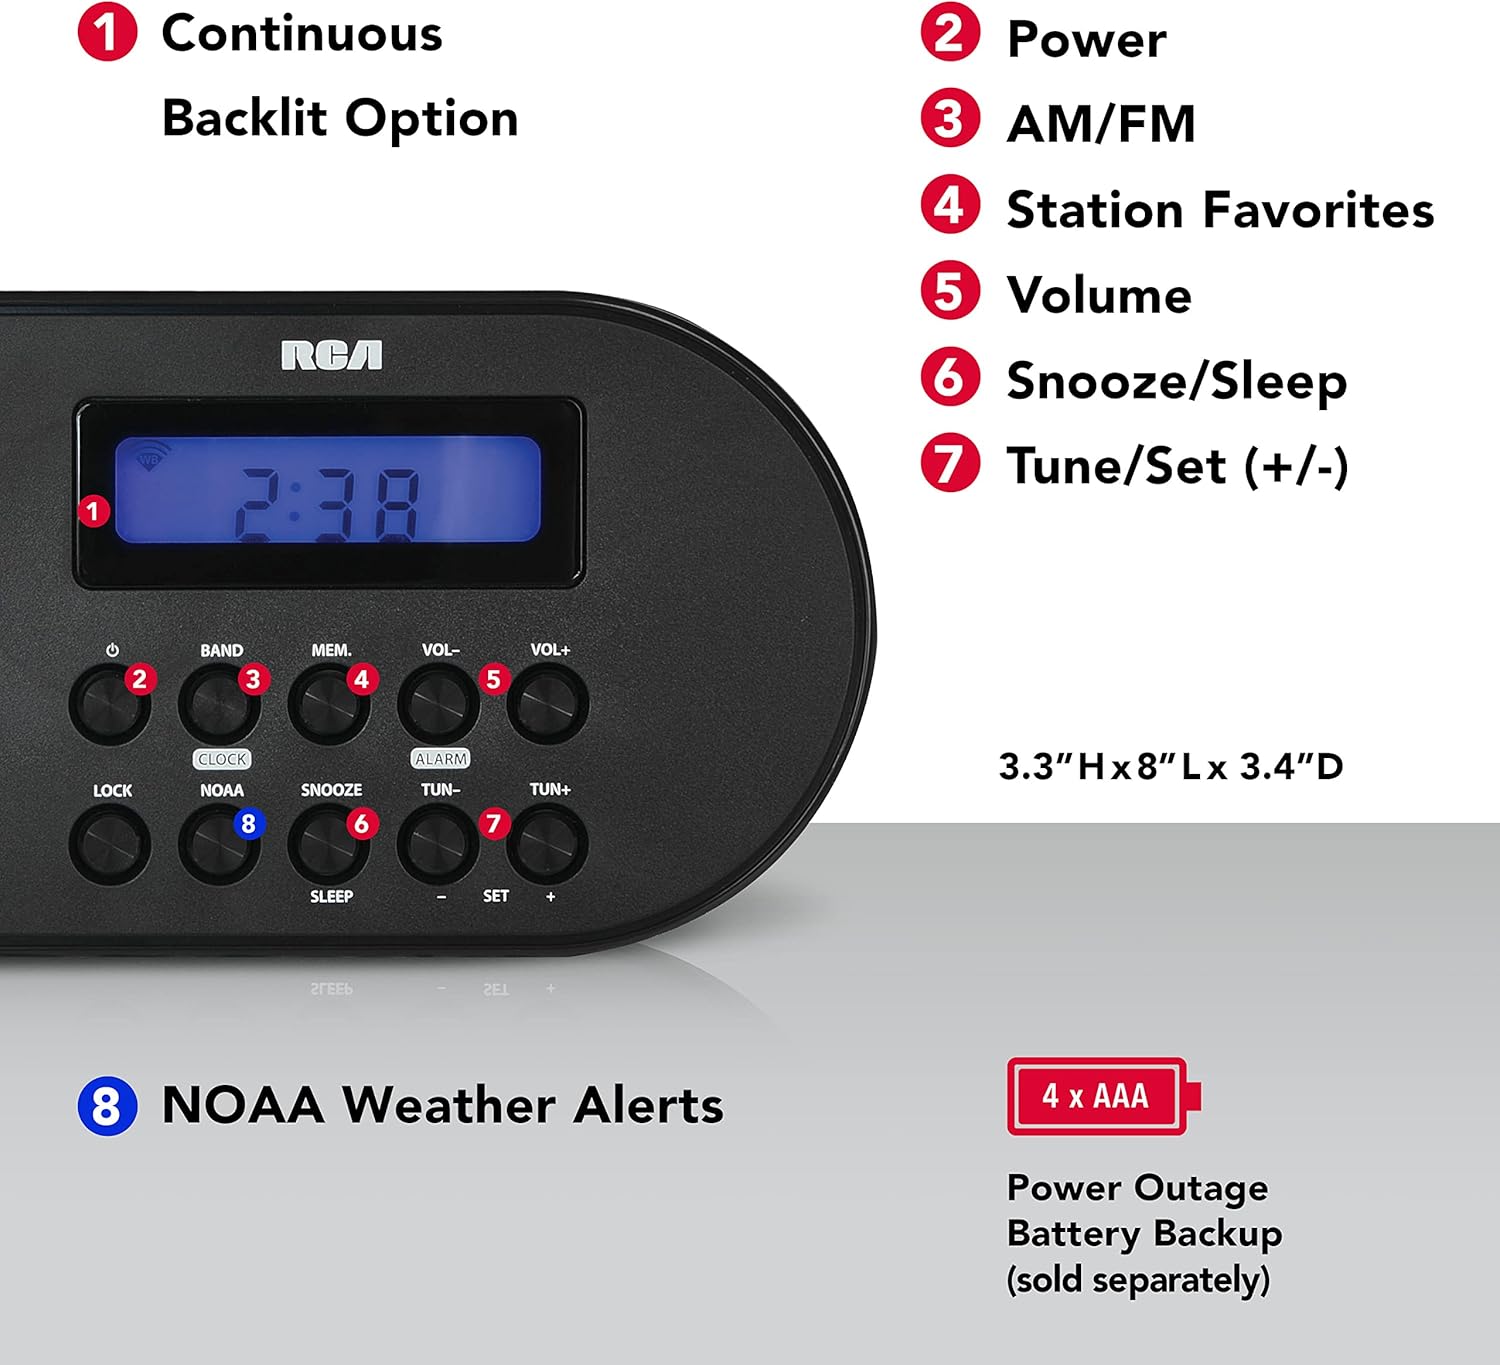
Figure 5.1: Front Panel Controls and Display. This diagram highlights key features: 1. Continuous Backlit Option, 2. Power Button, 3. AM/FM Band Button, 4. Station Favorites (Memory) Button, 5. Volume Controls, 6. Snooze/Sleep Button, 7. Tune/Set (+/-) Buttons, and 8. NOAA Weather Alerts Button.
5.1. Front Panel
- Display: Shows time, frequency, and alert indicators.
- Power Button: Turns the unit on/off.
- BAND Button: Switches between AM, FM, and Weather bands.
- MEM. (Memory) Button: Saves and recalls radio station presets.
- VOL- / VOL+ Buttons: Adjusts the volume level.
- CLOCK Button: Used for setting the time.
- ALARM Button: Used for setting the alarm.
- SNOOZE Button: Temporarily silences the alarm.
- NOAA Button: Activates/deactivates NOAA weather alert functions.
- TUN- / TUN+ Buttons: Tunes radio frequency or adjusts settings.
- LOCK Button: Locks buttons to prevent accidental changes.
- SLEEP Button: Sets a sleep timer for the radio.
- SET +/- Buttons: Used for confirming settings or navigating menus.
5.2. Rear Panel

Figure 5.2: Rear Panel and Battery Compartment. This image displays the back of the radio, highlighting the compartment for 4 AAA batteries, which provide backup power.
- AC Power Input: Connects to the included AC adapter for primary power.
- Battery Compartment: Holds 4 x AAA batteries for backup power during outages.
- Headphone Jack: For connecting headphones (3.5mm).
- Telescopic Antenna: Extends for improved FM and Weather band reception.
6. Setup
6.1. Powering the Unit
- AC Power: Connect the AC power adapter to the "AC Power Input" jack on the rear of the radio, then plug the adapter into a standard wall outlet.
- Battery Backup (Optional): For power outage protection and portability, open the battery compartment on the rear of the unit. Insert 4 x AAA batteries (not included), ensuring correct polarity (+/-). Close the compartment securely.
6.2. Setting the Clock
- Press and hold the CLOCK button until the time display flashes.
- Use the TUN- or TUN+ buttons to adjust the hour. Press CLOCK again to confirm the hour.
- Use the TUN- or TUN+ buttons to adjust the minute. Press CLOCK again to confirm the minute and exit clock setting mode.
7. Operating Instructions
7.1. AM/FM Radio Operation
- Press the POWER button to turn on the radio.
- Press the BAND button to select either AM or FM band.
- Extend the telescopic antenna for better FM reception. For AM reception, rotate the unit for best signal.
- Use the TUN- or TUN+ buttons to manually tune to a desired frequency. Press and hold these buttons to auto-scan for the next available station.
- Adjust the volume using the VOL- or VOL+ buttons.
7.2. Setting Radio Presets
- Tune to the desired station.
- Press and hold the MEM. button until the preset number flashes on the display.
- Use the TUN- or TUN+ buttons to select the desired preset number (e.g., P01, P02).
- Press MEM. again to save the station to the selected preset.
- To recall a preset, briefly press the MEM. button and then use TUN- or TUN+ to cycle through saved stations.
7.3. Setting the Alarm
- Press and hold the ALARM button until the alarm time flashes.
- Use the TUN- or TUN+ buttons to adjust the alarm hour. Press ALARM again to confirm.
- Use the TUN- or TUN+ buttons to adjust the alarm minute. Press ALARM again to confirm.
- The alarm icon will appear on the display, indicating the alarm is set.
- To turn off the alarm, press the ALARM button once. The alarm icon will disappear.
7.4. Snooze and Sleep Functions
- Snooze: When the alarm sounds, press the SNOOZE button to temporarily silence the alarm for a few minutes. The alarm will sound again after the snooze period.
- Sleep Timer: While the radio is playing, press the SLEEP button repeatedly to cycle through available sleep timer durations (e.g., 90, 60, 30, 15 minutes, OFF). The radio will automatically turn off after the selected time.
7.5. NOAA Weather Alert Operation
The radio is designed to automatically receive NOAA weather alerts. Ensure the unit is powered on or in standby mode with battery backup for continuous monitoring.
- Press the NOAA button to activate the weather alert function. The NOAA icon will appear on the display.
- When a severe weather alert is issued by the National Weather Service for your localized area, the radio will automatically switch to the NOAA weather band and sound an alert tone, followed by the weather broadcast.
- To deactivate the NOAA alert function, press the NOAA button again. The NOAA icon will disappear.
7.6. Using the Headphone Jack
Plug any standard 3.5mm stereo headphones into the headphone jack on the rear of the unit for private listening. The internal speaker will be muted automatically.
8. Maintenance
8.1. Cleaning
Wipe the exterior of the unit with a soft, dry cloth. Do not use abrasive cleaners or solvents.
8.2. Battery Replacement
If using battery backup, replace all 4 AAA batteries when the display dims or the unit fails to power on during an AC power outage. Ensure correct polarity when inserting new batteries.
9. Troubleshooting
| Problem | Possible Cause | Solution |
|---|---|---|
| No power / Unit does not turn on. | AC adapter not properly connected; Batteries are dead or incorrectly inserted. | Ensure AC adapter is securely plugged in. Replace batteries, checking polarity. |
| Poor radio reception. | Antenna not extended; Weak signal; Interference. | Fully extend the telescopic antenna. For AM, rotate the unit. Try moving the radio to a different location away from electronic devices. |
| NOAA alerts not received. | NOAA function not activated; Out of NOAA broadcast range; No active alerts. | Ensure the NOAA function is turned on (NOAA icon visible). Verify you are within range of a NOAA broadcast. Check for active alerts in your area. |
| Alarm does not sound. | Alarm not set; Volume too low; Alarm turned off. | Ensure the alarm is set and the alarm icon is visible. Increase volume. Check if alarm was accidentally deactivated. |
10. Specifications
| Feature | Detail |
|---|---|
| Model Number | RCWR7V |
| Product Dimensions | 0.9"L x 3.6"W x 3.1"H (2.29 x 9.14 x 7.87 cm) |
| Item Weight | 15.2 ounces (0.43 kg) |
| Power Source | Corded Electric (AC Adapter), 4 x AAA Batteries (backup, not included) |
| Tuner Technology | AM, FM, NOAA Weather Band |
| Special Feature | Built-In Clock, Weather Alert |
| Hardware Interface | 3.5mm Audio (Headphone Jack) |
11. Warranty and Support
For warranty information and technical support, please refer to the warranty card included with your product or visit the official RCA website. Keep your purchase receipt as proof of purchase.
For further assistance, you may contact RCA customer service through their official channels.


