
1. Introduction and Overview
The Arduino CTC 101 Program - Full Kit (AKX00002) is a comprehensive educational solution designed for students aged 13 to 17, focusing on Science, Technology, Engineering, Arts, and Mathematics (STEAM). This kit provides a hands-on learning experience in coding, electronics, and robotics, making complex concepts accessible and engaging.
The program is structured to support both beginners and advanced learners, offering interactive projects and step-by-step instructions. It is ideal for classroom environments, fostering teamwork, collaboration, and critical thinking skills.

Image 1.1: The Arduino CTC 101 Program Full Kit packaging, a grey container with an orange and white label.
The CTC 101 program has been certified by the Finnish Kokoa Education Standard, ensuring high educational value and robust pedagogical design.

Image 1.2: A badge indicating 'Certified Educational Quality Arduino CTC 101' from Kokoa Education Standard, Finland, 2018.
2. What's in the Box
The Arduino CTC 101 Program Full Kit is designed to be ready-to-use, including all necessary components for an immersive educational experience. While the exact list of components can vary slightly, a typical kit includes:
- Multiple Arduino boards (e.g., Arduino 101 boards)
- Various sensors (e.g., light sensors, temperature sensors, ultrasonic sensors)
- Actuators (e.g., servo motors, DC motors)
- Electronic components (e.g., resistors, capacitors, LEDs, buttons)
- Breadboards and jumper wires for circuit building
- USB cables for connecting Arduino boards to computers
- Mechanical parts for building robotic structures (e.g., laser-cut wooden parts, wheels)
- Storage containers to keep components organized
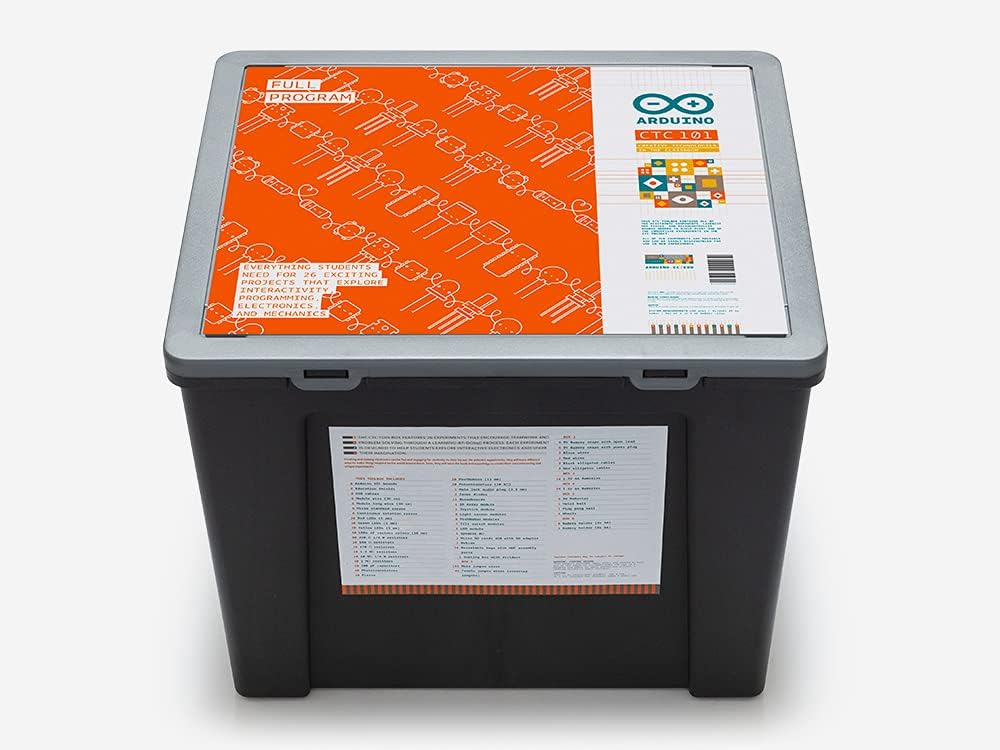
Image 2.1: A wide shot showing the various components of the kit, including multiple Arduino boards, sensors, wires, and laser-cut wooden parts, neatly organized in clear plastic boxes.

Image 2.2: A close-up view of various electronic components, including Arduino boards in their packaging, wires, and other small parts, stored within the kit's organizer.
3. Setup Instructions
Before beginning your projects with the Arduino CTC 101 kit, follow these steps to set up your development environment:
- Software Installation: Download and install the Arduino IDE (Integrated Development Environment) from the official Arduino website (www.arduino.cc/en/software). Ensure you select the correct version for your operating system.
- Driver Installation: During the Arduino IDE installation, necessary USB drivers for your Arduino boards should be installed automatically. If you encounter connection issues, refer to the Arduino troubleshooting guides for manual driver installation.
- Connect Your Board: Use the provided USB cable to connect one of your Arduino boards to your computer. The board should power on, indicated by an LED.
- Select Board and Port: Open the Arduino IDE. Go to Tools > Board and select the specific Arduino board model you are using (e.g., Arduino 101). Then, go to Tools > Port and select the serial port that corresponds to your connected Arduino board.
- First Program (Blink): Load the 'Blink' example sketch (File > Examples > 01.Basics > Blink). This simple program will make an LED on your Arduino board blink. Upload it to your board by clicking the 'Upload' button (right arrow icon). This confirms your setup is working correctly.

Image 3.1: A person's hands connecting an Arduino board to a computer, with code visible on the monitor, illustrating the setup process.
4. Operating Instructions
The Arduino CTC 101 Program is designed around project-based learning. Each lesson or project will guide you through building circuits, writing code, and understanding the underlying principles of electronics and programming.
4.1 Project-Based Learning
- Follow Lesson Plans: The kit comes with structured lesson plans. Adhere to these plans for optimal learning progression. Each lesson typically includes theoretical explanations, practical exercises, and project challenges.
- Circuit Building: Carefully follow circuit diagrams provided in the lessons. Ensure components are correctly oriented and connected to avoid damage.
- Coding: Write or modify Arduino sketches (programs) using the Arduino IDE. Pay attention to syntax and logic. The IDE provides tools for verifying and uploading your code.
- Experimentation: After completing a project, experiment with modifications. Change component values, alter code, or combine concepts from different lessons to deepen your understanding.
4.2 Safety Guidelines
- Always disconnect power before making changes to your circuit.
- Do not exceed the voltage or current ratings of components.
- Handle electronic components with care to prevent damage from static electricity.
- Supervise younger users during assembly and operation.
5. Maintenance
Proper maintenance ensures the longevity and functionality of your Arduino CTC 101 kit components.
- Storage: Store all components in their designated compartments within the kit box when not in use. This prevents loss and damage.
- Cleaning: Keep components clean and free from dust and debris. Use a soft, dry cloth for cleaning. Avoid using liquids directly on electronic parts.
- Handling: Handle Arduino boards and sensitive components by their edges to minimize contact with electrical pins and prevent static discharge.
- Cable Care: Avoid bending USB and jumper cables sharply. Store them neatly to prevent tangling and damage to wires.
6. Troubleshooting
Encountering issues is a natural part of learning electronics and programming. Here are some common problems and their solutions:
6.1 Board Not Connecting/Uploading
- Check USB Cable: Ensure the USB cable is securely connected to both the Arduino board and your computer. Try a different USB port or cable.
- Correct Board/Port Selected: In the Arduino IDE, verify that the correct board type (Tools > Board) and serial port (Tools > Port) are selected.
- Driver Issues: If the port is not visible, drivers might not be installed correctly. Reinstall the Arduino IDE or manually install drivers as per Arduino's official guides.
- Restart IDE/Computer: Sometimes, simply restarting the Arduino IDE or your computer can resolve connection issues.
6.2 Code Not Working as Expected
- Syntax Errors: The Arduino IDE will highlight syntax errors in the message area. Review your code for typos, missing semicolons, or incorrect capitalization.
- Logic Errors: If the code compiles but doesn't behave as intended, it's likely a logic error. Use the Serial Monitor (Tools > Serial Monitor) to print variable values and debug your program's flow.
- Circuit Errors: Double-check your circuit connections against the diagram. A single misplaced wire can cause unexpected behavior.
- Component Functionality: Ensure all components are working correctly. Test individual components if possible.
6.3 Power Issues
- No Power LED: If the power LED on the Arduino board does not light up, check the USB connection. If using an external power supply, ensure it meets the board's voltage requirements and is correctly connected.
- Component Overload: If components are getting unusually hot, you might be drawing too much current. Review your circuit design and component specifications.
7. Specifications
The Arduino CTC 101 Program - Full Kit (AKX00002) includes various components, each with its own specifications. Below are general specifications for the kit and its primary components:
| Feature | Detail |
|---|---|
| Product Model | AKX00002 |
| Brand | Arduino |
| Educational Objective | STEM (Science, Technology, Engineering, Mathematics) |
| Recommended Age | 13 - 17 years (Manufacturer recommended age: 0 - 13 years, but program is tailored for 13-17) |
| Theme | Robotics, Coding, Electronics |
| Item Dimensions (Packaging) | 15.75 x 19.69 x 16.14 inches |
| Item Weight (Total Kit) | 11500 g |
| Included Components | Arduino boards, sensors, actuators, electronic components, wires, mechanical parts (refer to 'What's in the Box' section for details) |
8. Warranty Information
Arduino products typically come with a limited warranty covering manufacturing defects. For specific warranty terms, duration, and conditions applicable to your Arduino CTC 101 Program - Full Kit (AKX00002), please refer to the official Arduino website or the documentation included with your purchase. It is recommended to register your product if an option is available to ensure full warranty coverage.
Keep your proof of purchase (receipt or invoice) as it will be required for any warranty claims.
9. Support
For further assistance, technical support, or additional resources, please utilize the following channels:
- Official Arduino Website: Visit www.arduino.cc for documentation, tutorials, project examples, and software downloads.
- Arduino Forum: The Arduino community forum is an excellent resource for asking questions, sharing projects, and finding solutions to common problems. Access it via the official website.
- Contact Support: If you require direct technical support, refer to the 'Support' or 'Contact Us' section on the official Arduino website for contact methods.

Image 9.1: A graphic encouraging users to visit the Arduino Store, featuring the Arduino logo and a laptop displaying the Arduino website.
No official product videos were provided in the product data for embedding in this manual.


