
EMOS ESW5003
EMOS Wireless Indoor Outdoor Weather Station 5003 PRO User Manual
Model: ESW5003 | Brand: EMOS
1. Introduction
Thank you for choosing the EMOS Wireless Indoor Outdoor Weather Station 5003 PRO. This advanced weather station provides comprehensive real-time weather data, including indoor and outdoor temperature, humidity, air pressure, wind speed and direction, rainfall, heat index, and dew point. With its large, easy-to-read color display and wireless sensor, you can monitor local weather conditions with precision and plan your activities accordingly. This manual will guide you through the setup, operation, and maintenance of your new weather station.

Figure 1.1: EMOS Wireless Weather Station 5003 PRO main unit and outdoor 5-in-1 sensor.
2. Safety Information
- Read all instructions carefully before operating the device.
- Keep the main unit and sensor away from extreme temperatures, direct sunlight, and moisture.
- Do not expose the main unit to water or other liquids. The outdoor sensor is weather-resistant but should not be submerged.
- Use only the specified power adapter for the main unit.
- Dispose of old batteries responsibly according to local regulations.
- Do not attempt to disassemble or repair the device yourself. Contact qualified service personnel.
- Ensure the outdoor sensor is mounted securely to prevent it from falling due to wind or other environmental factors.
3. Package Contents
Verify that all components are present in the package:
- 1x Wireless Color Display Main Unit
- 1x 5-in-1 Outdoor Sensor (Anemometer, Wind Vane, Rain Collector, Thermo-hygrometer, UV/Light Sensor)
- 1x Power Adapter for Main Unit
- Mounting Materials (Pole Attachment, Wall Attachment, Roof Attachment, Screws, Anchors)
- User Manual

Figure 3.1: All components included in the product packaging.
4. Product Overview
4.1. Main Display Unit
The main display unit features a large, backlit color LCD screen that shows all weather data at a glance. It can be powered by the included AC adapter or by 3x AAA batteries (not included) for backup power. The unit can be placed on a tabletop or mounted on a wall.

Figure 4.1: Detailed view of the main display unit's clear color interface.

Figure 4.2: Rear view of the main display unit, highlighting AC power input and backup battery compartment.
4.2. 5-in-1 Outdoor Sensor
The wireless 5-in-1 outdoor sensor measures wind speed, wind direction, rainfall, outdoor temperature, and outdoor humidity. It transmits data wirelessly to the main display unit up to 100 meters away (unobstructed). The sensor requires 3x AA batteries (not included).
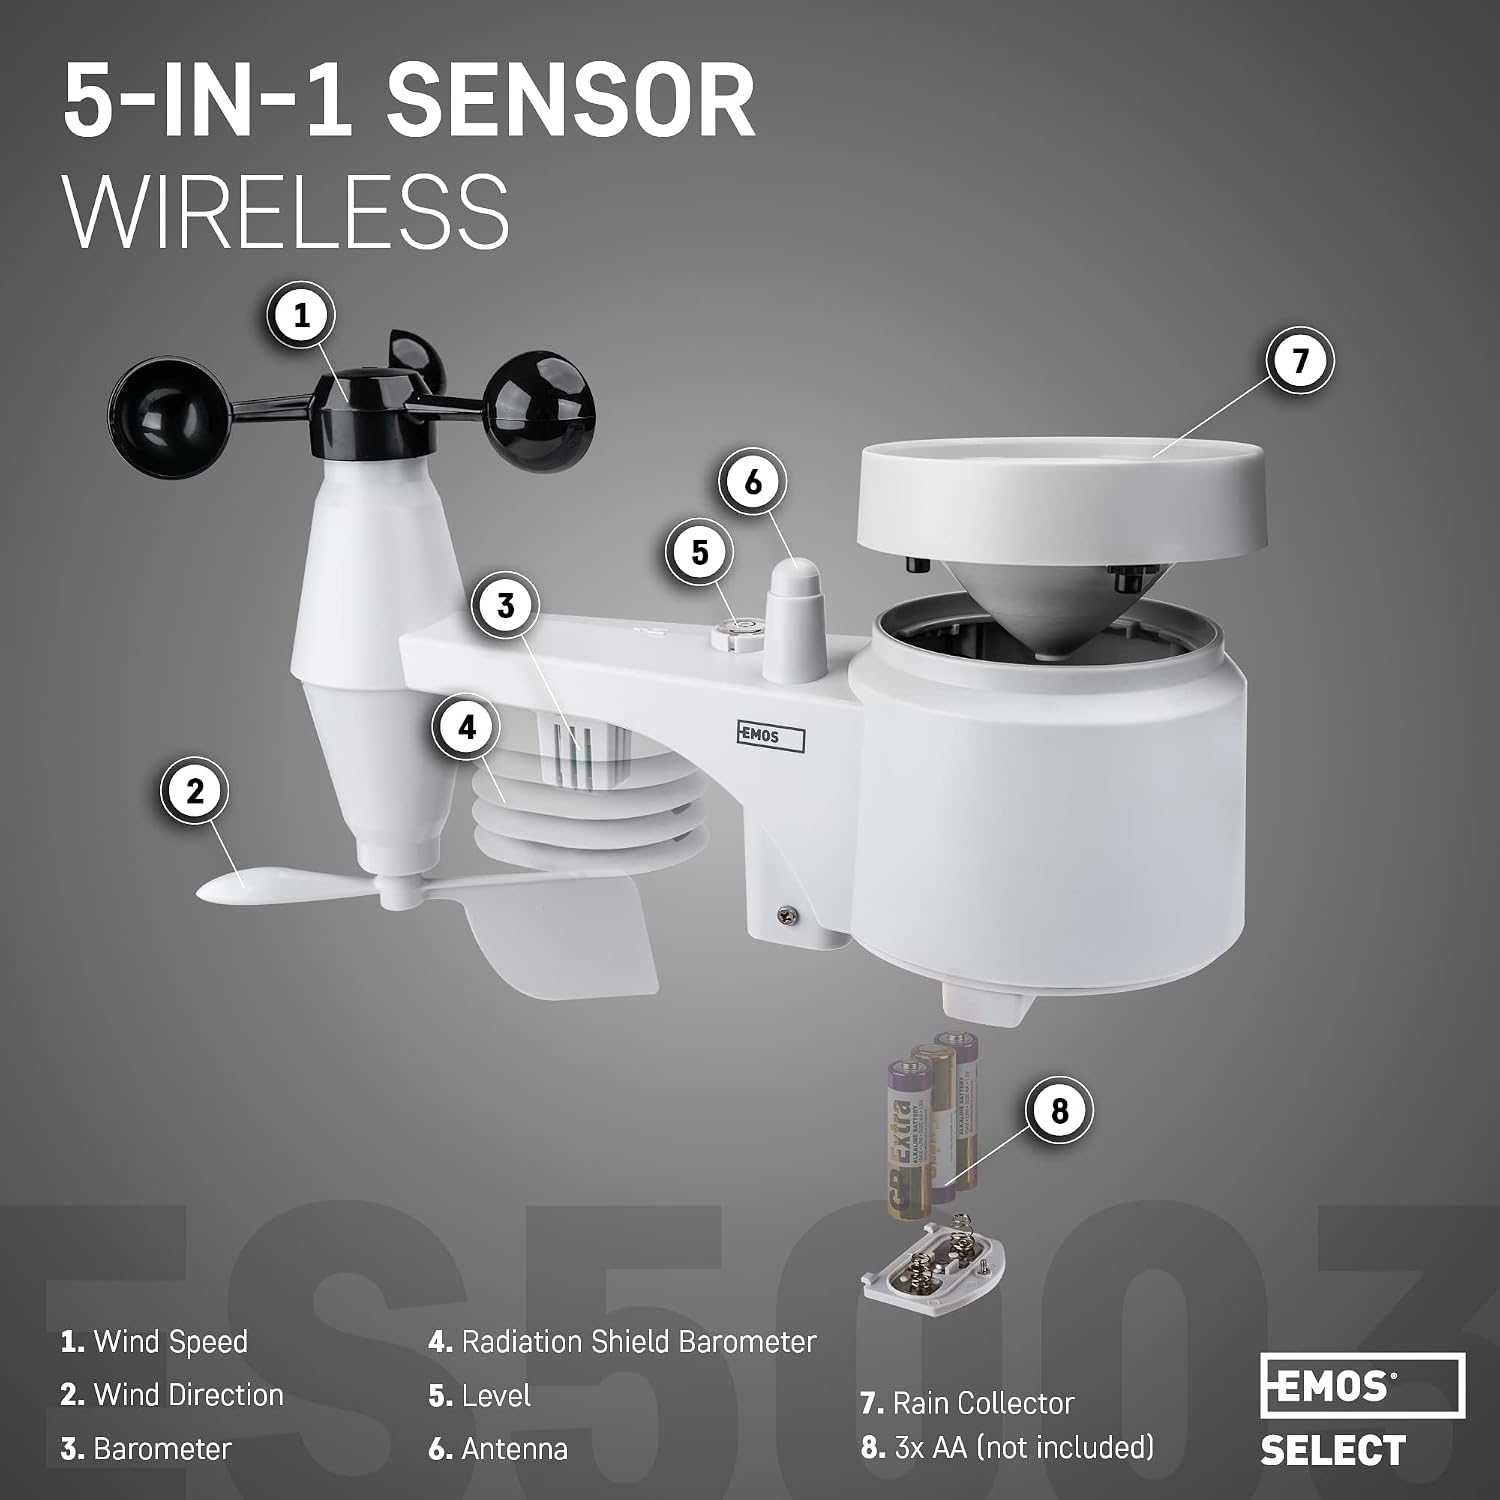
Figure 4.3: Components of the 5-in-1 wireless outdoor sensor, including wind speed cups, wind vane, radiation shield, rain collector, and battery compartment.
5. Setup
5.1. Unpacking and Initial Inspection
Carefully remove all components from the packaging. Inspect them for any signs of damage. If any part is damaged or missing, contact customer support.
5.2. Outdoor Sensor Installation
The outdoor sensor should be installed in an open area to ensure accurate readings for wind, rain, and temperature.
- Choose a Location: Select a location that is free from obstructions (e.g., trees, buildings) that could block wind or rain. The sensor should be at least 1.5 meters (5 feet) above the ground for optimal wind measurement. Ensure it is within 100 meters of the main display unit.
- Insert Batteries: Open the battery compartment on the 5-in-1 sensor and insert 3x AA batteries (not included), observing polarity. Close the compartment securely.
- Mounting: Use the provided mounting materials (pole, wall, or roof attachment) to secure the sensor.
- Pole Attachment: Ideal for mounting on a pole in an open area.
- Wall Attachment: Suitable for mounting on a vertical surface.
- Roof Attachment: Designed for secure installation on a roof.

Figure 5.1: Various mounting options for the outdoor sensor: pole, wall, and roof attachments.

Figure 5.2: The outdoor sensor offers a wireless range of up to 100 meters for flexible placement.
5.3. Main Display Unit Setup
- Power Connection: Plug the included AC power adapter into the main display unit and then into a wall outlet.
- Backup Batteries (Optional): For backup power during outages, insert 3x AAA batteries (not included) into the battery compartment on the back of the unit, observing polarity.
- Placement: Place the main unit on a flat surface using its integrated stand or mount it on a wall using the wall mount hole. Ensure it is in a location where you can easily view the display and within wireless range of the outdoor sensor.
5.4. Initial Synchronization
Once both the outdoor sensor and main unit are powered on, they will automatically attempt to synchronize. This may take a few minutes. The outdoor signal strength indicator on the main unit will show a stable connection once synchronized. If synchronization fails, press the "SENSOR" button on the back of the main unit to initiate a manual search.
6. Operating Instructions
6.1. Display Overview
The main display unit provides a comprehensive overview of current and forecasted weather conditions.
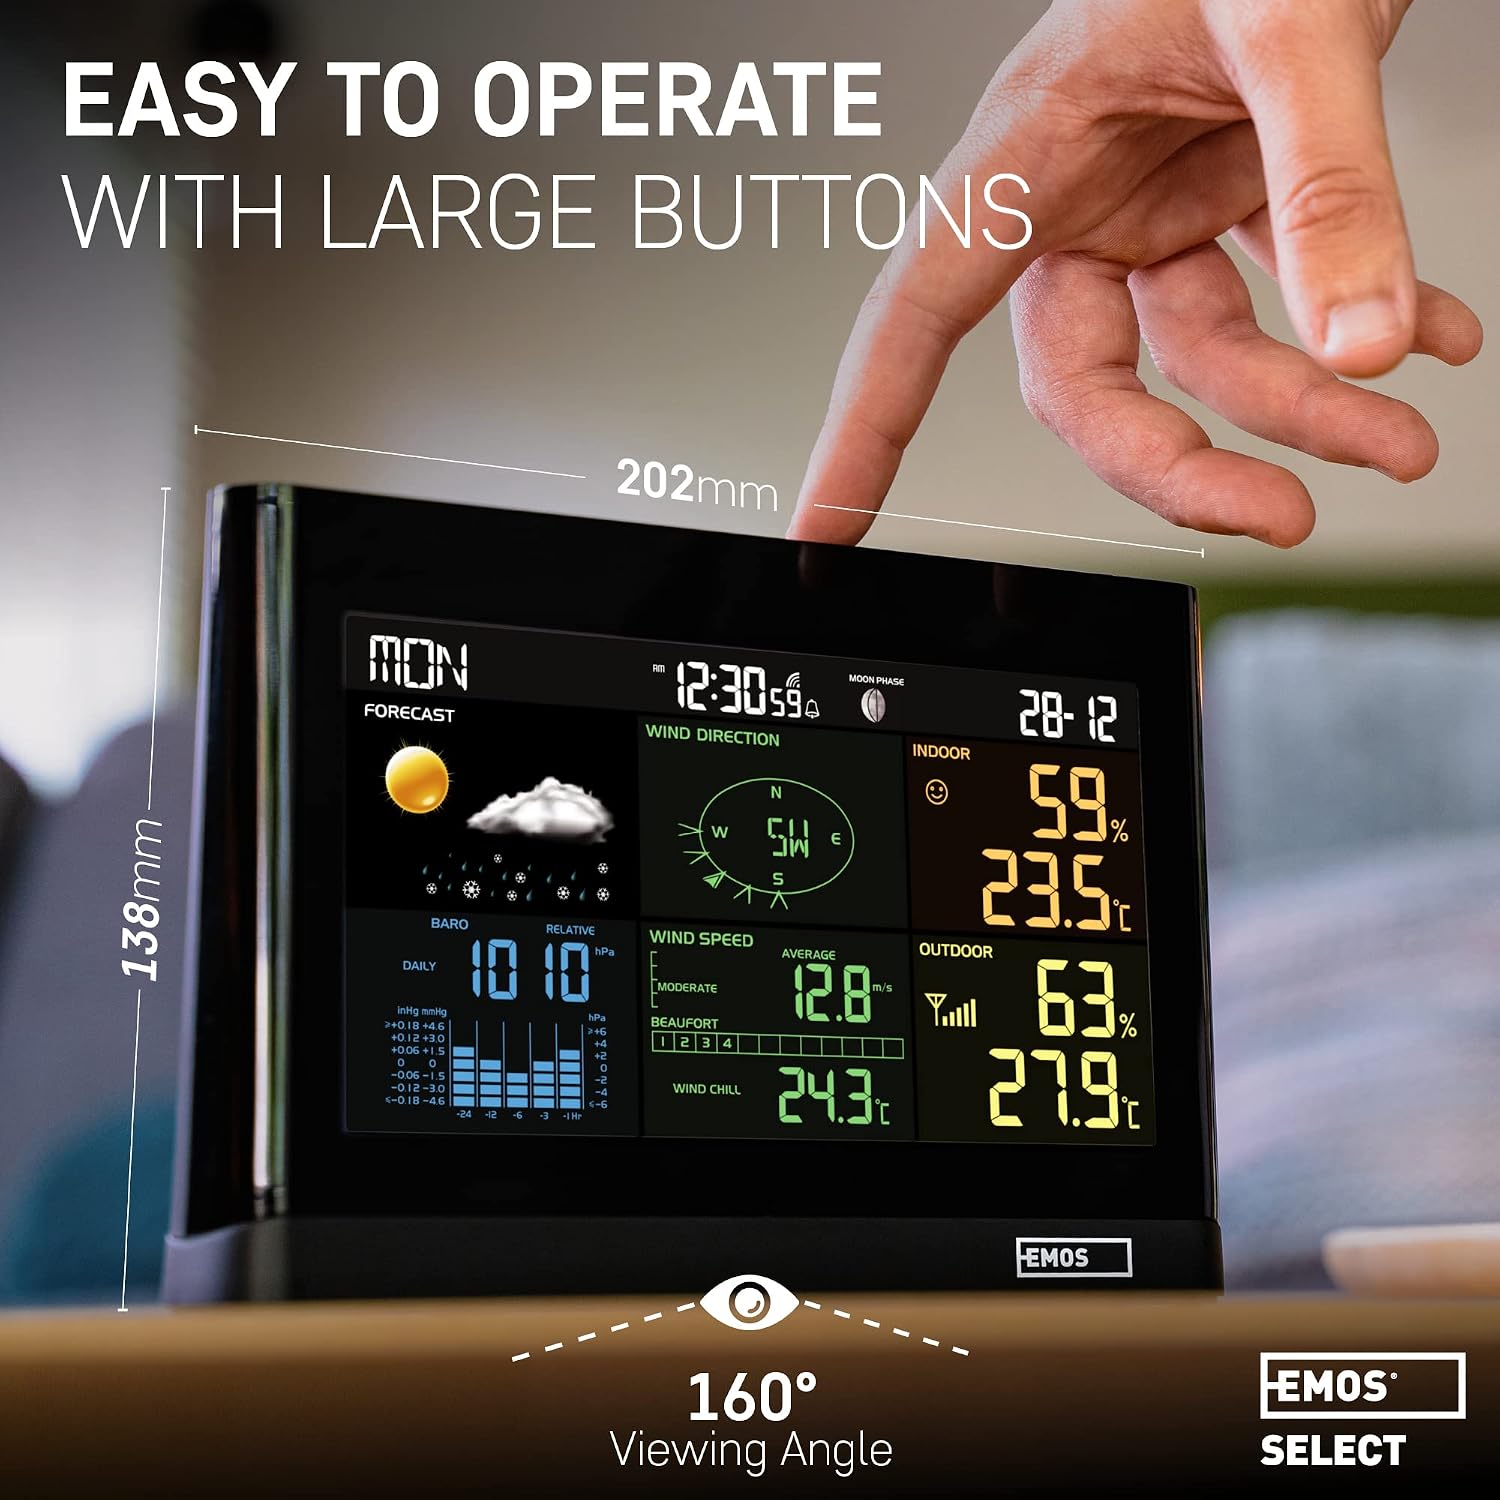
Figure 6.1: The display unit features large, easy-to-press buttons and a wide 160-degree viewing angle for optimal readability.
- Time & Date: Displays current time and date.
- Indoor Metrics: Shows indoor temperature and humidity.
- Outdoor Metrics: Shows outdoor temperature and humidity, along with signal strength from the outdoor sensor.
- Weather Forecast: Icons indicate forecasted weather conditions (sunny, cloudy, rainy, snowy).
- Barometric Pressure: Displays current atmospheric pressure and historical trends.
- Wind Data: Shows wind speed (average and gust), wind direction, and wind chill.
- Rainfall: Displays daily, weekly, and monthly rainfall accumulation.
- Moon Phase: Indicates the current moon phase.


Figure 6.2: Various data displays on the main unit, including forecast, temperature, pressure, humidity, time, moon phase, rainfall, and wind data.
6.2. Setting Time and Date
The weather station typically synchronizes time via radio control (RCC function). If manual setting is required:
- Press and hold the "TIME SET" button on the back of the unit.
- Use the "+" or "-" buttons to adjust values.
- Press "TIME SET" again to confirm and move to the next setting (e.g., 12/24 hour format, hour, minute, year, month, day).
- Press "TIME SET" to exit setup mode.
6.3. Setting Alarms and Alerts
The weather station allows you to set time alarms and weather alerts (e.g., for high/low temperature).
- Time Alarm: Press the "ALARM/SNOOZE" button to view alarm time. Press and hold to enter alarm setting mode. Use "+" or "-" to adjust, and "ALARM/SNOOZE" to confirm.
- Weather Alerts: Press the "ALERT" button to cycle through different alert types (e.g., temperature, wind). Press and hold to set alert thresholds. Use "+" or "-" to adjust values.
6.4. Changing Units of Measurement
You can change units for temperature, wind speed, rainfall, and pressure.
- Temperature: Press the "°C/°F" button to switch between Celsius and Fahrenheit.
- Wind Speed: Press the "WIND" button to cycle through units like m/s, km/h, mph, knots, Beaufort.
- Rainfall: Press the "RAIN" button to switch between mm and inches.
- Pressure: Press the "BARO" button to switch between hPa, inHg, and mmHg.
7. Maintenance
- Cleaning: Wipe the display unit with a soft, damp cloth. Do not use abrasive cleaners. Periodically clean the outdoor sensor, especially the rain collector and wind cups, to remove debris that may affect accuracy.
- Battery Replacement: Replace batteries in the outdoor sensor annually or when the low battery indicator appears on the display. Replace backup batteries in the main unit as needed.
- Rain Collector: Ensure the rain collector is free of leaves, insects, or other blockages.
- Wind Vane/Cups: Check that the wind vane and wind cups spin freely.
8. Troubleshooting
| Problem | Possible Cause | Solution |
|---|---|---|
| No outdoor data displayed. | Sensor not synchronized or out of range. Low sensor batteries. | Ensure sensor is within 100m of main unit. Press "SENSOR" button on main unit. Replace sensor batteries. |
| Inaccurate temperature/humidity. | Sensor exposed to direct sunlight or heat sources. Blocked ventilation. | Relocate sensor to a shaded area. Clean sensor's radiation shield. |
| Inaccurate wind speed/direction. | Obstructions near sensor. Wind cups/vane not spinning freely. | Ensure sensor is in an open area. Clear any debris from wind cups/vane. |
| Inaccurate rainfall. | Rain collector blocked. Sensor not level. | Clear debris from rain collector. Ensure sensor is mounted level. |
| Display is blank or flickering. | Power adapter issue. Low main unit batteries. | Check power adapter connection. Replace main unit backup batteries. |
9. Specifications
| Feature | Detail |
|---|---|
| Model Number | ESW5003 |
| Dimensions (Main Unit) | 2 x 19.2 x 12.7 cm (L x W x H) |
| Weight | 2.01 kg |
| Temperature Accuracy | ±1°C |
| Connectivity Technology | Radio Frequency (RF) |
| Power Source (Main Unit) | AC Powered (with 3x AAA battery backup, not included) |
| Power Source (Outdoor Sensor) | 3x AA Batteries (not included) |
| Special Features | Alarm, Large Screen, Clock, Wireless |
| Recommended Uses | Precipitation, Pressure, Wind Direction, Temperature, Heat Index, Humidity, Dew Point |
10. Warranty and Support
EMOS products are designed for reliability and performance. For information regarding warranty coverage, technical support, or service, please refer to the warranty card included with your product or visit the official EMOS website.
Return Policy: This product is subject to a 30-day refund/replacement return policy. Please retain your proof of purchase.
Related documentsESW5003


Ask a question about this manual
Ask about setup, troubleshooting, compatibility, parts, safety, or missing instructions. Manuals+ will review the question and use this page’s manual context to help answer it.