
Introduction
This manual provides detailed instructions for the setup, operation, and maintenance of your ATG Fyre Pro 55 Portable Bluetooth Party Speaker and Karaoke Machine. Please read this manual thoroughly before using the product to ensure proper function and to maximize your user experience.
Package Contents
- ATG Fyre Pro 55 Speaker
- Built-in Rechargeable Battery
- AC Input Charger
- User Manual (this document)
Note: Please check all items carefully upon unpacking. If any items are missing or damaged, contact customer support.
Product Overview
Familiarize yourself with the main components and controls of your Fyre Pro 55 speaker.

Figure 1: Front view of the ATG Fyre Pro 55 speaker, showcasing its dual woofers and active LED light display. The speaker has a black finish with a protective metal grille.
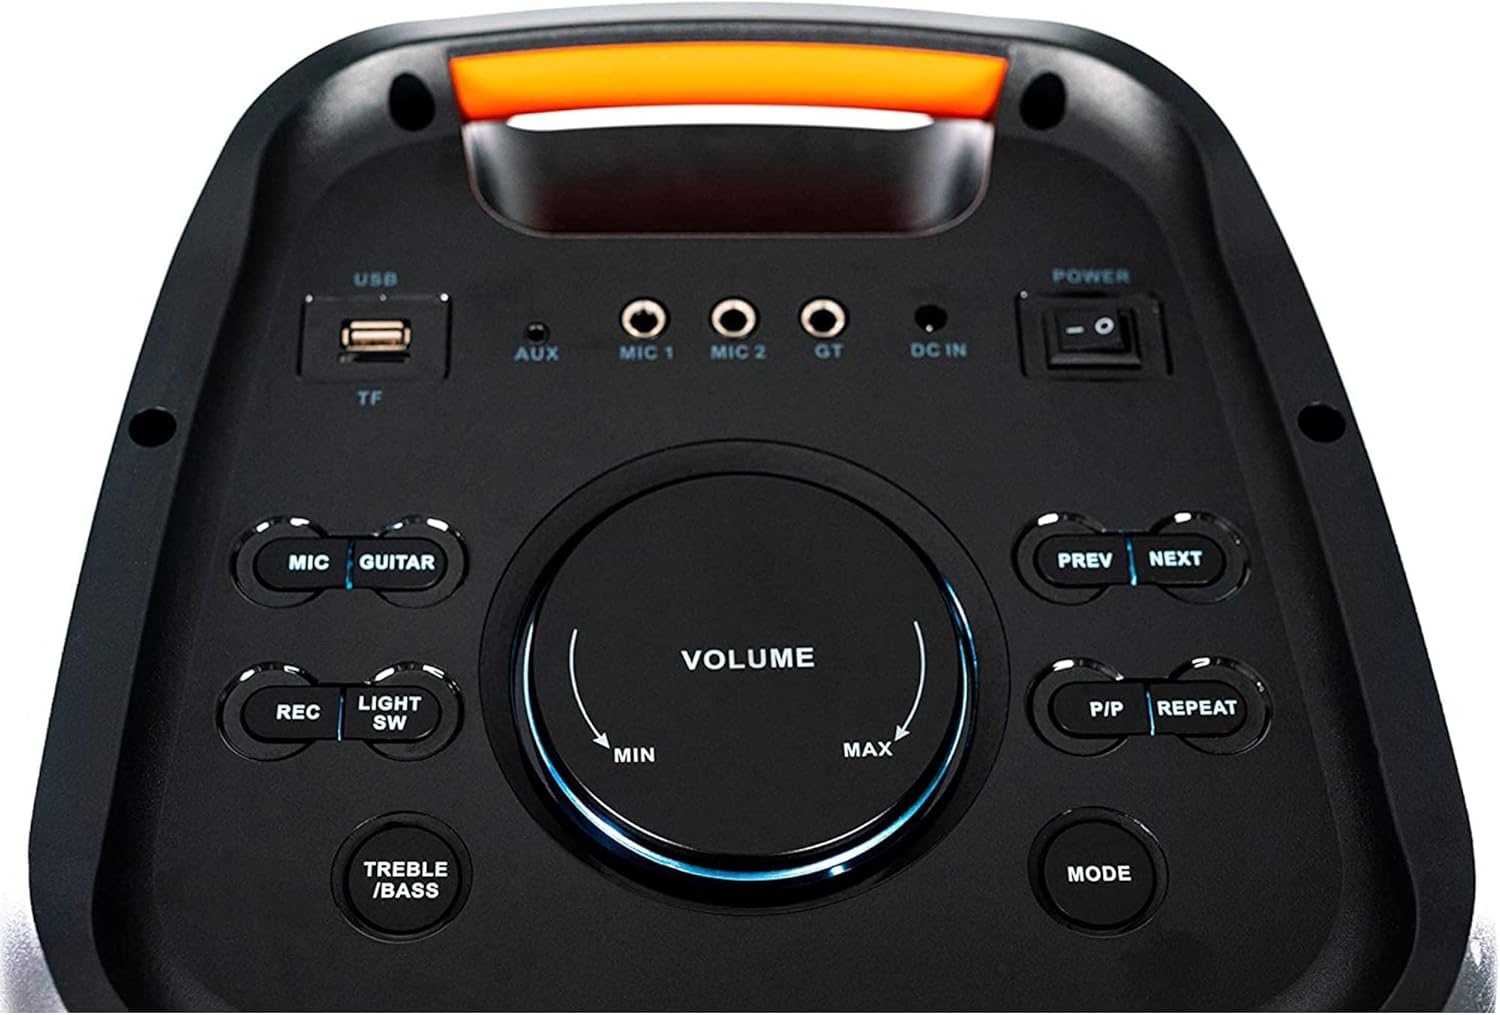
Figure 2: Top control panel of the Fyre Pro 55. This panel includes the USB and TF card slots, AUX input, two microphone input jacks (MIC 1, MIC 2), a guitar input (GT), DC IN port, and the power switch. Control buttons for MIC, GUITAR, REC, LIGHT SW, TREBLE/BASS, MODE, PREV, NEXT, P/P (Play/Pause), REPEAT, and a large central VOLUME knob are also visible.
Control Panel Functions:
- USB/TF Card Slot: For playing audio from USB drives or Micro TF cards.
- AUX In: 3.5mm jack for connecting external audio devices.
- MIC 1 / MIC 2: Input jacks for wired microphones.
- GT (Guitar Input): Input jack for connecting a guitar.
- DC IN: Power input for charging the speaker.
- Power On/Off: Main power switch.
- ECHO: Adjusts the echo effect for microphones.
- MIC VOL: Controls the volume of connected microphones.
- Master Volume: Adjusts the overall speaker volume.
- Bass Adjust: Controls the bass level.
- Treble Adjust: Controls the treble level.
- MODE Button: Switches between USB, Bluetooth, FM Radio, and AUX input modes.
- REC (Record): Initiates or stops recording to USB or TF card.
- RPT (Repeat): Toggles repeat function for playback.
- MIC Priority: When active, lowers other audio sources' volume during microphone use.
- PREV: Skips to the previous song or radio station.
- PLAY/PAUSE: Plays or pauses audio playback.
- NEXT: Skips to the next song or radio station.
- LED: Toggles the LED light effects on or off.
Setup
Charging the Speaker:
- Locate the DC IN port on the control panel.
- Connect the provided AC input charger to the DC IN port.
- Plug the charger into a standard wall outlet.
- The charging indicator (if present) will illuminate. A full charge takes approximately 5-6 hours.
- The speaker can operate for up to 5 hours at 50% volume on a full charge.
Powering On/Off:
- To power on, toggle the Power On/Off switch to the 'ON' position.
- To power off, toggle the Power On/Off switch to the 'OFF' position.
Operating Instructions
Bluetooth Pairing:
- Power on the Fyre Pro 55 speaker.
- Press the MODE button until "Bluetooth" mode is selected. The speaker will indicate it is ready for pairing (e.g., a blinking LED or audible prompt).
- On your Bluetooth-enabled device (mobile phone, notebook, iPhone, iPad), enable Bluetooth and search for available devices.
- Select "ATG Fyre Pro 55" (or similar name) from the list of devices.
- Once paired, the speaker will confirm the connection (e.g., a solid LED or audible prompt).
- You can now stream audio wirelessly from your device. The operating range is up to 10 meters.
USB/TF Card Playback:
- Insert a USB disk or Micro TF card into the respective slot on the control panel.
- Press the MODE button to select "USB" or "TF Card" mode. The speaker will automatically begin playing audio files.
- Use the PREV, PLAY/PAUSE, and NEXT buttons to control playback.
- Press RPT to cycle through repeat modes (e.g., repeat one, repeat all).
AUX Input:
- Connect an external audio device (PC, MID, TV, etc.) to the AUX In jack using a 3.5mm audio cable (not included).
- Press the MODE button to select "AUX In" mode.
- Control playback and volume from your connected device.
FM Radio:
- Press the MODE button to select "FM Radio" mode.
- Press and hold the PLAY/PAUSE button to automatically scan and save available FM stations.
- Use the PREV and NEXT buttons to navigate between saved radio stations.
Karaoke Function:
- Connect a wired microphone to either the MIC 1 or MIC 2 input jack.
- Adjust the microphone volume using the MIC VOL knob.
- Adjust the echo effect using the ECHO knob.
- To prioritize microphone audio, press the MIC Priority button. This will reduce the volume of other audio sources when the microphone is in use.
Recording Function:
- Ensure a USB disk or TF card is inserted.
- Connect a wired microphone.
- Press the REC button to start recording.
- Press the REC button again to stop recording. Recordings will be saved to the inserted USB or TF card.
Audio Adjustment:
- Master Volume: Use the large central VOLUME knob to adjust the overall sound output.
- Bass/Treble: Use the Bass Adjust and Treble Adjust controls to fine-tune the audio equalization.
LED Light Display:
- Press the LED button to toggle the integrated LED light effects on or off.
Troubleshooting
| Problem | Possible Cause | Solution |
|---|---|---|
| No power | Battery is depleted; Power switch is off. | Charge the speaker fully; Ensure the power switch is in the 'ON' position. |
| No sound | Volume is too low; Incorrect mode selected; Device not connected properly. | Increase master volume; Press MODE to select the correct input source (Bluetooth, USB, AUX, FM); Reconnect Bluetooth device or AUX cable. |
| Bluetooth not pairing | Speaker not in pairing mode; Device too far; Bluetooth disabled on source device. | Ensure speaker is in Bluetooth mode; Move device closer (within 10m); Enable Bluetooth on your device and search again. |
| Microphone not working | Microphone not connected; MIC VOL too low; Microphone faulty. | Ensure microphone is securely plugged into MIC 1 or MIC 2; Increase MIC VOL; Test with another microphone if available. |
| Recording not working | No USB/TF card inserted; Card full or corrupted. | Insert a compatible USB disk or TF card; Check card storage or try a different card. |
Specifications

Figure 3: Visual representation of the Fyre Pro 55 speaker's dimensions: approximately 22 inches (56 cm) in height, 12.6 inches (32 cm) in width, and 9.8 inches (25 cm) in depth.
- Model Name: FYRE55PRO
- Bluetooth Range: Up to 10 meters
- Speaker Configuration: 2 x 5.5" Woofers with 2" Horn Tweeters
- Output Power: 240 Watts (Peak), 60 Watts (RMS)
- Connectivity: USB disk, Micro SD card reader, Microphone input jack (x2), Aux-in 3.5mm jack, Guitar input
- Power Source: Built-in rechargeable lithium battery 7.4V 4400mAh
- Play Time: Approximately 5 hours (at 50% volume)
- Recharge Power: 9V/1.5A
- Charge Time: 5-6 hours (with 9V/1.5A charger)
- Product Dimensions (L x W x H): 250mm x 320mm x 560mm (9.84"D x 12.6"W x 22.05"H)
- Item Weight: 8 pounds (approx. 3.6 kg)
- Wireless Communication: AM/FM, Bluetooth
- Control Method: Remote
- UPC: 786468907722
Maintenance
- Cleaning: Use a soft, dry cloth to clean the exterior of the speaker. Do not use abrasive cleaners or solvents.
- Storage: Store the speaker in a cool, dry place away from direct sunlight and extreme temperatures.
- Battery Care: To prolong battery life, avoid fully discharging the battery frequently. Charge the speaker regularly, even if not in use for extended periods.
- Water Exposure: This product is not waterproof. Avoid exposure to water or excessive moisture.
Warranty and Support
The ATG Fyre Pro 55 speaker comes with a limited warranty. For specific warranty terms and conditions, please refer to the documentation provided at the time of purchase or contact Audio To Go customer support.
For technical assistance, troubleshooting, or service inquiries, please visit the official Audio To Go website or contact their customer service department.
Manufacturer: Audio To Go