
1. Introduction and Overview
The MSI Z690 Force WiFi Gaming Motherboard is engineered to provide a robust and high-performance foundation for advanced computing systems. Designed for 12th Gen Intel Core, Pentium, and Celeron processors, it features the LGA 1700 socket and supports cutting-edge DDR5 memory. This motherboard integrates advanced thermal solutions and comprehensive connectivity options, including Wi-Fi 6E and 2.5G LAN, to ensure stable operation and superior performance for gaming and professional applications.
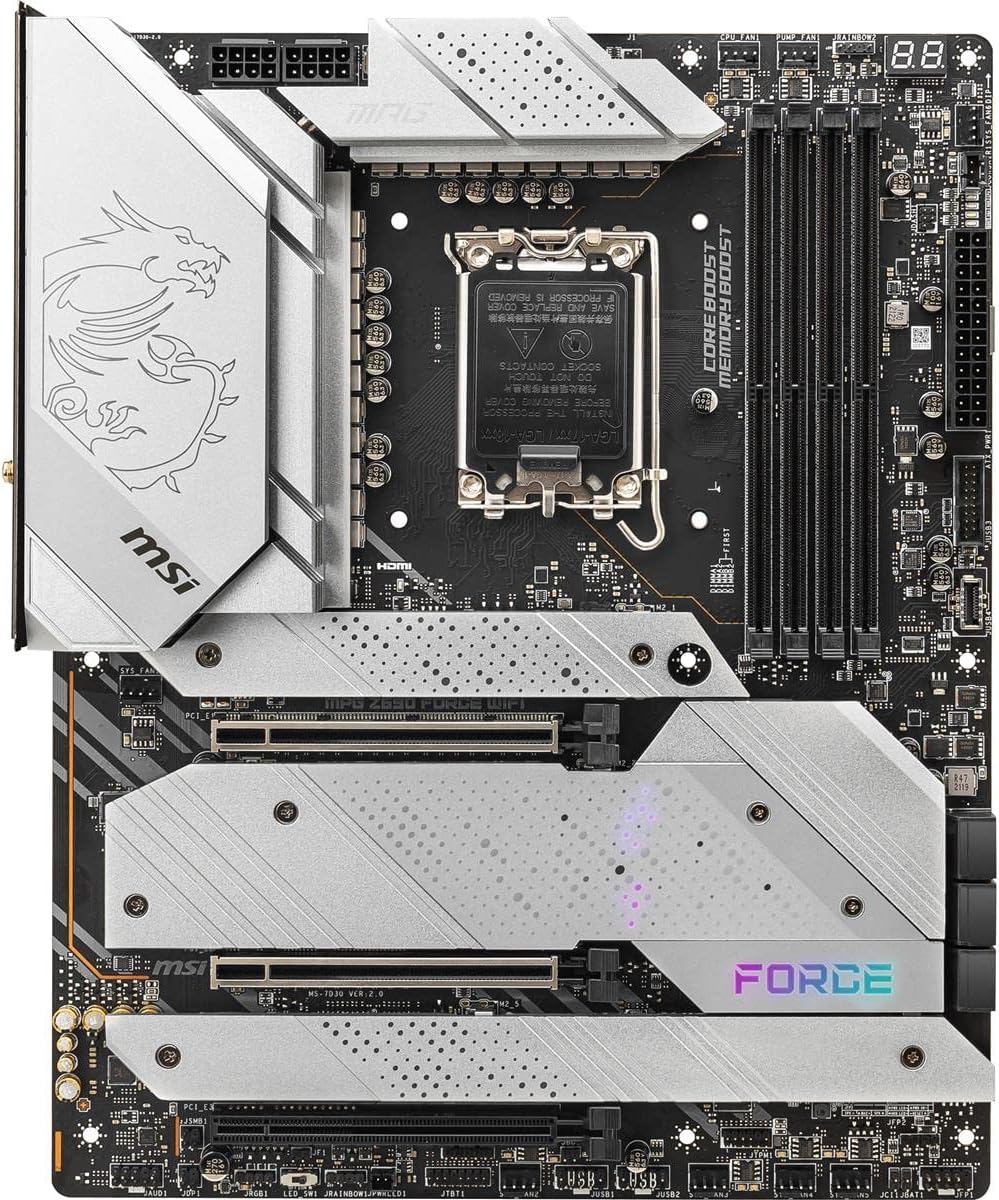
2. Key Features
- Processor Support: Supports 12th Gen Intel Core / Pentium / Celeron processors for LGA 1700 socket.
- Memory Support: Supports DDR5 Memory, with overclocking capabilities up to 5600 MHz.
- Advanced Thermal Solution: Features an Extended Heatsink Design and M.2 Shield Frozr for efficient heat dissipation, ensuring stable performance during demanding tasks.
- Network Connectivity: Equipped with 2.5G LAN and Intel Wi-Fi 6E Solution for upgraded, secure, stable, and fast network connections.
- High-Speed Storage: Includes Lightning M.2 slots, running at PCIe Gen4 x4, to maximize performance for NVMe based SSDs.
3. Package Contents
Verify that all items listed below are present in your motherboard package. If any item is missing or damaged, contact your retailer.

- MSI Z690 Force WiFi Motherboard
- Wi-Fi Antenna
- User Manual
- Quick Installation Guide
- EZ M.2 Clips
- Screwdrivers
- USB Drive
- SATA Cables (x2)
- 1 to 2 RGB LED Extension Y Cable
- CORSAIR RGB LED Extension
- Rainbow RGB LED Extension Cable
- Cable Stickers
- MPG Stickers
- Case Badge
- Cleaning Brush
- Reward Program / Shout Out Flyer
- Registration Card
- Product Catalog
4. Setup and Installation
Before beginning installation, ensure your workspace is clean and static-free. It is recommended to wear an anti-static wrist strap. Always disconnect power from your system before installing or removing components.
4.1. Preparing the Case
Install the I/O shield into the rear opening of your computer case. Ensure the standoffs inside the case align with the screw holes on the motherboard.
4.2. CPU Installation
Carefully open the CPU socket lever. Align the triangular mark on the CPU with the mark on the socket. Gently place the CPU into the socket without forcing it. Close the lever to secure the CPU.

4.3. CPU Cooler Installation
Apply thermal paste to the CPU if your cooler does not have it pre-applied. Mount the CPU cooler according to its manufacturer's instructions, ensuring even pressure and secure attachment.
4.4. RAM (DDR5) Installation
Open the clips on the DDR5 memory slots. Align the notch on the memory module with the key in the slot. Press down firmly on both ends of the module until the clips snap into place.
4.5. M.2 SSD Installation
Locate the M.2 slots. Remove the M.2 Shield Frozr heatsink if present. Insert the M.2 SSD into the slot at an angle, then gently push it down and secure it with the provided EZ M.2 clip or screw. Reinstall the M.2 Shield Frozr for optimal thermal performance.
4.6. Graphics Card (GPU) Installation
Open the PCIe slot latch. Align your graphics card with the PCIe x16 slot and press down firmly until it clicks into place. Secure the card to the case with a screw.
4.7. Power Connections
Connect the 24-pin ATX power connector and the 8-pin (or 4+4 pin) CPU power connector from your power supply to the motherboard. Connect SATA power cables to your storage drives.
4.8. Front Panel Connections
Connect the front panel cables (power switch, reset switch, HDD LED, power LED, USB, audio) to their respective headers on the motherboard. Refer to the motherboard manual for exact pin layouts.
5. Operating Your Motherboard
5.1. Initial Boot and BIOS Setup
After all components are installed and connected, power on your system. Press the DEL key during startup to enter the BIOS/UEFI setup utility. Here you can configure boot order, enable XMP for memory, and adjust other system settings.
5.2. Driver Installation
Once the operating system is installed, install the necessary drivers for your motherboard. These include chipset drivers, LAN drivers, Wi-Fi drivers, audio drivers, and any other utility drivers. Drivers can be found on the included USB drive or downloaded from the official MSI website.
5.3. Network Connectivity
Connect the included Wi-Fi antenna to the motherboard's rear I/O panel for wireless connectivity. For wired connections, plug an Ethernet cable into the 2.5G LAN port.
6. Maintenance
Regular maintenance helps ensure the longevity and optimal performance of your motherboard.
- Dust Removal: Periodically clean dust from the motherboard and components using compressed air. Ensure the system is powered off and unplugged before cleaning.
- BIOS Updates: Check the MSI website for the latest BIOS updates. BIOS updates can improve compatibility, stability, and performance. Follow the update instructions carefully to avoid system damage.
- Driver Updates: Keep your drivers updated to ensure compatibility with new software and to benefit from performance improvements and bug fixes.
7. Troubleshooting
If you encounter issues with your system, consider the following common troubleshooting steps:
- No Power/No Boot:
- Ensure all power cables (24-pin ATX, 8-pin CPU) are securely connected.
- Check if the power supply is switched on and functioning correctly.
- Verify front panel power switch connection.
- No Display:
- Ensure the monitor cable is connected to the graphics card (not the motherboard's integrated graphics ports, unless using an F-series CPU).
- Reseat the graphics card and RAM modules.
- Try booting with only one RAM stick.
- System Instability/Crashes:
- Check CPU and GPU temperatures. Ensure adequate cooling.
- Verify that all drivers are up to date.
- Run memory diagnostic tools to check for RAM errors.
- Clear CMOS (Complementary Metal-Oxide-Semiconductor) by removing the CMOS battery for a few minutes or using the clear CMOS jumper.
8. Specifications
| Category | Specification |
|---|---|
| Model Name | Z690 FORCE WIFI |
| CPU Socket | LGA 1700 |
| Compatible Processors | 12th Gen Intel Core / Pentium / Celeron |
| Chipset | Intel Z690 |
| RAM Technology | DDR5 |
| Memory Speed (Max) | 5600 MHz (OC) |
| Storage Interface | PCIe Gen4 x4 M.2 slots, SATA 6Gb/s |
| LAN | 2.5G LAN |
| Wireless Connectivity | Intel Wi-Fi 6E |
| USB Ports | Includes USB 2.0, USB 3.2 Gen1, Gen2, and Gen2x2 ports |
| Dimensions (LxWxH) | 12 x 9.6 x 2.5 inches (ATX Form Factor) |
| Item Weight | 4.91 pounds |
| First Available Date | October 27, 2021 |
9. Warranty and Support
MSI products come with a limited warranty. For detailed warranty information, including terms and conditions, please refer to the warranty card included in your package or visit the official MSI website. For technical support, driver downloads, and BIOS updates, please visit the MSI support page at www.msi.com/support.


