
Introduction
This manual provides detailed instructions for the installation, operation, and maintenance of your MACHSWON Universal Motorcycle LCD Digital Speedometer. This multi-functional unit integrates a speedometer, tachometer, and odometer, featuring a 7-color adjustable backlight and is designed for universal fitment on 12V DC motorcycles.
Safety Precautions
Please read and understand all safety information before installing or operating the device.
- Ensure the motorcycle's power is disconnected before installation to prevent electrical shock or damage.
- All wiring connections must be secure and properly insulated to avoid short circuits.
- Consult a qualified technician if you are unsure about any installation steps.
- Do not attempt to disassemble or modify the unit, as this may void the warranty and cause malfunction.
- Ensure the unit is securely mounted and does not obstruct your view or interfere with motorcycle controls.
Package Contents
Verify that all items are present in the package:
- 1 x LCD Digital Speedometer Unit
- 1 x Speed Sensor
- 1 x Wiring Harness
- Mounting Hardware (clips, screws)
Product Features
- Multi-Functional Display: Integrates tachometer, speedometer, gear indicator, time display, and total travel distance.
- Adjustable Units: Kilometers and miles can be adjusted.
- Speed Sensor Included: Comes with a dedicated speed sensor for precise readings.
- Durable Construction: Robust ABS shell with a clear lens, waterproof, and impact-resistant.
- 7-Color Backlight: Digital LCD screen features 7 adjustable backlight colors for enhanced visibility in various lighting conditions.
- Anti-Glare Display: Designed for clear viewing at all angles.
- Universal Fitment: Compatible with most DC 12V motorcycles, including 1, 2, and 4-cylinder (4-stroke motorcycle disc-brake front tire) models.
- User-Friendly Controls: Two buttons for switching between total odometer, trip distance, and water temperature display.
- Engine Trouble Light: Includes an engine trouble light reminder.
Technical Specifications
| Parameter | Value |
|---|---|
| Brand | MACHSWON |
| Model Number | MGH844308J |
| Material | ABS Plastic |
| Operating Voltage | DC 12V |
| Product Dimensions (L x W x H) | 19 cm x 16 cm x 9.5 cm (approx. 7.48" x 6.3" x 3.74") |
| Item Weight | 0.4 kg (approx. 0.88 lbs) |
| Backlight Colors | 7 colors (adjustable) |
| Display Type | Large Screen Full LCD Anti-Glare |
| Cylinder Compatibility | 1, 2, and 4 cylinder (4-stroke motorcycle disc-brake front tire) |
Setup and Installation
1. Pre-Installation Check
Before beginning installation, ensure your motorcycle's battery is disconnected. Verify all components listed in the "Package Contents" section are present and undamaged.
2. Mounting the Speedometer Unit
Select a suitable location on your motorcycle's dashboard or handlebar where the speedometer is clearly visible and does not obstruct controls. Secure the unit using the provided mounting hardware.
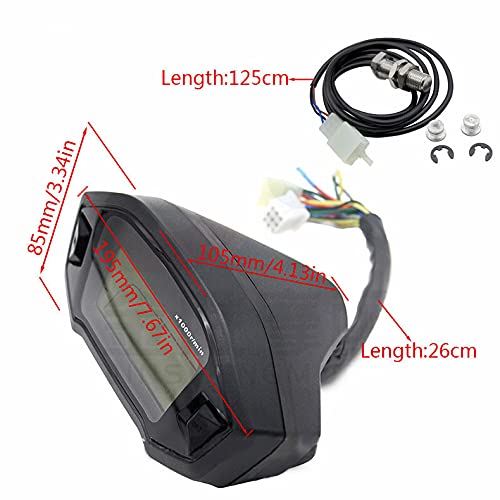
Image: The speedometer unit showing its dimensions (approximately 19cm length, 8.5cm height, 10.5cm width) and the attached wiring harness (26cm length) and speed sensor cable (125cm length).
3. Wiring Connections
The speedometer unit comes with a multi-pin wiring harness. Connect the wires according to your motorcycle's electrical system. Refer to your motorcycle's service manual for specific wiring diagrams if needed. Common connections include:
- Positive (+) 12V: Connect to a switched 12V power source (e.g., ignition).
- Ground (-): Connect to the motorcycle's chassis ground.
- Ignition Signal: For RPM readings (tachometer).
- Speed Sensor Input: Connect the included speed sensor.
- Turn Signals (Left/Right): For indicator lights.
- High Beam Indicator: For high beam light.
- Neutral Gear Indicator: For neutral light.
- Fuel Level Sensor: If applicable.
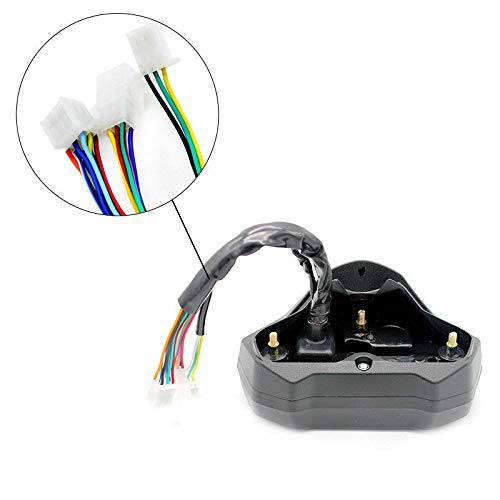
Image: Close-up view of the multi-pin connectors on the wiring harness, showing various colored wires for different electrical connections.
4. Speed Sensor Installation
Install the provided speed sensor on your motorcycle's front wheel, typically near the brake rotor or sprocket, ensuring it can accurately detect wheel rotation. The sensor cable length is approximately 125cm.
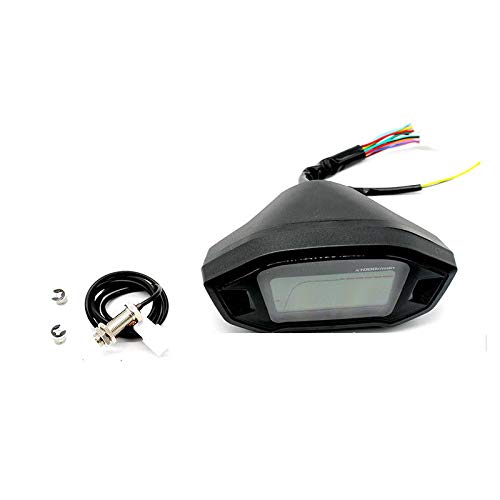
Image: The main speedometer unit displayed alongside the speed sensor, its cable, and two small mounting clips.
5. Initial Power-Up and Calibration
After all connections are made, reconnect the motorcycle's battery. Turn on the ignition. The speedometer should power on. You may need to calibrate the speedometer for accurate speed readings based on your wheel size and cylinder configuration. Refer to the operating instructions for calibration procedures.
Operating Instructions
1. Power On
Upon turning the motorcycle's ignition key to the ON position, the speedometer will power on and display the current readings.
2. Display Modes
The unit displays various information including speed, engine RPM, total odometer, trip odometer, time, and gear indicator. The engine trouble light will illuminate if a fault is detected.
3. Adjusting Backlight Color
The speedometer features 7 adjustable backlight colors. Use the buttons on the unit to cycle through the available colors and select your preferred option.

Image: A collage showing the speedometer display with different backlight colors, including blue, green, yellow, red, and light blue.
4. Switching Odometer and Temperature Displays
The unit has two buttons, typically located on the left and right sides. Press these buttons to switch between the total travel distance (odometer), trip distance (subtotal), and water temperature display (if connected and supported by your motorcycle).
5. Unit Adjustment (Kilometer/Mile)
The display units for distance (kilometer/mile) can be adjusted. Consult the specific button combination or menu option for this setting, usually involving a long press or sequence of presses on one of the control buttons.
6. Cylinder Setting
The speedometer supports 1, 2, and 4-cylinder engines. Ensure the correct cylinder setting is configured for accurate RPM readings. This setting is typically accessed through a specific button sequence during initial setup or calibration.
Maintenance
- Cleaning: Use a soft, damp cloth to clean the display and housing. Avoid abrasive cleaners or solvents that could damage the plastic.
- Inspection: Periodically check all wiring connections for tightness and signs of wear or corrosion.
- Sensor Check: Ensure the speed sensor is clean and properly positioned for accurate readings.
- Storage: If storing the motorcycle for an extended period, ensure the unit is protected from extreme temperatures and moisture.
Troubleshooting
| Problem | Possible Cause | Solution |
|---|---|---|
| Display does not power on. | No power supply; loose wiring; blown fuse. | Check 12V power connection and ground. Inspect wiring harness for damage. Check motorcycle's fuse box. |
| Incorrect speed reading (e.g., 127mph constantly). | Improper speed sensor installation; sensor malfunction; incorrect calibration. | Ensure speed sensor is correctly installed and detecting wheel rotation. Verify sensor functionality. Recalibrate the speedometer according to instructions. |
| Tachometer (RPM) not working or inaccurate. | Incorrect ignition signal connection; wrong cylinder setting. | Verify the ignition signal wire is correctly connected. Adjust the cylinder setting to match your engine (1, 2, or 4 cylinder). |
| Backlight not changing colors. | Button malfunction; internal fault. | Ensure buttons are functioning correctly. If problem persists, contact support. |
| Engine trouble light remains on. | Motorcycle engine fault; wiring issue. | Consult your motorcycle's service manual for engine fault codes. Check wiring to the speedometer's trouble light input. |
Warranty and Support
MACHSWON is committed to providing high-quality products. All products are subject to strict quality control. If you encounter any quality problems or are not satisfied with the product, please contact our customer service for assistance. We are dedicated to offering the best possible solution.
For support, please refer to the contact information provided with your purchase or visit the official MACHSWON store online.