
1. Introduction
This manual provides detailed instructions for the installation, setup, operation, and maintenance of the DAVITU Leadshine DMA860H digital DSP 2-phase stepper motor driver. The DMA860H is designed for high-performance applications, particularly suitable for CNC routers, and is compatible with 86mm (NEMA 34) and 110mm (NEMA 42) 2-phase stepper motors.
2. Product Overview
2.1 Key Features
- High efficiency and excellent high-speed performance.
- Maximum DC72V input voltage.
- Maximum output current of 7.2A.
- Self-adjustment function for optimal performance.
- Pure-sine current control for smooth motor operation.
- Maximum pulse input frequency of 300KHz.
- Suitable for TTL and optically isolated input signals.
- Automatic idle current reduction.
- 16 microstep resolutions in decimal binary, up to 51,200 steps/revolution.
- Compatible with 2, 3, and 4 phase motors.
- Supports PUL/DIR (Pulse/Direction) and CW/CCW (Clockwise/Counter-Clockwise) modes.
- Integrated protection features: short-voltage, over-voltage, and over-current protection.
2.2 Compatibility
The DMA860H driver is primarily designed for 86mm (NEMA 34) and 110mm (NEMA 42) 2-phase stepper motors. It is compatible with and can replace Leadshine DM860, MA860H, MA860, and M860 drivers, offering improved performance with lower heat generation and reduced vibration.
2.3 Model Comparison
The DMA860H is an updated digital DSP 2-phase step driver. Below is a comparison with previous models regarding power supply compatibility:
- M860: Direct-current (DC) power supply only.
- MA860: Direct-current (DC) and alternating current (AC) power supply.
- MA860H: Direct-current (DC) and alternating current (AC) power supply.
- DMA860H: Direct-current (DC) and alternating current (AC) power supply.
3. Setup and Installation
Proper installation and wiring are crucial for the safe and effective operation of the DMA860H driver. Refer to the diagrams and tables below for guidance.
3.1 Driver Layout and DIP Switches
The DMA860H driver features clearly labeled terminals and DIP switches for current and microstep settings. The image below illustrates the driver's layout.
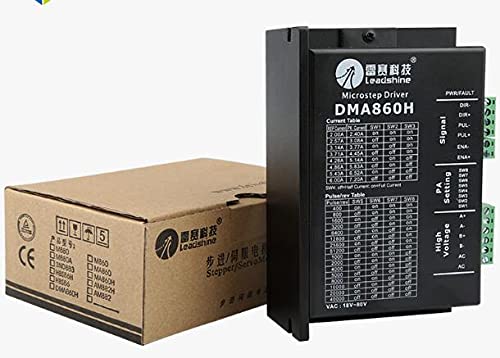
Figure 1: Front view of the DMA860H driver, showing terminal blocks and DIP switch configuration tables.
The DIP switches are located on the side of the driver. Switches SW1-SW3 control the output current, and SW5-SW8 control the microstep resolution. SW4 is for half-current/full-current setting.
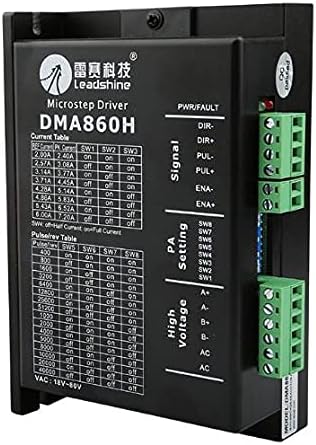
Figure 2: Top view of the DMA860H driver, highlighting the DIP switches.
3.2 Wiring Connections
Connect the stepper motor, power supply, and control signals to the appropriate terminals as indicated on the driver and in the following descriptions:
- Signal Input (PUL, DIR, ENA):
- PUL+ / PUL-: Pulse signal input.
- DIR+ / DIR-: Direction signal input.
- ENA+ / ENA-: Enable signal input.
- Motor Connections (A+, A-, B+, B-): Connect the stepper motor phases to these terminals. Ensure correct phase matching.
- Power Supply (AC, AC): Connect the AC power supply (18VAC-80VAC) or DC power supply (24-80VDC) to these terminals. The DMA860H supports both AC and DC input.
3.3 Current Setting (SW1, SW2, SW3)
The output current to the motor is set using DIP switches SW1, SW2, and SW3. Refer to the table below to select the desired peak current. "ON" typically means the switch is in the down position, and "OFF" is up.
| Peak Current (A) | SW1 | SW2 | SW3 |
|---|---|---|---|
| 2.00A | ON | ON | ON |
| 2.57A | OFF | ON | ON |
| 3.14A | ON | OFF | ON |
| 3.71A | OFF | OFF | ON |
| 4.28A | ON | ON | OFF |
| 4.86A | OFF | ON | OFF |
| 5.43A | ON | OFF | OFF |
| 6.00A | OFF | OFF | OFF |
3.4 Microstep Resolution Setting (SW5, SW6, SW7, SW8)
The microstep resolution (pulses per revolution) is configured using DIP switches SW5, SW6, SW7, and SW8. Select the desired resolution based on your application requirements. "ON" typically means the switch is in the down position, and "OFF" is up.
| Pulses/Rev | SW5 | SW6 | SW7 | SW8 |
|---|---|---|---|---|
| 400 | ON | ON | ON | ON |
| 800 | OFF | ON | ON | ON |
| 1600 | ON | OFF | ON | ON |
| 3200 | OFF | OFF | ON | ON |
| 6400 | ON | ON | OFF | ON |
| 12800 | OFF | ON | OFF | ON |
| 25600 | ON | OFF | OFF | ON |
| 51200 | OFF | OFF | OFF | ON |
| 1000 | ON | ON | ON | OFF |
| 2000 | OFF | ON | ON | OFF |
| 4000 | ON | OFF | ON | OFF |
| 5000 | OFF | OFF | ON | OFF |
| 8000 | ON | ON | OFF | OFF |
| 10000 | OFF | ON | OFF | OFF |
| 20000 | ON | OFF | OFF | OFF |
| 25000 | OFF | OFF | OFF | OFF |
3.5 Half-Current/Full-Current Setting (SW4)
DIP switch SW4 controls the idle current reduction feature:
- SW4 ON: Enables automatic idle current reduction. The driver will reduce the motor current when the motor is idle to minimize heat generation.
- SW4 OFF: Disables automatic idle current reduction. The motor will maintain full current even when idle.
4. Operating Instructions
- Power On: After ensuring all connections are secure and DIP switches are set correctly, apply power to the DMA860H driver. The power indicator LED should illuminate.
- Signal Input: Provide pulse (PUL) and direction (DIR) signals from your controller (e.g., CNC controller, PLC). The motor will move according to these signals.
- Enable/Disable: Use the enable (ENA) signal to activate or deactivate the motor driver. When disabled, the motor will be free-spinning.
- Monitoring: Observe the motor's behavior. If unexpected movement or errors occur, refer to the Troubleshooting section.
5. Maintenance
The DMA860H driver is designed for reliable operation with minimal maintenance. However, adhering to the following guidelines can prolong its lifespan:
- Cleanliness: Keep the driver free from dust, debris, and moisture. Use compressed air to gently clean the heatsink fins periodically.
- Ventilation: Ensure adequate airflow around the driver to prevent overheating. Do not obstruct the heatsink (Figure 3).
- Connections: Periodically check all wiring connections for tightness and signs of wear or corrosion.
- Operating Environment: Operate the driver within its specified temperature and humidity ranges.
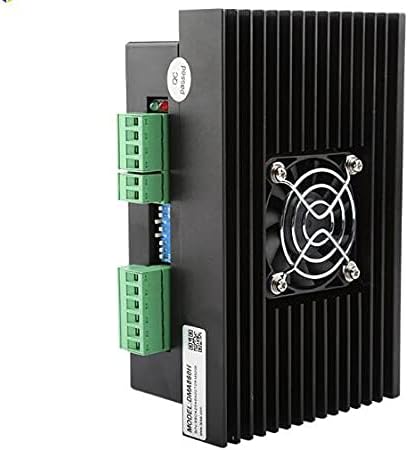
Figure 3: Side view of the DMA860H driver, illustrating the heatsink for thermal management.
6. Troubleshooting
If you encounter issues with your DMA860H driver, consider the following troubleshooting steps:
- Motor Not Moving:
- Check power supply connections and voltage.
- Verify control signal (PUL, DIR, ENA) connections and integrity.
- Ensure the enable signal is active (ENA+ / ENA-).
- Confirm motor wiring is correct (A+, A-, B+, B-).
- Check DIP switch settings for current and microstep resolution.
- Motor Stalling or Losing Steps:
- Increase the output current setting (refer to Table 1).
- Reduce the microstep resolution if the motor is struggling at high speeds (refer to Table 2).
- Check for mechanical issues with the motor or load.
- Ensure the power supply can deliver sufficient current.
- Motor Overheating:
- Ensure adequate ventilation around the driver and motor.
- Verify the output current setting is not excessively high for the motor.
- Enable automatic idle current reduction (SW4 ON).
- Driver Fault LED On:
- Indicates a protection event (over-voltage, over-current, short-voltage).
- Check power supply voltage.
- Inspect motor wiring for short circuits.
- Cycle power to reset the driver after resolving the issue.
7. Specifications
| Parameter | Value |
|---|---|
| Model | DMA860H |
| Motor Type Compatibility | 2, 3, 4 Phase Stepper Motors (86mm/NEMA 34, 110mm/NEMA 42) |
| Input Voltage | 18VAC - 80VAC or 24VDC - 80VDC |
| Output Current | 2.4A - 7.2A (Peak, adjustable) |
| Microstep Resolution | 16 settings, up to 51,200 Pulses/Rev |
| Pulse Input Frequency | Max 300KHz |
| Control Modes | PUL/DIR, CW/CCW |
| Protection Features | Short-voltage, Over-voltage, Over-current |
| Idle Current Reduction | Automatic (selectable via SW4) |
8. Warranty and Support
For warranty information and technical support, please refer to the documentation provided with your purchase or contact DAVITU customer service directly. Ensure you have your product model number (DMA860H) and purchase details available when seeking support.