
1. Introduction
This user manual provides comprehensive instructions for the safe and efficient operation, setup, and maintenance of your LeTkingok Mini Multifunctional Electric Belt Sander, model L-S03. This versatile tool is designed for various tasks including sanding, polishing, and sharpening, making it suitable for DIY projects and precision work. Please read this manual thoroughly before first use and retain it for future reference.
2. Safety Instructions
Always observe the following safety precautions to reduce the risk of electric shock, fire, and serious injury.
- Work Area Safety: Keep your work area clean and well-lit. Cluttered or dark areas invite accidents. Do not operate power tools in explosive atmospheres, such as in the presence of flammable liquids, gases, or dust.
- Electrical Safety: Power tool plugs must match the outlet. Never modify the plug in any way. Do not abuse the cord. Never use the cord for carrying, pulling, or unplugging the power tool. Keep cord away from heat, oil, sharp edges, or moving parts.
- Personal Safety: Always wear appropriate personal protective equipment, including safety glasses, dust mask, non-skid safety shoes, and hearing protection. Dress properly. Do not wear loose clothing or jewelry. Keep your hair and clothing away from moving parts.
- Tool Use and Care: Do not force the power tool. Use the correct power tool for your application. Disconnect the plug from the power source before making any adjustments, changing accessories, or storing power tools.
- Maintenance: Maintain power tools and accessories. Check for misalignment or binding of moving parts, breakage of parts, and any other condition that may affect the power tool's operation. If damaged, have the power tool repaired before use.
3. Package Contents
Carefully unpack the box and ensure all items are present and undamaged. If any items are missing or damaged, please contact customer support.
- LeTkingok Mini Multifunctional Electric Belt Sander (L-S03)
- Power Adapter (100-240V AC to DC)
- Assorted Sanding Belts (e.g., 120, 320, 600, 800, 1000 mesh)
- Assorted Sanding Discs (e.g., 120, 400, 1000, 2000 mesh)
- Polishing Wheel
- Grinding Wheel
- Polishing Wax/Compound
- Hex Wrenches (for adjustments)
- Sanding Disc Backing Pad
- Instruction Manual (this document)

Figure 3.1: Overview of the LeTkingok Mini Multifunctional Electric Belt Sander and its complete set of accessories, including various sanding belts, discs, polishing wheels, and power adapter.
4. Product Overview
The LeTkingok Mini Multifunctional Electric Belt Sander is a compact and robust tool designed for precision work. It features a durable metal construction and a powerful motor for efficient material removal and finishing.

Figure 4.1: Front view of the mini belt sander, highlighting its compact dimensions: approximately 175mm in length, 110mm in width, and 40mm in height for the motor assembly.

Figure 4.2: Underside view of the sander, showing the belt tensioning mechanism and the adjustable angle for the sanding platform.
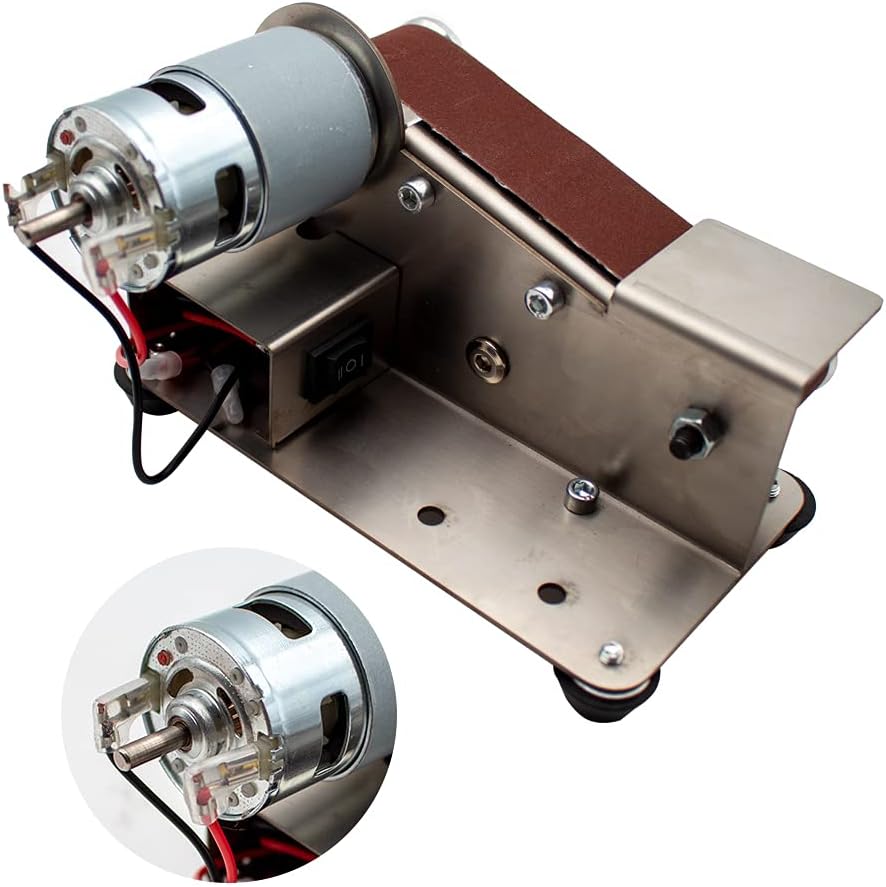
Figure 4.3: Detail of the electric motor and the integrated power switch, indicating the electrical connections.
5. Setup
5.1 Attaching the Power Adapter
- Ensure the sander's power switch is in the "OFF" position.
- Connect the DC output plug of the power adapter to the power input jack on the sander.
- Plug the AC input cord of the power adapter into a standard 100-240V electrical outlet.
5.2 Installing/Changing Sanding Belts
- Unplug the sander from the power source.
- Locate the belt tensioning mechanism (refer to Figure 4.2).
- Loosen the tension to remove the existing belt or to install a new one.
- Slide the new sanding belt onto the rollers, ensuring it is centered.
- Re-apply tension to the belt until it is snug but not overly tight. The belt should track straight when the machine is briefly turned on.

Figure 5.1: Various grit sanding belts available for different applications, ranging from coarse to fine.
5.3 Attaching Polishing Wheels or Grinding Wheels
- Unplug the sander from the power source.
- The motor shaft may have a threaded end for attaching accessories.
- Carefully screw on the desired polishing wheel or grinding wheel. Ensure it is securely fastened.
- Do not overtighten.

Figure 5.2: The mini belt sander configured with a polishing wheel and a grinding wheel, alongside various sanding belts and discs.
6. Operating Instructions
6.1 General Operation
- Ensure the correct accessory (sanding belt, polishing wheel, or grinding wheel) is installed for your task.
- Plug the power adapter into a suitable electrical outlet.
- Turn the power switch to the "ON" position. The motor will start, and the belt or wheel will begin to rotate.
- Hold the workpiece firmly and apply it gently to the moving belt or wheel. Avoid excessive pressure, which can slow the motor or damage the workpiece.
- For sanding, move the workpiece evenly across the belt to ensure uniform material removal.
- For sharpening, maintain a consistent angle against the grinding wheel.
- For polishing, apply a small amount of polishing compound to the polishing wheel and gently buff the workpiece.
- When finished, turn the power switch to the "OFF" position and unplug the tool.
6.2 Angle Adjustment for Sharpening/Sanding
The sanding platform can be adjusted to a specific angle (e.g., 15 degrees as shown in Figure 4.1) for precise sharpening or beveling. Use the provided hex wrench to loosen the adjustment screws, set the desired angle, and then securely tighten the screws.
7. Maintenance
7.1 Cleaning
- Always unplug the tool before cleaning.
- Use a soft, dry cloth to wipe down the exterior of the sander.
- Use compressed air to blow dust and debris from the motor vents and belt area.
- Do not use solvents or harsh chemicals, as they may damage plastic parts.
7.2 Belt Replacement
Sanding belts wear out over time and should be replaced when they become dull or damaged. Refer to Section 5.2 for instructions on how to install/change sanding belts.
7.3 Storage
Store the sander in a clean, dry place, out of reach of children. Ensure the power cord is neatly coiled and not kinked.
8. Troubleshooting
| Problem | Possible Cause | Solution |
|---|---|---|
| Sander does not turn on. | No power supply; Power switch off; Faulty power adapter. | Check power outlet; Ensure switch is ON; Test power adapter or replace if faulty. |
| Belt slips or stops. | Belt too loose; Excessive pressure on workpiece; Worn belt. | Adjust belt tension; Reduce pressure; Replace belt. |
| Excessive vibration or noise. | Belt misalignment; Loose components; Damaged motor/bearings. | Adjust belt tracking; Check and tighten all screws; Contact support if motor/bearings are suspected. |
| Poor sanding/polishing performance. | Worn belt/disc/wheel; Incorrect grit/compound for task. | Replace worn accessories; Use appropriate grit or polishing compound. |
9. Specifications
| Feature | Detail |
|---|---|
| Product Name | Mini Multifunctional Electric Belt Sander |
| Model Number | L-S03 |
| Brand | LeTkingok |
| Input Voltage | 100-240V AC (via power adapter) |
| Operating Voltage | 240 Volts |
| Power Source | Corded Electric (DC/AC) |
| Maximum Rotation Speed | 10000 RPM |
| Product Dimensions (L x W x H) | 17.5 x 11 x 4 cm (approx. 11 x 11 x 17.5 cm overall) |
| Item Weight | 1.9 Kilograms |
| Grain Type | Coarse |
| UPC | 794304604704 |
| ASIN | B09FLH539P |
10. Warranty and Support
For warranty information, technical support, or replacement parts, please contact the manufacturer or your point of purchase. Keep your purchase receipt as proof of purchase.
Manufacturer: LeTkingok