
USKEYVISION Flex-K4
USKEYVISION Flex-K4 Phone Video Kit Instruction Manual
Model: Flex-K4
1. Important Safety Information
Please read all instructions carefully before using the USKEYVISION Flex-K4 Phone Video Kit. Retain this manual for future reference.
- Do not expose the device to water or excessive moisture.
- Avoid extreme temperatures.
- Keep out of reach of children.
- Use only specified charging cables for the LED light.
- Do not attempt to disassemble or modify the product.
2. Package Contents
Verify that all items listed below are included in your package:
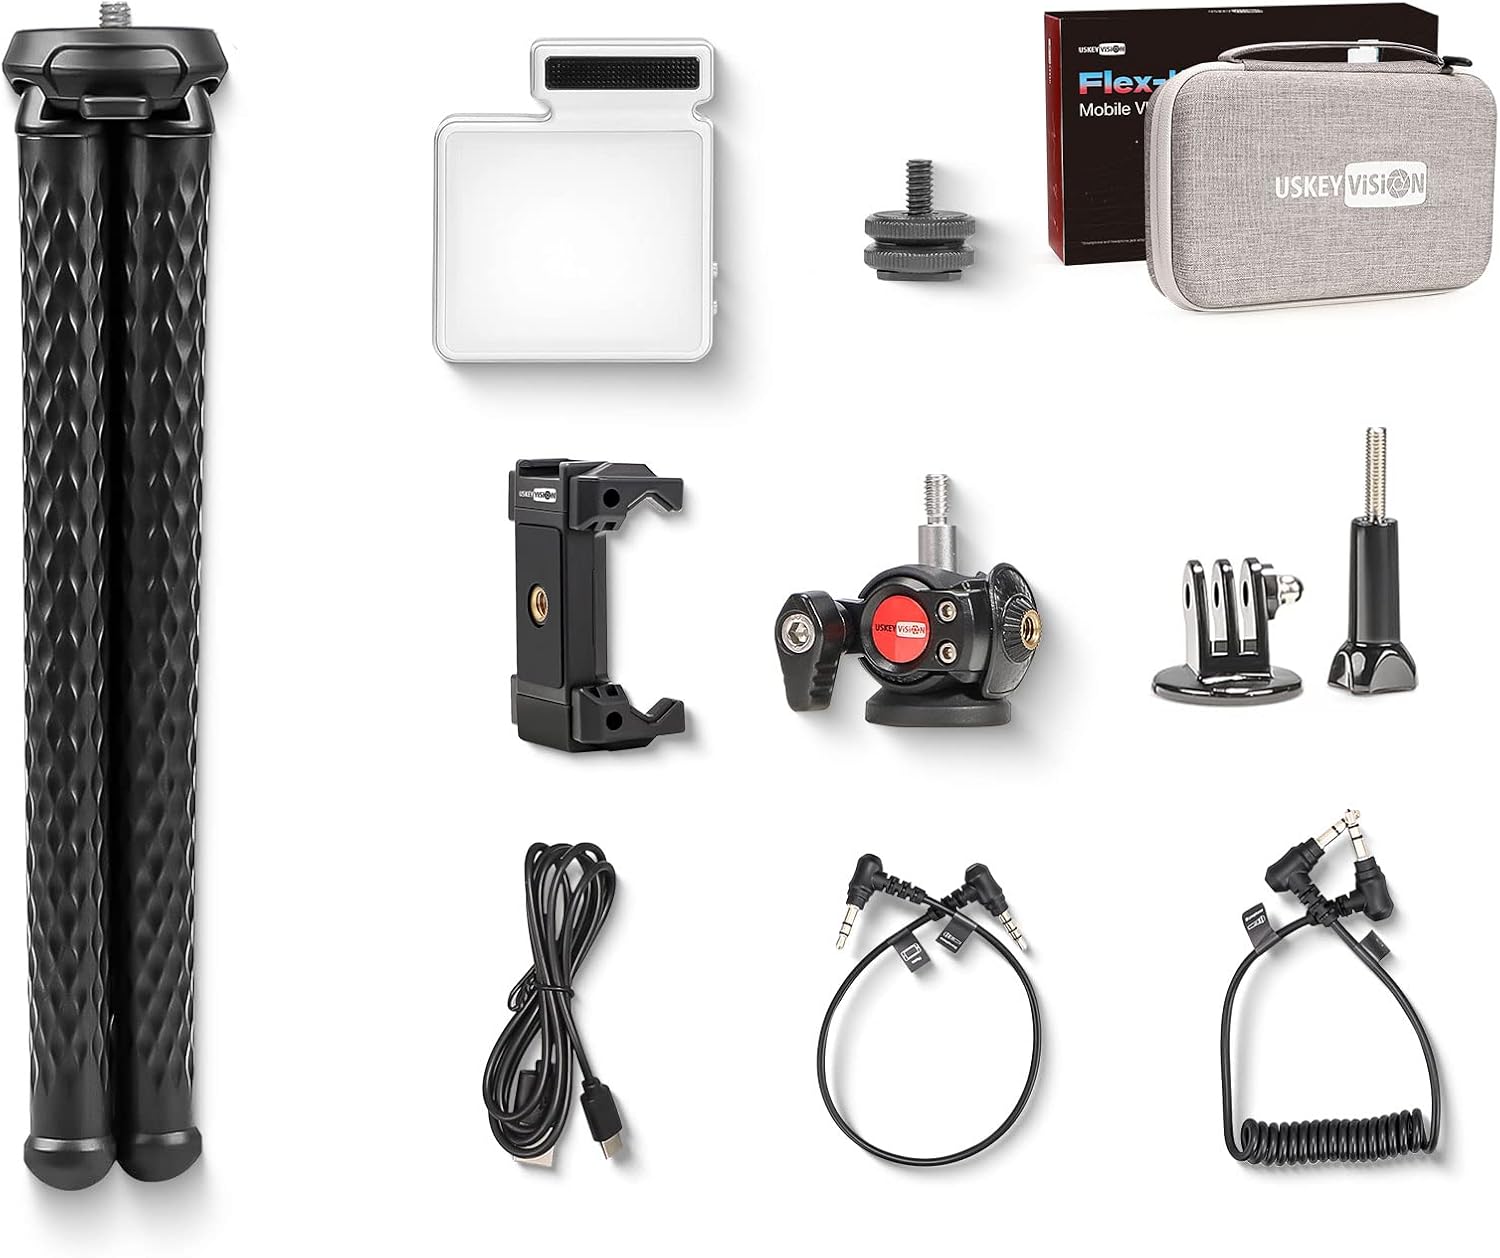
Image: All components of the USKEYVISION Flex-K4 Phone Video Kit laid out, including the flexible tripod, microphone light, smartphone clip, cables, and carrying case.
- 1 x Flex-1 Flexible Tripod
- 1 x 360° Rotating Ball Head
- 1 x Integrated Microphone Light (UVGL-6)
- 1 x Universal Smartphone Clip
- 1 x Action Camera Adapter
- 1 x Flexible Grip (part of tripod)
- 1 x TRRS to TRS Cable (for phone)
- 1 x TRS to TRS Cable (for tablet/camera)
- 1 x USB-C Charging Cable (for light)
- 1 x Windshield (for microphone)
- 1 x Storage Case Bag
- 1 x User Manual (this document)
Note: The 3.5mm to Lightning adapter cable for iPhone 7 or above, or USB-C to 3.5mm adapter for newer Android phones, is not included in this kit and must be purchased separately if required.
3. Component Overview
3.1 Flexible Tripod (Flex-1)
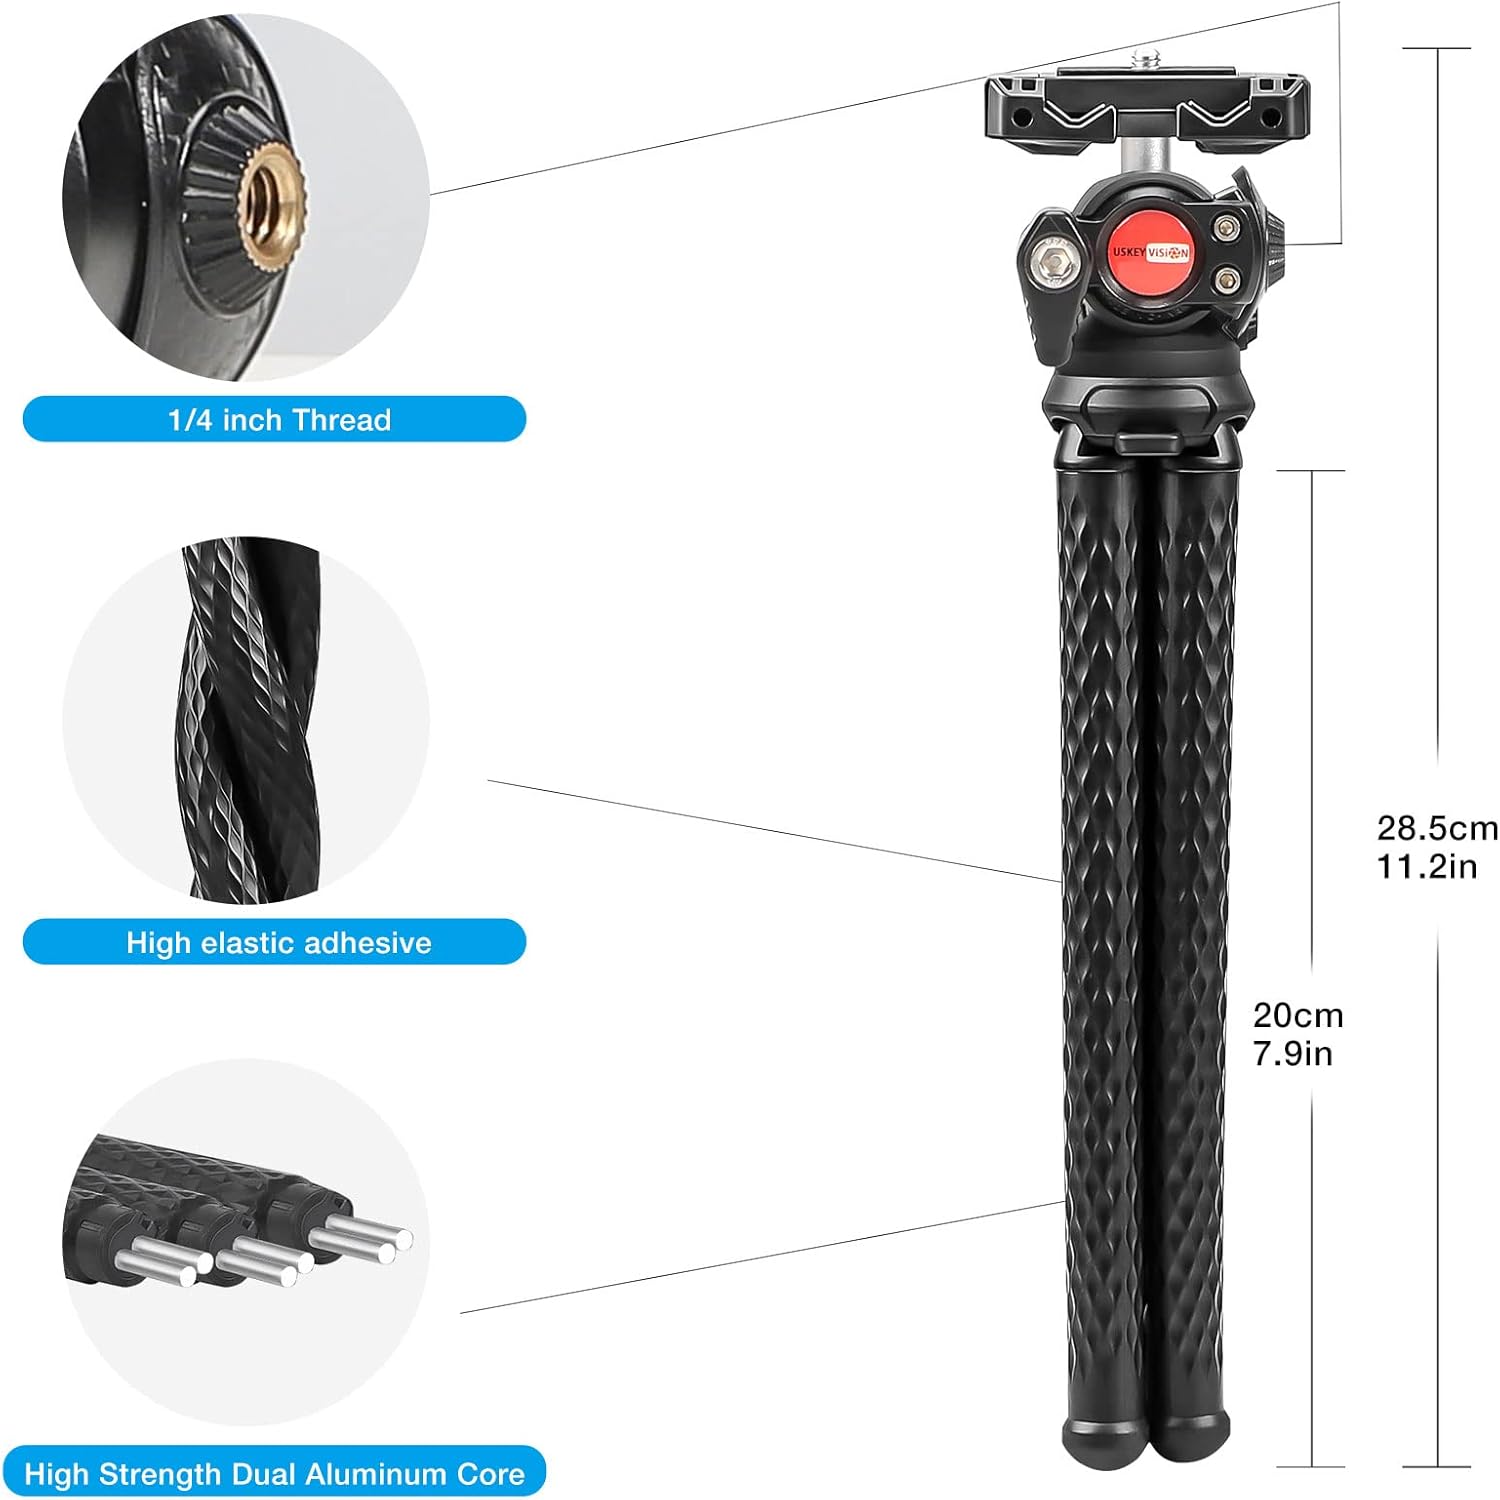
Image: Diagram showing the flexible tripod with dimensions (28.5cm total, 20cm leg length) and construction details like 1/4 inch thread, high elastic adhesive, and high strength dual aluminum core.
The Flex-1 tripod features flexible legs with a high-strength dual aluminum core, allowing it to be bent and wrapped around various objects. It includes a 1/4 inch screw thread for attaching the ball head or other accessories.
3.2 360° Rotating Ball Head

Image: Close-up of the 360-degree rotating ball head with a red locking knob, designed for precise angle adjustments.
This ball head allows for 360-degree rotation and tilt, providing versatile positioning for your camera or smartphone. It features a locking knob to secure the desired angle.
3.3 Integrated Microphone Light (UVGL-6)

Image: Diagram of the integrated microphone light showing numbered components: (1) Microphone, (2) 3.5mm headphone jack, (3) 72pcs 2835 light beads, (4) USB-C charging port, (5) Work indicator, (6) Power/mode switch button, (7) Up and down button, (8) 1/4" screw hole.
The UVGL-6 combines a cardioid condenser microphone with an LED video light. It features 72 light beads, a 3.5mm audio output, a USB-C charging port, and controls for power, brightness, and color temperature.
3.4 Universal Smartphone Clip

Image: Close-up of the universal smartphone clip, designed to securely hold various smartphone sizes and featuring a cold shoe mount on top.
This clip securely holds most smartphones and includes a cold shoe mount on top for attaching accessories like the microphone light.
4. Setup Instructions
4.1 Assembling the Tripod and Ball Head
- Screw the 360° Rotating Ball Head onto the 1/4 inch screw thread at the top of the Flexible Tripod.
- Ensure it is tightened securely.
4.2 Attaching the Smartphone Clip
- Loosen the locking knob on the ball head.
- Screw the Universal Smartphone Clip onto the 1/4 inch screw thread on the ball head.
- Tighten the locking knob on the ball head to secure the clip.
- Gently expand the smartphone clip and insert your smartphone. Ensure the phone is centered and held firmly.
4.3 Mounting the Microphone Light
- Slide the Integrated Microphone Light (UVGL-6) into the cold shoe mount located on top of the Universal Smartphone Clip.
- Ensure it is fully inserted and secure.
4.4 Connecting the Microphone to a Smartphone
- Connect one end of the provided TRRS to TRS cable (3.5mm jack with 3 black rings) to the 3.5mm headphone jack on the Integrated Microphone Light.
- Connect the other end of the cable to your smartphone's 3.5mm audio input jack.
- Important: If your smartphone does not have a 3.5mm audio jack (e.g., newer iPhones, some Android models), you will need a separate adapter (e.g., Lightning to 3.5mm or USB-C to 3.5mm), which is not included.
- For action cameras or traditional cameras, use the TRS to TRS cable (3.5mm jack with 2 black rings) if applicable.
4.5 Charging the LED Light
- Locate the USB-C charging port on the Integrated Microphone Light.
- Connect the provided USB-C charging cable to the light and a standard USB power source (e.g., wall adapter, computer USB port).
- The work indicator light will show charging status.
5. Operating Instructions
5.1 Using the Flexible Tripod

Image: The flexible tripod with a smartphone and microphone light attached, wrapped securely around a tree branch, demonstrating its versatile mounting capabilities.
- Standard Use: Position the tripod on a flat surface for stable recording.
- Flexible Mounting: Bend the legs to wrap around poles, branches, or other irregular surfaces. Ensure the setup is stable before recording.
- Angle Adjustment: Use the 360° Rotating Ball Head to adjust the camera angle. Loosen the knob, set the angle, and tighten the knob to secure.
5.2 Operating the Integrated Microphone Light (UVGL-6)
Image: Detailed instructions for operating the microphone light, showing buttons for power/mode and up/down, and how to adjust brightness and color temperature modes.
- Power On/Off: Long press the Power/Mode switch button (6) for three seconds to turn the light on or off.
- Brightness Mode (DIM):
- When powered on, the indicator (5) shows white for Brightness Mode.
- Long press the Up and Down button (7) to continuously adjust brightness.
- Short press the Up and Down button (7) to cycle through three distinct brightness levels.
- Color Temperature Mode (CCT):
- Short press the Power/Mode switch button (6) to switch from Brightness Mode to Color Temperature Mode. The indicator (5) will show red.
- Long press the Up and Down button (7) to continuously adjust color temperature.
- Short press the Up and Down button (7) to cycle through three distinct color temperature levels.
- Microphone Operation: The integrated microphone automatically begins recording when the light is powered on and connected via the audio cable. It stops recording when the light is powered off.

Image: Visual representation of the three adjustable brightness levels (Low, Medium, High) of the LED video light, alongside an "Light off" state.
5.3 General Usage Tips
- Always ensure your smartphone is securely mounted before recording.
- Test microphone audio levels before a critical recording session.
- Charge the LED light fully before extended use.
- Use the included windshield for the microphone in windy outdoor conditions to reduce noise.
6. Maintenance
- Cleaning: Wipe the product with a soft, dry cloth. Do not use harsh chemicals or abrasive cleaners.
- Storage: Store the kit in the provided storage case bag when not in use to protect components from dust and damage. Keep in a cool, dry place.
- Battery Care: For optimal battery life of the LED light, avoid fully discharging it frequently and recharge it periodically if stored for long periods.
7. Troubleshooting
| Problem | Possible Cause | Solution |
|---|---|---|
| Microphone not recording audio. |
|
|
| LED light not turning on or dim. |
|
|
| Tripod is unstable. |
|
|
8. Specifications
| Model | Flex-K4 |
| Product Dimensions | 10.24 x 2.36 x 6.3 inches (26 x 6 x 16 cm) |
| Item Weight | 1.65 pounds (750 grams) |
| Microphone Type | Cardioid Condenser |
| LED Light Beads | 72 pcs 2835 |
| LED Light Charging Port | USB-C |
| Compatible Devices | Smartphones (iPhone 13/12/11 mini/Pro/Max, XS Max, XR, XS, X, 8, 7, 6, Android), Action Cameras, Mirrorless Cameras, Webcams |
| Batteries | 1 Lithium Ion battery required (for LED light) |
9. Warranty and Support
For warranty information or technical support, please contact USKEYVISION customer service through their official website or the retailer where the product was purchased. Please have your model number (Flex-K4) and purchase details available.
Visit the USKEYVISION Store: USKEYVISION Official Store
Ask a question about this manual
Ask about setup, troubleshooting, compatibility, parts, safety, or missing instructions. Manuals+ will review the question and use this page’s manual context to help answer it.