
Bushnell 119902V
Bushnell Primos Hunting CelluCore 30 Verizon Trail Camera User Manual
Model: 119902V
Brand: Bushnell
Introduction
This manual provides detailed instructions for the setup, operation, and maintenance of your Bushnell Primos Hunting CelluCore 30 Verizon Trail Camera (Model 119902V). This device is designed for outdoor surveillance, capturing high-resolution images and videos of wildlife. Please read this manual thoroughly before using the camera to ensure optimal performance and longevity.
Important Safety Information
WARNING: This product can expose you to chemicals including Lead, which is known to the State of California to cause cancer and birth defects or other reproductive harm. For more information, go to www.P65Warnings.ca.gov.
Always handle batteries and electronic components with care. Do not expose the camera to extreme temperatures or direct sunlight for prolonged periods. Ensure all covers are securely closed to prevent water ingress.
Package Contents
Verify that all items are present in your package:
- Bushnell Primos Hunting CelluCore 30 Verizon Trail Camera (Model 119902V)
- Antenna
- Mounting Strap
- User Manual (this document)
Note: SD card and AA batteries are not included and must be purchased separately.
Setup Guide
1. Install Batteries
The CelluCore 30 requires 12 AA batteries for operation. For best performance and extended battery life (up to 6 months), use high-quality alkaline or lithium batteries.
- Open the camera's main latch and swing open the front cover.
- Locate the removable battery tray.
- Insert 12 AA batteries into the tray, ensuring correct polarity (+/-) as indicated.
- Slide the loaded battery tray back into the camera until it clicks securely into place.

Image: The camera with its battery tray extended, illustrating the insertion of 12 AA batteries. This model supports up to 6 months of battery life.

Image: A detailed view of the removable battery tray, emphasizing its capacity for 12 AA batteries and ease of replacement.
2. Insert SD Card
A Class 10 SD card (up to 32GB) is required to store images and videos.
- With the camera open, locate the SD card slot on the side.
- Insert the SD card with the metal contacts facing down, until it clicks into place.
- To remove, push the card in slightly until it springs out.

Image: The camera's interior, displaying the 3-inch color view screen, control panel, and the slot for an SD card (up to 32GB).
3. Attach Antenna
Screw the provided antenna onto the threaded port at the top of the camera. Ensure it is finger-tight for optimal signal reception.

Image: Front view of the Bushnell CelluCore 30 camera, showcasing its Treebark Camo finish and the attached antenna.

Image: Another front view of the camera, featuring a longer, flexible antenna for potentially improved signal.
4. Power On and Initial Configuration
Once batteries and SD card are installed, and the antenna is attached:
- Flip the power switch to the "ON" position.
- The 3-inch color view screen will activate.
- Use the control buttons (Up, Down, Left, Right, OK, Menu, Shot) to navigate the menu.
- Set the date, time, and desired operating mode (photo, video, or hybrid).
- Configure cellular settings for Verizon network connectivity. Refer to the on-screen prompts and the Bushnell Wireless App for detailed cellular setup.

Image: The camera's interior, showing the 3-inch color view screen displaying the Bushnell Trail Cameras logo. Key features like 0.2-second trigger speed, 30MP images, no-glow LEDs, 100ft night range, and solar compatibility are indicated.
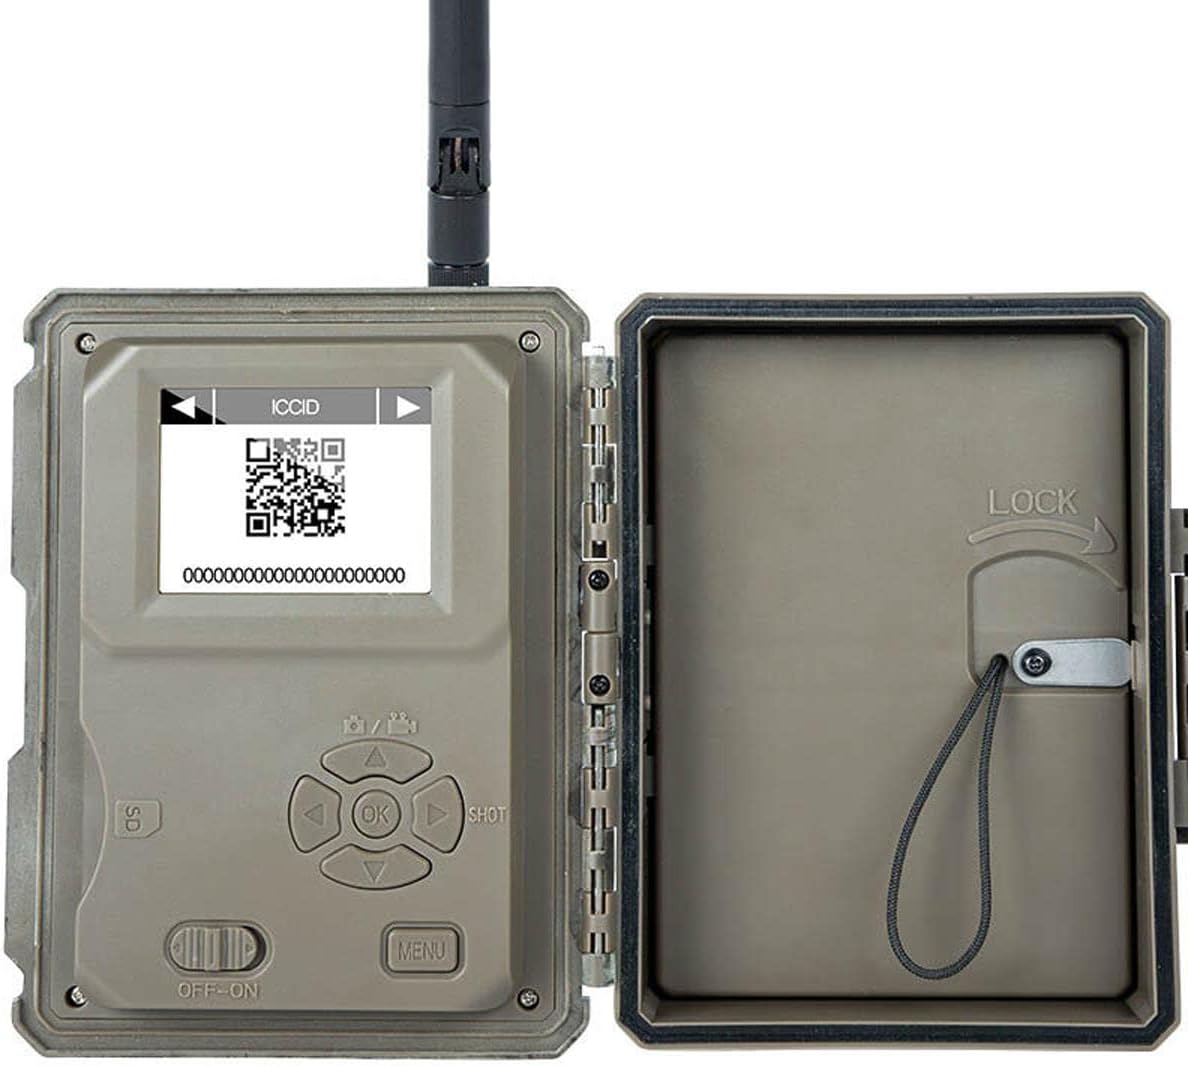
Image: The camera's internal screen displaying a QR code and ICCID, essential for activating the cellular function on the Verizon network.
Operating Instructions
Camera Modes
The CelluCore 30 offers various modes to suit your surveillance needs:
- Photo Mode: Captures still images. Features 30MP image resolution and a 0.2-second trigger speed.
- Video Mode: Records video clips.
- Hybrid Mode: Captures both a still image and a video clip per trigger.
Menu Navigation
Use the directional buttons and the "OK" button to navigate through the camera's settings. The "MENU" button accesses the main settings, and the "SHOT" button can be used to manually trigger a photo or video for testing.
The camera includes 3 preset menus for quick setup, as well as an advanced mode for detailed customization.
Key Features
- Trigger Speed: Ultra-fast 0.2-second trigger speed to capture fast-moving subjects.
- Image Quality: Crystal clear 30MP images.
- Night Vision: Equipped with No-Glow LEDs for discreet night capture, offering a 100ft night range.
- Cellular Connectivity: Verizon network compatible for remote image/video transmission.
- Solar Compatible: Designed to work with external solar panels (sold separately) for extended deployment.
Maintenance
- Cleaning: Use a soft, dry cloth to clean the camera lens and housing. Avoid abrasive cleaners or solvents.
- Battery Replacement: Replace all 12 AA batteries simultaneously when the low battery indicator appears. Do not mix old and new batteries or different battery types.
- SD Card Management: Regularly format your SD card in the camera to ensure optimal performance and prevent data corruption. Back up important files before formatting.
- Firmware Updates: Periodically check the Bushnell website for firmware updates to ensure your camera has the latest features and bug fixes.
Troubleshooting
| Problem | Possible Cause / Solution |
|---|---|
| Camera not powering on |
|
| No images/videos captured |
|
| Poor image/video quality |
|
| Cellular transmission issues |
|
Specifications
| Feature | Detail |
|---|---|
| Model Name | 119902V |
| Brand | Bushnell |
| Image Resolution | 30 Megapixels |
| Trigger Speed | 0.2 seconds |
| Night Range | 100 feet (No-Glow LEDs) |
| Display Screen | 3-inch Color View Screen |
| Memory Card Support | Up to 32GB SD Card (Class 10 recommended) |
| Battery Type | 12 AA (not included) |
| Battery Life | Up to 6 months (with 12 AA Lithium batteries) |
| Cellular Carrier | Verizon |
| Color | Treebark Camo (Multi) |
| Material | Blend |
| Item Package Dimensions | 8.7 x 5.63 x 2.99 inches |
| Item Weight | 0.61 Kilograms (approx. 1.35 Pounds) |
| Model Year | 2021 |
Warranty and Support
For warranty information, technical support, or service inquiries, please visit the official Bushnell website or contact their customer service department.
Bushnell Official Website: www.bushnell.com
Please have your model number (119902V) and purchase date available when contacting support.
Related documents119902V


Ask a question about this manual
Ask about setup, troubleshooting, compatibility, parts, safety, or missing instructions. Manuals+ will review the question and use this page’s manual context to help answer it.