Introduction
The JBL PROFLORA CO2 VALVE is a silent solenoid valve designed for precise CO2 dosage in aquariums. It serves as an essential component for CO2 fertilization systems or CO2/pH controllers, enabling automated control over CO2 supply. This manual provides detailed instructions for the proper installation, operation, and maintenance of your JBL PROFLORA CO2 VALVE.
Key Features:
- Silent operation for CO2 dosage in aquariums.
- Designed as an add-on for CO2 fertilization systems or CO2/pH controllers.
- Simple integration into the CO2 hose or direct mounting on the pressure reducer.
- High-quality design with anodized aluminum and precise CNC milling in titanium color.
- Reliable clamping nuts instead of O-rings for secure connections.
- Enables CO2 supply start/stop via a timer or CO2/pH controller (not included).
Setup and Installation
Proper installation is crucial for the efficient and safe operation of your JBL PROFLORA CO2 VALVE. Follow these steps carefully.
1. Unpacking and Component Check
Carefully unpack all components. Ensure the package contains:
- 1x JBL Solenoid Valve for CO2 supply
- Hose
- Universal power supply unit
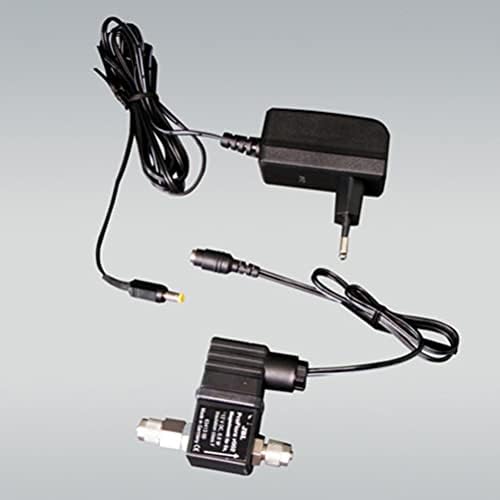
Image: All components of the JBL PROFLORA CO2 VALVE, including the solenoid valve, power adapter, and connecting cables.

Image: The JBL PROFLORA CO2 VALVE, power supply, and associated cables arranged for setup.
2. Connecting the CO2 Hose
The solenoid valve can be integrated into the CO2 hose of your existing fertilization system or mounted directly onto the pressure reducer.
- Integration into CO2 Hose: Cut the CO2 hose at the desired point. Connect each end of the cut hose to the inlet and outlet ports of the solenoid valve. Ensure a secure connection using the clamping nuts. The valve is designed with reliable clamping nuts for a tight seal.
- Direct Mounting on Pressure Reducer: If your pressure reducer allows, you can mount the solenoid valve directly onto it. Refer to your pressure reducer's manual for specific instructions on attaching accessories.

Image: Detail of the valve's connection, illustrating how the CO2 hose is attached and secured with a clamping nut.

Image: A CO2 hose properly connected to the solenoid valve, secured by the clamping nut.

Image: The solenoid valve with an arrow, indicating the correct flow direction or orientation for installation.
3. Connecting the Power Supply
Connect the universal power supply unit to the solenoid valve. Then, plug the power supply into a suitable electrical outlet.

Image: The solenoid valve fully connected to the CO2 hose and its power adapter, ready for operation.

Image: The universal power supply unit and its cables, showing the connection points for the solenoid valve.
Operating Instructions
The JBL PROFLORA CO2 VALVE is designed to control the CO2 supply to your aquarium. It acts as an on/off switch for the CO2 flow.
- Automated Control: To automate the CO2 supply, connect the solenoid valve's power supply to a timer or a dedicated CO2/pH controller. These devices (not included) will switch the power to the solenoid valve on and off according to your programmed schedule or desired pH levels.
- Manual Control: If not using a timer or controller, you can manually plug and unplug the power supply to start or stop the CO2 flow. This method is less precise and generally not recommended for consistent CO2 dosing.
- CO2 Flow Adjustment: The actual CO2 flow rate (bubbles per minute) should be adjusted using the fine-tuning valve on your CO2 pressure reducer, not by the solenoid valve itself. The solenoid valve only controls the on/off state of the flow.
Ensure that your CO2 system (pressure reducer, diffuser, CO2 bottle) is correctly set up and calibrated before operating the solenoid valve.
Maintenance
The JBL PROFLORA CO2 VALVE is designed for durability and requires minimal maintenance.
- Regular Inspection: Periodically check all connections for leaks. Listen for any hissing sounds that might indicate a CO2 leak.
- Cleaning: Keep the exterior of the valve clean and free from dust. Use a soft, dry cloth for cleaning. Do not use harsh chemicals or abrasive materials.
- Hose Condition: Inspect the CO2 hose regularly for signs of wear, kinks, or damage. Replace damaged hoses immediately to prevent CO2 loss.
- Power Supply: Ensure the power supply unit and cables are in good condition and not damaged.
Troubleshooting
If you encounter issues with your JBL PROFLORA CO2 VALVE, consider the following common troubleshooting steps:
- No CO2 Flow:
- Check if the power supply is properly connected and plugged into a live outlet.
- Verify that the timer or CO2/pH controller is functioning correctly and is set to "ON".
- Ensure the CO2 bottle has sufficient gas and the pressure reducer is open.
- Check for any kinks or blockages in the CO2 hose.
- CO2 Leak:
- Inspect all connections (valve to hose, valve to reducer) for tightness. Tighten clamping nuts if necessary.
- Apply a soapy water solution to connections; bubbles indicate a leak.
- Check the CO2 hose for any damage or punctures.
- Valve Not Switching:
- Ensure the power supply is providing power to the valve.
- If using a controller, check its settings and functionality.
- If the valve remains open or closed when it shouldn't, and power is confirmed, the valve itself may require service.
If these steps do not resolve the issue, please contact JBL customer support.
Specifications
| Product Dimensions (L x W x H) | 4 x 10 x 12 cm; 318 grams |
| Model Number | 6467600 |
| Brand | JBL |
| Color | Silver Black |
| Item Form | Device |
| Number of Units | 1 |
| Batteries Required | No |
| ASIN | B09CQ9TTMP |
Warranty Information
Specific warranty details for the JBL PROFLORA CO2 VALVE are typically provided with the product packaging or available on the official JBL website. Please refer to these resources for comprehensive warranty terms and conditions. Keep your proof of purchase for any warranty claims.
Customer Support
For further assistance, technical support, or inquiries regarding your JBL PROFLORA CO2 VALVE, please visit the official JBL website or contact their customer service department.
JBL Official Website: www.jbl.de/en/ (or your regional JBL website)
When contacting support, please have your product model number (6467600) and proof of purchase readily available.


