
1. Product Overview
The Hyper Tough 6-inch Digital Caliper is a precision measuring instrument designed for various applications, including industrial, scientific, and DIY projects. Its robust nylon construction ensures durability, while the clear LCD provides accurate and easy-to-read measurements.

Figure 1.1: Front view of the Hyper Tough 6-inch Digital Caliper.

Figure 1.2: Hyper Tough Digital Caliper in its retail packaging.
Key Features:
- Durable nylon frame, jaws, and depth gauge.
- Capable of measuring outside, inside, depth, and step dimensions.
- Maximum measurement range of 0 to 6 inches (0 to 150 mm).
- Clear LCD display with a button for instant inch/millimeter conversion.
- Includes a 1.5V LR44 button cell battery for operation.
- Automatic shut-off feature to conserve battery life.
2. Components
Familiarize yourself with the main components of your digital caliper:

Figure 2.1: Main components of the digital caliper, including the LCD display, ON/OFF button, ZERO button, inch/mm conversion button, outside jaws, inside jaws, depth bar, and thumb roller.
- Outside Jaws: Used for measuring external dimensions.
- Inside Jaws: Used for measuring internal dimensions.
- Depth Bar: Extends from the end of the sliding jaw to measure depth.
- Step Measuring Faces: Used for measuring step dimensions.
- Main Scale: The fixed scale on the body of the caliper.
- Sliding Jaw: The movable part of the caliper.
- Thumb Roller: For fine adjustment of the sliding jaw.
- LCD Display: Shows the measurement readings.
- ON/OFF Button: Powers the caliper on or off.
- ZERO Button: Resets the display to zero at any position.
- Inch/MM Button: Toggles between inch and millimeter units.
- Battery Cover: Protects the battery compartment.
3. Setup and Battery Installation
Your Hyper Tough Digital Caliper comes with a 1.5V LR44 button cell battery. Follow these steps to install or replace the battery:
- Locate the battery cover on the back of the LCD display unit.
- Slide the battery cover open.
- Insert the 1.5V LR44 button cell battery with the positive (+) side facing up.
- Slide the battery cover back into place until it clicks securely.
The caliper is now ready for use. Press the ON/OFF button to power it on.
4. Operating Instructions
4.1 Basic Operation
- Power ON/OFF: Press the ON/OFF button to turn the caliper on or off. The display will show the current measurement or '0.00'.
- Zero Setting: To set the display to zero at any point, close the jaws completely and press the ZERO button. This is useful for relative measurements.
- Unit Conversion: Press the inch/mm button to switch between inches and millimeters. The selected unit will be displayed on the LCD.
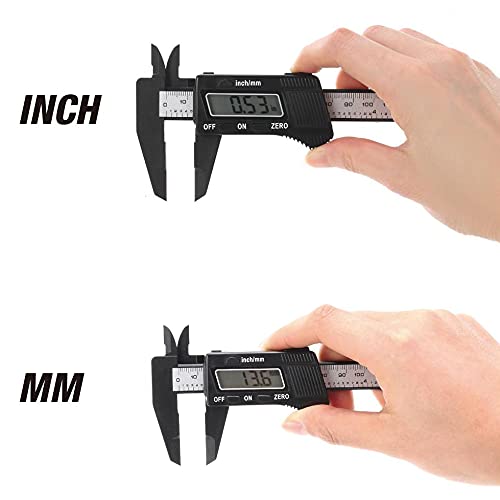
Figure 4.1: The caliper's LCD display showing measurements in inches (top) and millimeters (bottom).
4.2 Measuring Techniques
Ensure the caliper jaws are clean before taking measurements. Move the sliding jaw to open the caliper, position the object, and then gently close the jaws until they make contact.
4.2.1 Outside Measurement
Use the large outside jaws to measure external dimensions of objects.
- Open the outside jaws wider than the object.
- Place the object between the outside jaws.
- Gently close the jaws until they firmly contact the object.
- Read the measurement on the LCD display.

Figure 4.2: Measuring the outside diameter of a cylindrical object.
4.2.2 Inside Measurement
Use the small inside jaws to measure internal dimensions, such as the diameter of a hole or the width of a groove.
- Insert the inside jaws into the opening to be measured.
- Open the jaws until they firmly contact the inner surfaces.
- Read the measurement on the LCD display.

Figure 4.3: Measuring the inside diameter of a pipe.
4.2.3 Depth Measurement
Use the depth bar to measure the depth of holes, slots, or steps.
- Place the end of the main scale firmly on the top surface of the object.
- Extend the depth bar into the hole or slot until its end touches the bottom.
- Read the measurement on the LCD display.

Figure 4.4: Measuring the depth of a hole.
4.2.4 Step Measurement
Use the step measuring faces to measure the height of a step or shoulder on an object.
- Place the fixed step measuring face on the higher surface.
- Slide the movable jaw until its step measuring face rests on the lower surface.
- Read the measurement on the LCD display.

Figure 4.5: General operation of the caliper using the thumb roller for precise movement.
5. Care and Maintenance
Proper care will ensure the longevity and accuracy of your digital caliper:
- Cleaning: Wipe the caliper clean with a dry, soft cloth after each use. Avoid using solvents or harsh chemicals, as they may damage the nylon frame or electronic components.
- Storage: Store the caliper in a clean, dry place, away from direct sunlight, extreme temperatures, and high humidity. Keep the jaws closed when not in use to protect them.
- Battery Replacement: Replace the LR44 battery when the display becomes dim or erratic. Always dispose of used batteries responsibly.
- Avoid Impact: Do not drop the caliper or subject it to strong impacts, as this can affect its accuracy and functionality.
6. Troubleshooting
If you encounter issues with your digital caliper, refer to the following common problems and solutions:
- Display is blank or dim:
Solution: The battery may be low or depleted. Replace the 1.5V LR44 button cell battery. Ensure the battery is inserted with the correct polarity. - Readings are inconsistent or inaccurate:
Solution: Clean the measuring surfaces and the main beam thoroughly. Ensure there is no dust or debris obstructing the sliding mechanism. Press the ZERO button with the jaws closed to re-zero the caliper. - Sliding jaw is stiff or difficult to move:
Solution: Clean the main beam and the sliding mechanism. A small amount of silicone-based lubricant can be applied to the beam, but avoid getting it on the electronic components. - Caliper does not turn on:
Solution: Check battery installation and ensure it is a fresh battery. If the issue persists, contact customer support.
7. Product Specifications
Detailed specifications for the Hyper Tough 6-inch Digital Caliper:

Figure 7.1: Product specifications as listed on the packaging.
| Specification | Value |
|---|---|
| Model Number | TR33763B |
| Material | Nylon |
| Measurement Range | 0-6 inches (0-150 mm) |
| Resolution | 0.01 inch (0.1 mm) |
| Repeatability | 0.01 inch (0.1 mm) |
| Power Source | 1.5V LR44 Button Cell Battery |
| Operating Temperature | 32°F (0°C) - 104°F (40°C) |
| Storage Temperature | 14°F (-10°C) - 140°F (60°C) |
| Influence of Humidity | Up to 80% Non-Condensing |
| Package Dimensions | 28.6 x 10.4 x 2.4 cm; 84 g |
| UPC | 889526383466 |
8. Warranty and Support Information
Hyper Tough products are manufactured to high-quality standards. For specific warranty details and support, please refer to the warranty information provided with your purchase or visit the official Hyper Tough website.
For technical assistance or inquiries, please contact Hyper Tough customer service through their official channels.