
1. Introduction and Overview
The Dahua XVR1B08H-I is an 8-channel Cooper series Digital Video Recorder (DVR) featuring WizSense Artificial Intelligence technology. This DVR is designed to enhance security by significantly reducing false alarms and optimizing surveillance efficiency. It supports up to 8 HDCVI 5MP Lite channels and an additional 4 IP channels (up to 6MP maximum), incorporating intelligent encoding across all 8 channels.
Key features include Smart Motion Detection Plus (SMD Plus) for precise human and vehicle detection, and Smart H.265+ video compression for efficient storage and bandwidth usage.
2. Product Features
- Smart Motion Detection Plus (SMD Plus): This advanced feature significantly improves alarm accuracy by utilizing deep learning algorithms. It analyzes human and vehicle shapes based on motion detection, triggering alarms only when a person or vehicle is detected, thereby minimizing false alerts.
- AI Intelligent Video Encoding: The XVR1B08H-I's AI chip enables smart video encoding. It recognizes moving people and vehicles, dynamically reducing bandwidth when no human or vehicle activity is detected in the image.
- Smart H.265+ Compression: An optimized implementation of the H.265 codec, Smart H.265+ employs scene-adaptive encoding, dynamic GOP (Group of Pictures), dynamic ROI (Region of Interest), flexible multi-frame reference structure, and intelligent noise reduction. This technology delivers high-quality video while reducing bit rate and storage requirements by up to 70% compared to standard H.265.
- Long-Distance Transmission: The HDCVI system supports long-distance transmission over coaxial cable and UTP. It can transmit 4K/4MP video up to 700m, 1080p up to 800m, and 720p up to 1200m.
3. Physical Description and Dimensions
The Dahua XVR1B08H-I DVR is designed for compact installation. Below are the general dimensions and a visual representation of the unit.
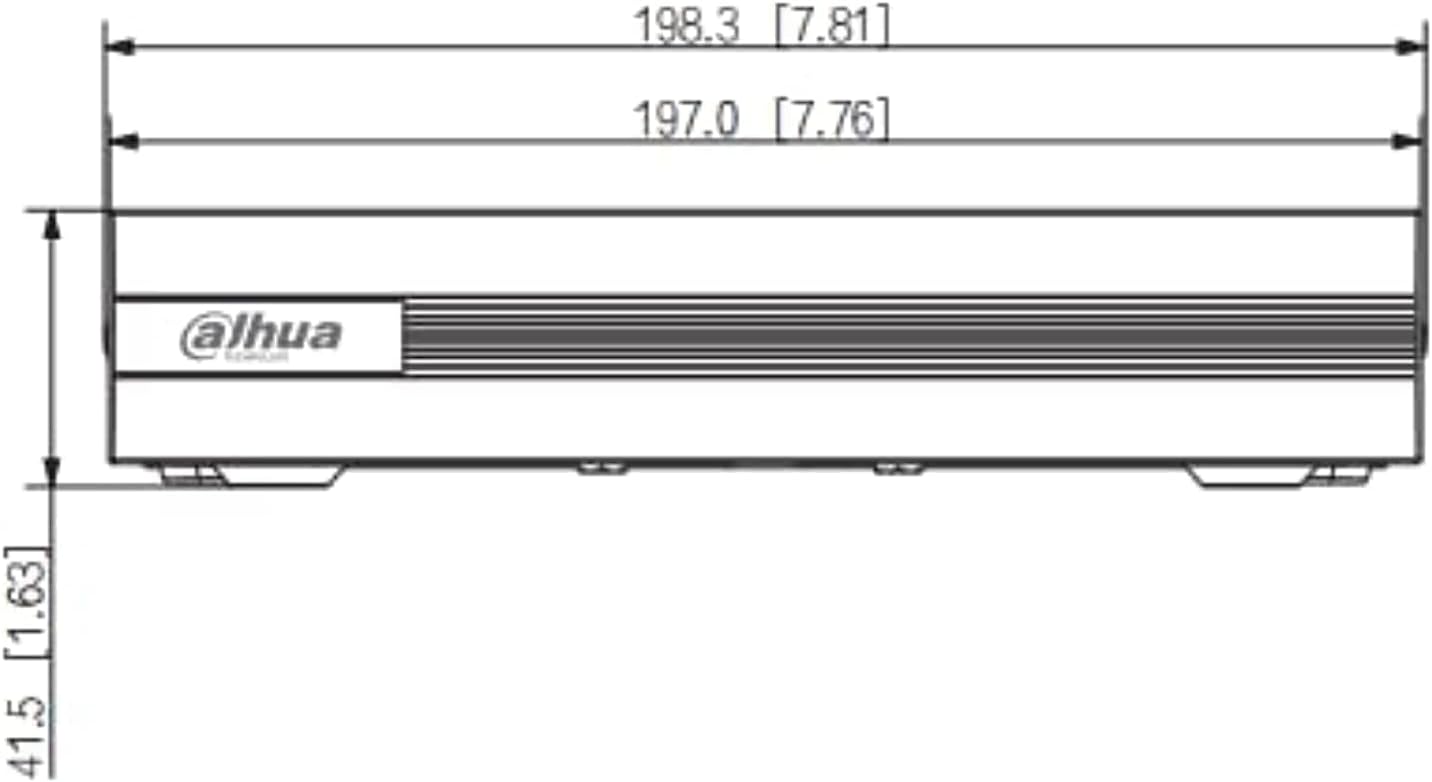
Figure 3.1: Front view of the Dahua XVR1B08H-I DVR.

Figure 3.2: Line drawing showing the dimensions of the DVR. The width is approximately 198.3 mm (7.81 inches), height is 41.5 mm (1.63 inches), and depth is 203.4 mm (8.01 inches).
4. Connections and Ports
The rear panel of the DVR provides various ports for connecting cameras, monitors, network, and power. Refer to the diagram below for port identification.

Figure 4.1: Rear panel connections of the DVR.
- VIDEO IN: BNC connectors for connecting HDCVI/Analog cameras.
- AUDIO IN (RCA Connector): Audio input for connecting an external microphone.
- VGA Port: Video output for connecting a VGA monitor.
- HDMI Port: High-Definition Multimedia Interface output for connecting an HDMI monitor or TV.
- USB Ports: For connecting a mouse, USB flash drive for backup, or other USB peripherals.
- Network Port: RJ-45 Ethernet port for network connection.
- Power Input: DC 12V power input for the DVR.
- Ground: Grounding terminal for electrical safety.
- AUDIO OUT (RCA Connector): Audio output for connecting external speakers or an amplifier.
5. Setup Instructions
5.1. Hard Drive Installation (Optional, HDD not included)
The DVR supports one SATA port for a hard drive up to 6TB. A hard drive is required for video recording and is not included with the DVR. Follow these steps to install a hard drive:
- Unplug the DVR from the power source.
- Remove the top cover of the DVR by unscrewing the retaining screws.
- Connect the SATA data cable and power cable to the hard drive.
- Secure the hard drive to the DVR chassis using the provided screws.
- Replace the top cover and secure it with the screws.
5.2. Initial Connection
- Connect your HDCVI/Analog cameras to the VIDEO IN BNC ports.
- Connect a monitor to the HDMI or VGA port.
- Connect the included mouse to one of the USB Ports.
- For network access and remote viewing, connect an Ethernet cable from the Network Port to your router or network switch.
- Connect the power adapter to the Power Input and then plug it into a power outlet.
- The DVR will power on automatically. Follow the on-screen instructions for initial setup, including setting up an administrator password and configuring network settings.
6. Operating Instructions
6.1. Live View
After startup, the DVR will display the live view of all connected cameras on the monitor. You can switch between single-camera view, multi-camera view, and other display modes using the on-screen interface or mouse controls.
6.2. Recording
Ensure a hard drive is installed and formatted. Recording can be configured for continuous, scheduled, or motion-triggered events. Access the 'Record' menu in the DVR's main interface to set up recording schedules and parameters for each channel.
6.3. Playback
To review recorded footage, navigate to the 'Playback' menu. Select the desired date, time, and camera channel. Use the playback controls (play, pause, fast forward, rewind) to navigate through the recordings.
6.4. Smart Motion Detection Plus (SMD Plus) Configuration
SMD Plus settings can be accessed through the 'AI' or 'Event' menu. Here you can enable SMD Plus for specific channels, adjust sensitivity, and configure alarm actions such as notifications or recording triggers. Ensure the detection area is properly defined to optimize performance.
6.5. Remote Access
For remote viewing via a mobile app or web browser, ensure the DVR is connected to the internet. Configure network settings (e.g., P2P, DDNS, port forwarding) in the 'Network' menu. Download the official Dahua mobile application (e.g., DMSS) and follow the app's instructions to add your device using its serial number or QR code.
7. Maintenance
- Cleaning: Regularly clean the exterior of the DVR with a soft, dry cloth. Do not use liquid cleaners or aerosols. Ensure ventilation openings are free from dust and obstructions.
- Firmware Updates: Periodically check the official Dahua website for firmware updates. Keeping the firmware updated ensures optimal performance, security, and access to new features. Follow the provided instructions carefully when performing updates.
- Data Backup: Regularly back up important video footage to an external USB drive or network storage to prevent data loss.
- Hard Drive Health: Monitor the health of the installed hard drive through the DVR's system information. Replace the hard drive if any errors or warnings are indicated.
8. Troubleshooting
- No Video Output:
- Check all video cable connections (HDMI/VGA) to the monitor and DVR.
- Ensure the monitor is powered on and set to the correct input source.
- Verify that cameras are properly connected and powered.
- No Recording:
- Confirm that a hard drive is installed and properly formatted.
- Check recording schedules and settings for each channel.
- Ensure the hard drive is not full.
- Network Connection Issues:
- Verify the Ethernet cable is securely connected to both the DVR and the router.
- Check network settings in the DVR's menu (IP address, gateway, DNS).
- Ensure your router is functioning correctly and has internet access.
- False Alarms (SMD Plus):
- Adjust the sensitivity settings for SMD Plus in the AI/Event menu.
- Ensure the camera view is clear and free from objects that might trigger false detections (e.g., swaying trees, reflections).
9. Specifications
| Feature | Specification |
|---|---|
| Model | DH-XVR1B08H-I |
| Brand | Dahua |
| Number of Channels | 8 HDCVI 5MP Lite + 4 IP (up to 6MP) |
| Connectivity Technology | Ethernet |
| Compatible Devices | Security Cameras |
| Storage Capacity (Max) | 6 TB (1 SATA Port) |
| Video Input Type | IP |
| USB Ports | 1 |
| Item Weight | 2 Kilograms |
| Manufacturer | DAHUA |
10. Warranty and Support
This Dahua XVR1B08H-I DVR comes with a 1-year warranty directly from the manufacturer. For technical support, warranty claims, or further assistance, please contact Dahua customer service or your authorized Dahua dealer. Keep your purchase receipt as proof of purchase for warranty purposes.


