
1. Introduction
This manual provides detailed instructions for the proper use and maintenance of your TOZTVXU V9 Digital Satellite Signal Finder. This device is designed to assist in the installation and alignment of satellite dishes, ensuring optimal signal reception. It features a 3.5-inch LCD display, supports Full HD DVB-S/S2 and H.265, and offers a user-friendly interface for efficient satellite setup.
Please read this manual thoroughly before operating the device to ensure safe and correct usage.
2. Safety Information
- Do not expose the device to rain or moisture to prevent electric shock or fire.
- Avoid placing the device near heat sources such as radiators, heat registers, stoves, or other apparatus that produce heat.
- Use only the power adapter supplied with the device. Using unauthorized adapters may damage the device and void the warranty.
- Do not attempt to open or repair the device yourself. Refer all servicing to qualified service personnel.
- Keep the device away from strong magnetic fields.
- Ensure proper ventilation around the device during operation.
3. Package Contents
Verify that all items listed below are included in your package:
- 1 x TOZTVXU V9 Digital Satellite Signal Finder
- 1 x AV Cable
- 1 x Car Charger Cable
- 1 x Power Adapter (DC12V / 1500mA)
- 1 x Carrying Bag
- 1 x User Manual (German & English)

Figure 3.1: Included accessories with the V9 Digital Satellite Signal Finder.
4. Product Overview
The TOZTVXU V9 Digital Satellite Signal Finder is a compact and portable device designed for easy satellite dish alignment. It features a 3.5-inch color LCD display and an intuitive button layout, offering a comprehensive solution for satellite installation.

Figure 4.1: Key features and front view of the V9 Satellite Signal Finder.
Key features include:
- 3.5-inch LCD Color Screen for live FTA picture and sound.
- Full DVB-S/S2 and H.265 compliant.
- Integrated 3000mA Lithium-ion battery for up to 4 hours of operation.
- Support for AV in and AV/HDMI out functions.
- LED display for 13V/18V/LOCK status.
- Software upgradeable via USB.
4.2 Front Panel and Controls
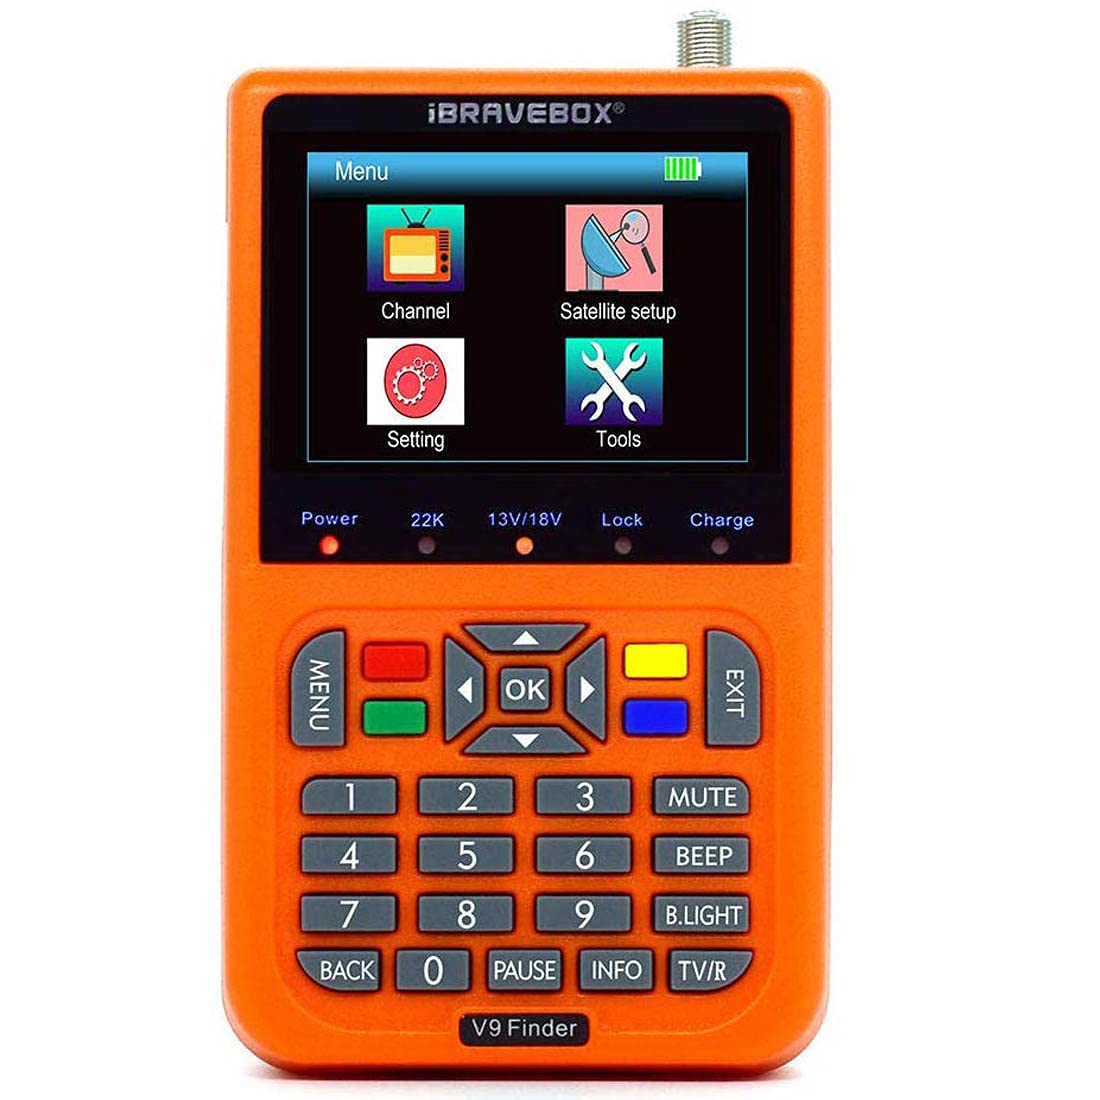
Figure 4.2: Front view of the V9 Satellite Signal Finder with control layout.
The front panel includes the 3.5-inch LCD screen, navigation buttons, numeric keypad, and function buttons. Key indicators for Power, 22K, 13V/18V, Lock, and Charge status are also present.
- LCD Display: 3.5-inch color screen for viewing menus, signal strength, and live FTA picture.
- MENU Button: Accesses the main menu.
- OK Button: Confirms selections or enters sub-menus.
- EXIT Button: Returns to the previous menu or exits current function.
- Arrow Buttons (Up/Down/Left/Right): Navigate through menu options.
- Numeric Keypad (0-9): For entering values or selecting channels.
- MUTE: Mutes audio output.
- BEEP: Toggles the signal lock beep sound.
- B.LIGHT: Adjusts backlight brightness.
- PAUSE: Pauses live video.
- INFO: Displays channel or signal information.
- TV/R: Switches between TV and Radio channels.
4.3 Side Panels and Ports

Figure 4.3: Left side view with LNB IN and Power Switch.
- LNB IN: Connects to the LNB (Low Noise Block) of your satellite dish.
- Power Switch: Turns the device ON/OFF.

Figure 4.4: Right side view with various input/output ports.
- DV OUT (HDMI): Connects to an external display for larger viewing.
- AV OUT: Analog video/audio output.
- AV IN: Analog video/audio input.
- USB Port: For software updates and media playback.
- DC IN: Power input for charging the device.
5. Setup
5.1 Charging the Device
Before first use, fully charge the device. Connect the supplied power adapter to the DC IN port on the side of the device and plug it into a power outlet. The "Charge" indicator LED will illuminate. A full charge typically takes approximately 4 hours and provides up to 4 hours of normal operation.
5.2 Initial Power On
Slide the Power Switch to the ON position. The device will boot up and display the main menu on the LCD screen.

Figure 5.1: Main Menu Interface.
5.3 Language Selection
From the Main Menu, navigate to Setting, then select System, and finally Language. Use the arrow buttons to select your preferred language (English, German, French, Portuguese, Spanish, Italian, Russian, Turkish, Polish, Arabic) and press OK to confirm.

Figure 5.2: System Menu with Language Option.
6. Operating Instructions
6.1 Satellite Installation
This section guides you through aligning your satellite dish using the V9 finder.
- Connect your LNB cable from the satellite dish to the LNB IN port on the V9 device.
- From the Main Menu, select Satellite Setup and press OK.
- In the Satellite Installation menu, select the desired satellite from the list. If your satellite is not listed, you may need to add it or edit an existing one.
- Adjust parameters such as LNB Freq, DiSEqC settings (DiSEqC1.0, DiSEqC1.1), 22K, and LNB Power according to your satellite system requirements.
- Select a Transponder from the list. You can add, edit, or delete transponders as needed.
- Observe the Signal Intensity and Signal Quality bars. Adjust your satellite dish's azimuth, elevation, and LNB skew until both bars show high values, indicating a strong and clear signal. The "LOCK" LED on the front panel will illuminate when a signal is locked.
- Once the signal is optimized, you can perform a channel scan by selecting Scan.
Figure 6.1: Satellite Installation Interface.
6.2 Channel Management
After scanning, you can manage your channels.
- From the Main Menu, select Channel and press OK.
- You can choose to view TV Channel List or Radio Channel List.
- The device supports various channel editing functions:
- Favorite: Organize channels into 8 different favorite groups.
- Move: Rearrange channel order.
- Lock: Protect channels with a password.
- Skip: Skip unwanted channels during browsing.
- Delete: Remove channels.
- Rename: Change channel names.
- Search: Find specific channels.
- Sort: Sort channels by various criteria.
- The device automatically saves the last viewed channel.

Figure 6.2: Channel List Interface.
6.3 System Settings
Access system-wide configurations from the Setting menu.
- Language: As described in Section 5.3.
- AV Setting: Configure audio/video output preferences.
- Local Time Setting: Set the correct time and date.
- OSD Setting: Adjust On-Screen Display parameters like transparency and duration.
- Favorite: Manage favorite channel groups.
- Other: Access additional system options.
6.4 Software Update
The device's software can be updated via the USB port. Download the latest firmware from the official TOZTVXU website (if available) and follow the instructions provided with the firmware package. Typically, this involves placing the firmware file on a USB drive and selecting the update option from the Tools menu.
7. Maintenance
7.1 Cleaning
Wipe the device with a soft, dry cloth. Do not use liquid cleaners or aerosol cleaners, as they may damage the finish or internal components.
7.2 Battery Care
- To prolong battery life, avoid fully discharging the battery frequently.
- If the device will not be used for an extended period, charge it to about 50% and store it in a cool, dry place. Recharge every 3-6 months.
- Do not expose the battery to extreme temperatures.
8. Troubleshooting
| Problem | Possible Cause | Solution |
|---|---|---|
| Device does not power on. | Battery is discharged. Power switch is OFF. | Charge the device using the supplied adapter. Ensure the power switch is in the ON position. |
| No signal or weak signal. | LNB cable not connected properly. Dish not aligned correctly. Incorrect satellite parameters (LNB Freq, DiSEqC). | Check LNB cable connection to the device and LNB. Re-align the satellite dish using the signal intensity and quality meters. Verify satellite parameters in the Satellite Installation menu. |
| No picture/sound on external display. | AV/HDMI cable not connected. Incorrect AV settings. | Ensure AV/HDMI cable is securely connected to both devices. Check AV settings in the System menu. |
| Software update fails. | Incorrect firmware file. USB drive not formatted correctly. | Ensure you are using the correct firmware for your model. Format USB drive to FAT32. |
9. Specifications
| Feature | Description |
|---|---|
| Display | 3.5-inch Color LCD, 16-bit OSD with anti-flicker |
| DVB Compliance | Full HD DVB-S / S2 and H.265 compliant |
| Processor | 64 MB Serial Flash, 1 GB DDR3 Memory |
| Channel Capacity | 6000 channels (TV and Radio) programmable |
| Demodulator | QPSK (S); QPSK, 8PSK, 16APSK, 32APSK (S2) |
| Modulation Range | 2 Mbit/s ~ 45 Mbit/s |
| SCPC & MCPC | Capable |
| Output Interface | LNB IN * 1, DV OUT (HDMI up to 1080P), AV OUT, AV IN, USB |
| Power Supply | DC12V / 1500mA (Input 100V ~ 240V, 50/60Hz) |
| Battery | 3000mA Lithium-ion, up to 4 hours normal work |
| OSD Language | English, German, French, Portuguese, Spanish, Italian, Russian, Turkish, Polish, Arabic |
| Additional Features | Automatic PAL/NTSC conversion, 13V/18V/LOCK status panel LED display, Software update via USB |
10. Warranty and Support
TOZTVXU products are manufactured to high quality standards. For warranty information and technical support, please refer to the warranty card included with your product or visit the official TOZTVXU website. Please retain your proof of purchase for any warranty claims.
For further assistance, contact TOZTVXU customer service.