Introduction
This manual provides essential information for the safe and efficient use of your Hotpoint HIC 3O33 WLEG fully integrated dishwasher. Please read these instructions carefully before installation and operation, and retain them for future reference. Proper installation, operation, and maintenance will ensure optimal performance and longevity of your appliance.
Safety Information
Always follow basic safety precautions when using electrical appliances to reduce the risk of fire, electric shock, and injury to persons. This appliance is intended for household use only.
- Ensure the appliance is properly earthed.
- Do not operate the dishwasher if it is damaged.
- Keep children away from the appliance, especially when the door is open.
- Only use detergents and rinse aids specifically designed for dishwashers.
- Sharp items should be loaded with points down to prevent injury.
- Do not touch the heating element during or immediately after use.
Installation
The Hotpoint HIC 3O33 WLEG is a fully integrated dishwasher designed to be installed within kitchen cabinetry. Professional installation is recommended to ensure correct plumbing and electrical connections.
Dimensions and Placement
Refer to the diagram below for precise dimensions and required cabinet space. Ensure adequate ventilation and access for maintenance.
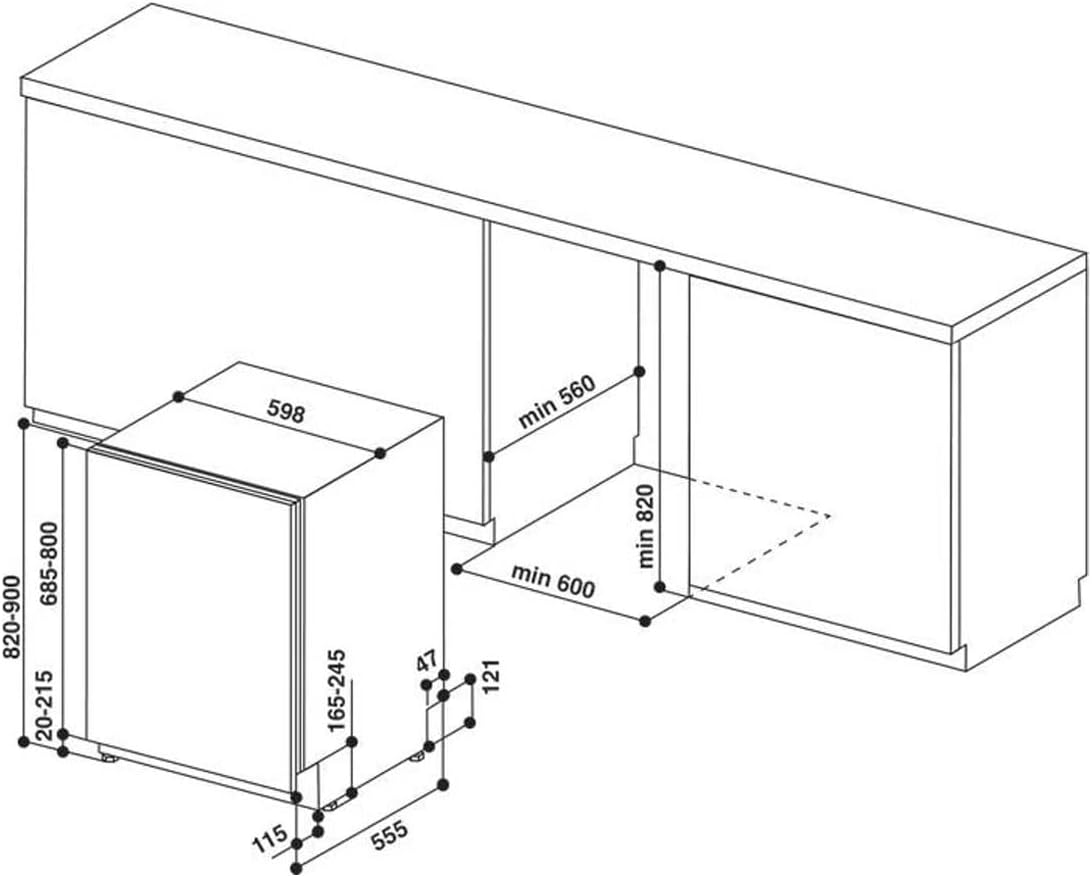
Image Description: A technical line drawing illustrating the dimensions and required cabinet space for the Hotpoint HIC 3O33 WLEG fully integrated dishwasher. Key measurements are provided in millimeters, showing the appliance's width (598mm), height range (820-900mm), and depth (555mm), along with specific clearances for installation within a kitchen unit. This diagram is crucial for proper planning and fitting of the appliance.
- Product Dimensions (L x W x H): 55.5 x 59.8 x 82 cm
- Weight: 35.5 kg
- Ensure the floor is level and capable of supporting the appliance's weight.
- Connect the water inlet hose to a cold water supply with a minimum pressure of 0.04 MPa and a maximum of 1 MPa.
- Connect the drain hose to a suitable drain pipe, ensuring it is not kinked or obstructed.
- Plug the appliance into a properly earthed electrical outlet.
Operating Instructions
Familiarize yourself with the control panel and basic operations before first use.
Control Panel Overview

Image Description: A detailed close-up view of the control panel for the Hotpoint HIC 3O33 WLEG dishwasher. The panel features various buttons and indicator lights, including a power button, program selection button (P), a digital display, and indicators for salt, rinse aid, and different wash cycles. The Hotpoint brand logo is prominently displayed in the center. This image helps users identify and understand the functions of each control element.
- Power Button: Turns the dishwasher on or off.
- Program Selector (P): Press to cycle through available wash programs.
- Digital Display: Shows program number, remaining time, or error codes.
- Delayed Start Button: Allows you to postpone the start of a wash cycle.
- Salt Indicator: Illuminates when the salt reservoir needs refilling.
- Rinse Aid Indicator: Illuminates when the rinse aid dispenser needs refilling.
Initial Setup and Loading
- Filling the Salt Dispenser: Unscrew the cap of the salt dispenser located at the bottom of the wash tub. Use a funnel to add dishwasher salt until the reservoir is full. Replace the cap tightly. The salt indicator will turn off after a few cycles.
- Filling the Rinse Aid Dispenser: Open the rinse aid dispenser cover, usually located next to the detergent dispenser. Fill with rinse aid up to the maximum level indicator. Close the cover securely. The rinse aid indicator will turn off after a few cycles.
- Loading Dishes:
- Scrape off large food particles from dishes.
- Place larger items in the lower rack and smaller, delicate items in the upper rack.
- Ensure dishes do not block the spray arms.
- Load cutlery into the cutlery basket with handles down for forks and spoons, and handles up for knives to prevent injury.

Image Description: The Hotpoint HIC 3O33 WLEG fully integrated dishwasher with its door open, revealing the interior racks. The upper and lower racks are visible, designed for efficient loading of various dishware. The control panel is also visible along the top edge of the door. This image demonstrates the internal layout and capacity of the dishwasher.
Starting a Wash Cycle
- Load the dishwasher and add detergent to the dispenser.
- Press the Power button to turn on the appliance.
- Press the Program Selector (P) repeatedly to choose your desired wash program. The program number will appear on the digital display.
- If desired, press the Delayed Start button to set a delay time.
- Close the dishwasher door firmly. The cycle will start automatically.
Maintenance
Regular maintenance ensures the efficient operation and extends the lifespan of your dishwasher.
Cleaning the Filters
- The filter system, located at the base of the wash tub, should be cleaned regularly (e.g., weekly).
- Twist the cylindrical filter counter-clockwise and lift it out.
- Remove the fine filter and the coarse filter.
- Rinse all filter components under running water to remove food particles. Use a soft brush if necessary.
- Reassemble the filters in reverse order, ensuring they are securely seated.
Cleaning the Spray Arms
Check the spray arm nozzles for blockages regularly. If blocked, remove the spray arms and clear the holes with a thin object.
Cleaning the Interior and Exterior
- Wipe the exterior surfaces with a soft, damp cloth. Do not use abrasive cleaners.
- Clean the door seal regularly to remove food residue.
- Run a dishwasher cleaning cycle periodically using a specialized dishwasher cleaner.
Winterization (for non-use in cold environments)
- If the dishwasher will be left in an unheated location during winter, disconnect the water supply and drain all water from the inlet hose and the appliance.
- Run a short cycle with antifreeze solution if recommended by a professional.
Troubleshooting
Before contacting customer service, consult the following table for common issues and their solutions.
| Problem | Possible Cause | Solution |
|---|---|---|
| Dishwasher does not start | Power cord not plugged in; Door not closed properly; Fuse blown; Water supply turned off. | Check power connection; Ensure door is latched; Check household fuse/breaker; Turn on water supply. |
| Poor cleaning results | Incorrect program selected; Spray arms blocked; Filters clogged; Insufficient detergent; Improper loading. | Select appropriate program; Clean spray arms; Clean filters; Add correct amount of detergent; Reload dishes correctly. |
| Water not draining | Drain hose kinked or blocked; Filters clogged; Drain pump fault. | Check and clear drain hose; Clean filters; Contact service if pump fault suspected. |
| Salt/Rinse Aid indicator remains on | Reservoir empty; Sensor fault. | Refill salt/rinse aid; If indicator persists after a few cycles, contact service. |
Specifications
Key technical specifications for the Hotpoint HIC 3O33 WLEG dishwasher.
| Feature | Detail |
|---|---|
| Model Name | HIC 3O33 WLEG |
| Brand | Hotpoint |
| Type of Installation | Integrated |
| Product Dimensions (L x W x H) | 55.5 x 59.8 x 82 cm |
| Item Weight | 35.5 kg |
| Place Settings Capacity | 14 place settings |
| Water Consumption (per cycle) | 9.5 Liters (approximate, depending on program) |
| Noise Level | 43 Decibels |
| Special Features | Timer, Delayed Start; Salt Indicator; Rinse Aid Indicator |
| Control Type | Front Control |
| Material | Stainless Steel |
| Energy Efficiency Rating | D |
Warranty and Support
For warranty information, technical support, or to schedule a service appointment, please refer to the warranty card included with your appliance or visit the official Hotpoint website.
Hotpoint Official Website: www.hotpoint.eu
Please have your model number (HIC 3O33 WLEG) and serial number ready when contacting support.


