1. Introduction
Thank you for purchasing the ORIA LED Digital Alarm Clock. This manual provides essential information for the proper setup, operation, and maintenance of your new alarm clock. Please read these instructions carefully before use and retain them for future reference.

Image 1: Front view of the ORIA LED Digital Alarm Clock.
2. Safety Information
- Do not expose the device to extreme temperatures, direct sunlight, or high humidity.
- Avoid dropping or subjecting the device to strong impacts.
- Use only the provided USB cable for power.
- If using AAA batteries, ensure correct polarity and replace all batteries simultaneously.
- Keep out of reach of children.
3. Package Contents
- 1 x ORIA LED Digital Alarm Clock
- 1 x USB Cable
- 1 x User Manual

Image 2: The ORIA LED Digital Alarm Clock with its included USB cable and user manual.
4. Product Overview
The ORIA LED Digital Alarm Clock features a large display and intuitive controls located on the back of the unit.
4.1. Button Functions
- DOWN Button: Decreases values during setting, adjusts brightness.
- UP Button: Increases values during setting, adjusts brightness.
- LIGHT/SNOOZE Button: Activates snooze during alarm, adjusts brightness.
- MODE Button: Switches between display modes, enters setting states.
- ALARM Button: Displays alarm mode, turns alarm on/off, enters alarm setting.

Image 3: Rear view of the alarm clock highlighting the control buttons.
4.2. Power Supply
The clock supports dual power supply options:
- USB Power Supply: Connect the provided USB cable to a 5V 1A USB adapter (not included) or a USB port. The display will remain continuously on.
- AAA Batteries (3 required, not included): Provides time memory function and power saving mode. In battery-only mode, the screen will automatically turn off after 16 seconds to conserve power. It can be activated by sound (e.g., clap) or touch.
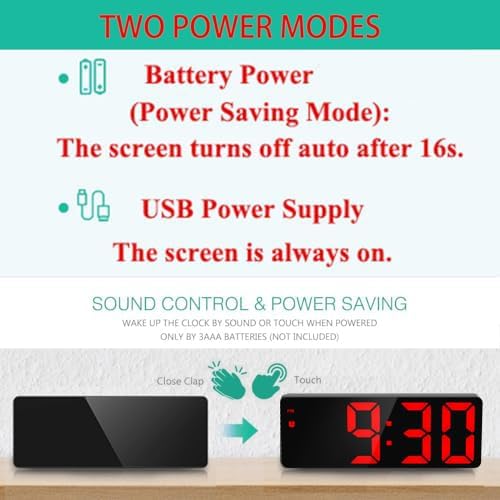
Image 4: Illustration of the two power modes and sound control feature.
5. Setup and Operation
5.1. Initial Power On
Connect the USB cable to the DC-IN port on the back of the clock and plug it into a power source. If using batteries, insert 3 AAA batteries into the battery compartment.
5.2. Time Setting
- Press the MODE button to enter Clock mode.
- Long press the MODE button to enter the setting state.
- Use the UP or DOWN buttons to adjust the 12/24 hour format. Press MODE to confirm.
- Use the UP or DOWN buttons to adjust the hour. Press MODE to confirm.
- Use the UP or DOWN buttons to adjust the minute. Press MODE to confirm and exit time setting.
5.3. Date Setting
- Press the MODE button repeatedly until you enter Date mode.
- Long press the MODE button to enter the setting state.
- Use the UP or DOWN buttons to adjust the year. Press MODE to confirm.
- Use the UP or DOWN buttons to adjust the month. Press MODE to confirm.
- Use the UP or DOWN buttons to adjust the day. Press MODE to confirm and exit date setting.
5.4. Alarm Setting
- Single press the ALARM button to display the alarm clock mode.
- In alarm mode, single press the ALARM button to toggle the alarm ON/OFF.
- Long press the ALARM button to enter the alarm setting.
- Use the UP or DOWN buttons to adjust the alarm hour. Press ALARM to confirm.
- Use the UP or DOWN buttons to adjust the alarm minute. Press ALARM to confirm.
- Use the UP or DOWN buttons to set the snooze time (1-60 minutes). Default is 5 minutes. Press ALARM to confirm.
- Use the UP or DOWN buttons to select the weekday alarm mode:
- 1-7: Everyday
- 1-6: Monday to Saturday
- 1-5: Monday to Friday

Image 5: The three working day alarm modes.
5.5. Snooze Function
When the alarm sounds, press the LIGHT/SNOOZE button to activate the snooze function. The alarm will sound again after the set snooze interval (1-60 minutes). The alarm ringing time is 1 minute, with a gradually strengthening sound pattern: first 'di', then 'didi', then 'dididi', and finally a continuous 'di'.
5.6. Brightness Adjustment
The clock offers 3 adjustable brightness levels. You can adjust the brightness manually or set it to automatically adjust during night mode.
- Manual Adjustment: Press the LIGHT/SNOOZE button to cycle through brightness levels (Bright, Medium, Low).
- Night Mode: The clock can automatically switch to low brightness between 18:00 and 6:00. To activate/deactivate Night Mode, press the MODE button until 'Night mode ON/OFF' is displayed, then use UP/DOWN to select.

Image 6: Visual representation of the adjustable brightness settings.
5.7. Cycle Display Function (Time, Date, Temperature)
To enable automatic cycling through time, date, and temperature displays:
- Press the MODE button until you are in Temperature mode.
- Long press the MODE button. You will hear a 'Bi' sound, indicating the cycle display is activated. The display will show time for 10 seconds, then date for 3 seconds, then temperature for 3 seconds, and repeat.
- To display only the time continuously, long press the MODE button again.
5.8. Smart Voice Control (Battery Mode Only)
When powered by AAA batteries only, the screen will turn off after 16 seconds to save power. You can activate the display by making a sound (e.g., a tap or clap) or by touching the clock.
Video 1: A demonstration of the ORIA LED Digital Alarm Clock's various functions, including time setting, alarm setting, night mode, and temperature display.
6. Maintenance
- Clean the clock with a soft, dry cloth. Do not use abrasive cleaners or solvents.
- Ensure the USB port and battery compartment are free from dust and debris.
- If the clock will not be used for an extended period, remove the AAA batteries to prevent leakage.
7. Troubleshooting
- Display is off: If powered by batteries, the screen automatically turns off after 16 seconds to save power. Tap or clap to activate. If powered by USB, ensure the cable is securely connected and the power source is active.
- Alarm not sounding: Check if the alarm is enabled (alarm icon displayed). Verify the alarm time is set correctly.
- Incorrect time/date: Follow the time and date setting instructions carefully. Ensure the 12/24 hour format is set as desired.
- Buttons unresponsive: Disconnect power and remove batteries for a few minutes, then reconnect. If the issue persists, contact customer support.
8. Specifications
| Display Type | Digital LED |
| Display Size | 6.5 inches |
| Brightness Levels | 3 Adjustable |
| Time Display Format | 12/24 hours |
| Snooze Function | Adjustable 5-60 minutes |
| USB Output | 5V 1A (for charging external devices) |
| Night Mode | Automatic low brightness (18:00 - 6:00) |
| Power Source | Corded Electric (USB) / 3 x AAA Batteries |
| Product Dimensions | 6.3"W x 2.36"H |
| Model Number | OUS-WA33R |

Image 7: Dimensions of the ORIA LED Digital Alarm Clock.
9. Warranty and Support
For warranty information or technical support, please refer to the product packaging or contact ORIA customer service directly. Keep your purchase receipt for any warranty claims.


