
HSHa FJ-PQJ-B AFY US-1
HSHa Power Paint Sprayer User Manual
Model: FJ-PQJ-B AFY US-1
Introduction
This user manual provides detailed instructions for the safe and efficient operation, maintenance, and troubleshooting of your HSHa Power Paint Sprayer. Please read this manual thoroughly before first use and keep it for future reference.

Image: A person holding and operating the HSHa Power Paint Sprayer, demonstrating its handheld design and power cord connection.
Safety Instructions
WARNING: Always follow basic safety precautions when using this electric paint sprayer to reduce the risk of fire, electric shock, and personal injury.
- Read all instructions before operating the sprayer.
- Wear appropriate personal protective equipment (PPE) including safety glasses, gloves, and a respirator.
- Ensure the work area is well-ventilated to prevent the accumulation of flammable vapors.
- Do not spray near open flames, pilot lights, or other ignition sources.
- Always disconnect the power supply before cleaning, adjusting, or servicing the sprayer.
- Keep children and pets away from the work area.
- Use only paints and materials compatible with the sprayer. Refer to paint manufacturer's instructions for thinning and compatibility.
- Do not immerse the motor unit in water or other liquids.
- Inspect the power cord for damage before each use. Do not use if damaged.
Product Components
Familiarize yourself with the various parts of your HSHa Power Paint Sprayer:

Image: Labeled diagram of the HSHa Power Paint Sprayer showing key components such as Jet outlet, Adjustment button, Disassembly switch, Air inlet, Electric switch + flow adjustment button, Comfortable handle, Power cord, and 800ML PVC container cup.
- Jet Outlet: Where paint exits the sprayer.
- Adjustment Button: Controls the spray pattern.
- Disassembly Switch: Releases the front section for cleaning.
- Air Inlet: Where air is drawn into the motor.
- Electric Switch + Flow Adjustment Button: Activates the sprayer and controls paint flow.
- Comfortable Handle: Ergonomic grip for user comfort.
- Power Cord: Connects the sprayer to an electrical outlet.
- 800ML PVC Container Cup: Holds the paint material.
Specifications
| Specification | Value |
|---|---|
| Model | FJ-PQJ-B AFY US-1 |
| Dimensions (L x W x H) | 26 x 17 x 20 cm |
| Weight | 1.4 kg |
| Nominal Power | 550 W |
| EU Voltage / Frequency | 230V / 50HZ |
| UL Voltage / Frequency | 110V / 60HZ |
| Nominal Speed | 32000 RPM |
| Air Flow | 160 L/MIN |
| Color Flow | 100-450 ml/min |
| Spray Distance | 200-250 MM |
| Spray Width | 200-300 MM |
| Viscosity (Max) | 8-12 seconds (using funnel) |
| Container Capacity | 800 ML |
| Wire Length | 2.0 M |
| Material | Metal |
Setup
1. Paint Preparation and Viscosity Check
Proper paint preparation is crucial for optimal spraying results and to prevent clogging. Always follow the paint manufacturer's instructions for thinning.
- Stir the paint thoroughly.
- If thinning is required, use the appropriate thinner (e.g., water for latex, mineral spirits for oil-based paints) as recommended by the paint manufacturer.
- Use the included funnel to check the paint's viscosity. The paint should flow through the funnel smoothly within 8-12 seconds. If it flows too slowly, add more thinner and re-test.
- Strain the paint through a paint strainer or cheesecloth to remove any lumps or debris that could clog the nozzle.
2. Assembly
- Ensure the sprayer is unplugged from the power source.
- Fill the 800ML PVC container cup with the prepared paint. Do not overfill.
- Screw the container cup firmly onto the sprayer body.
- Ensure the desired nozzle is securely in place. The sprayer comes with four nozzles to meet different painting requirements.
Operating Instructions
1. Adjusting Spray Patterns
The sprayer offers three different spray patterns for various applications:
- Circular (45°): Ideal for small areas, corners, and round objects.
- Horizontal (90°): Best for vertical surfaces, providing a wide horizontal spray.
- Vertical (180°): Best for horizontal surfaces, providing a wide vertical spray.
To change the spray pattern, rotate the adjustment button (jog wheel) on the front of the sprayer to align the nozzle with the desired pattern icon.
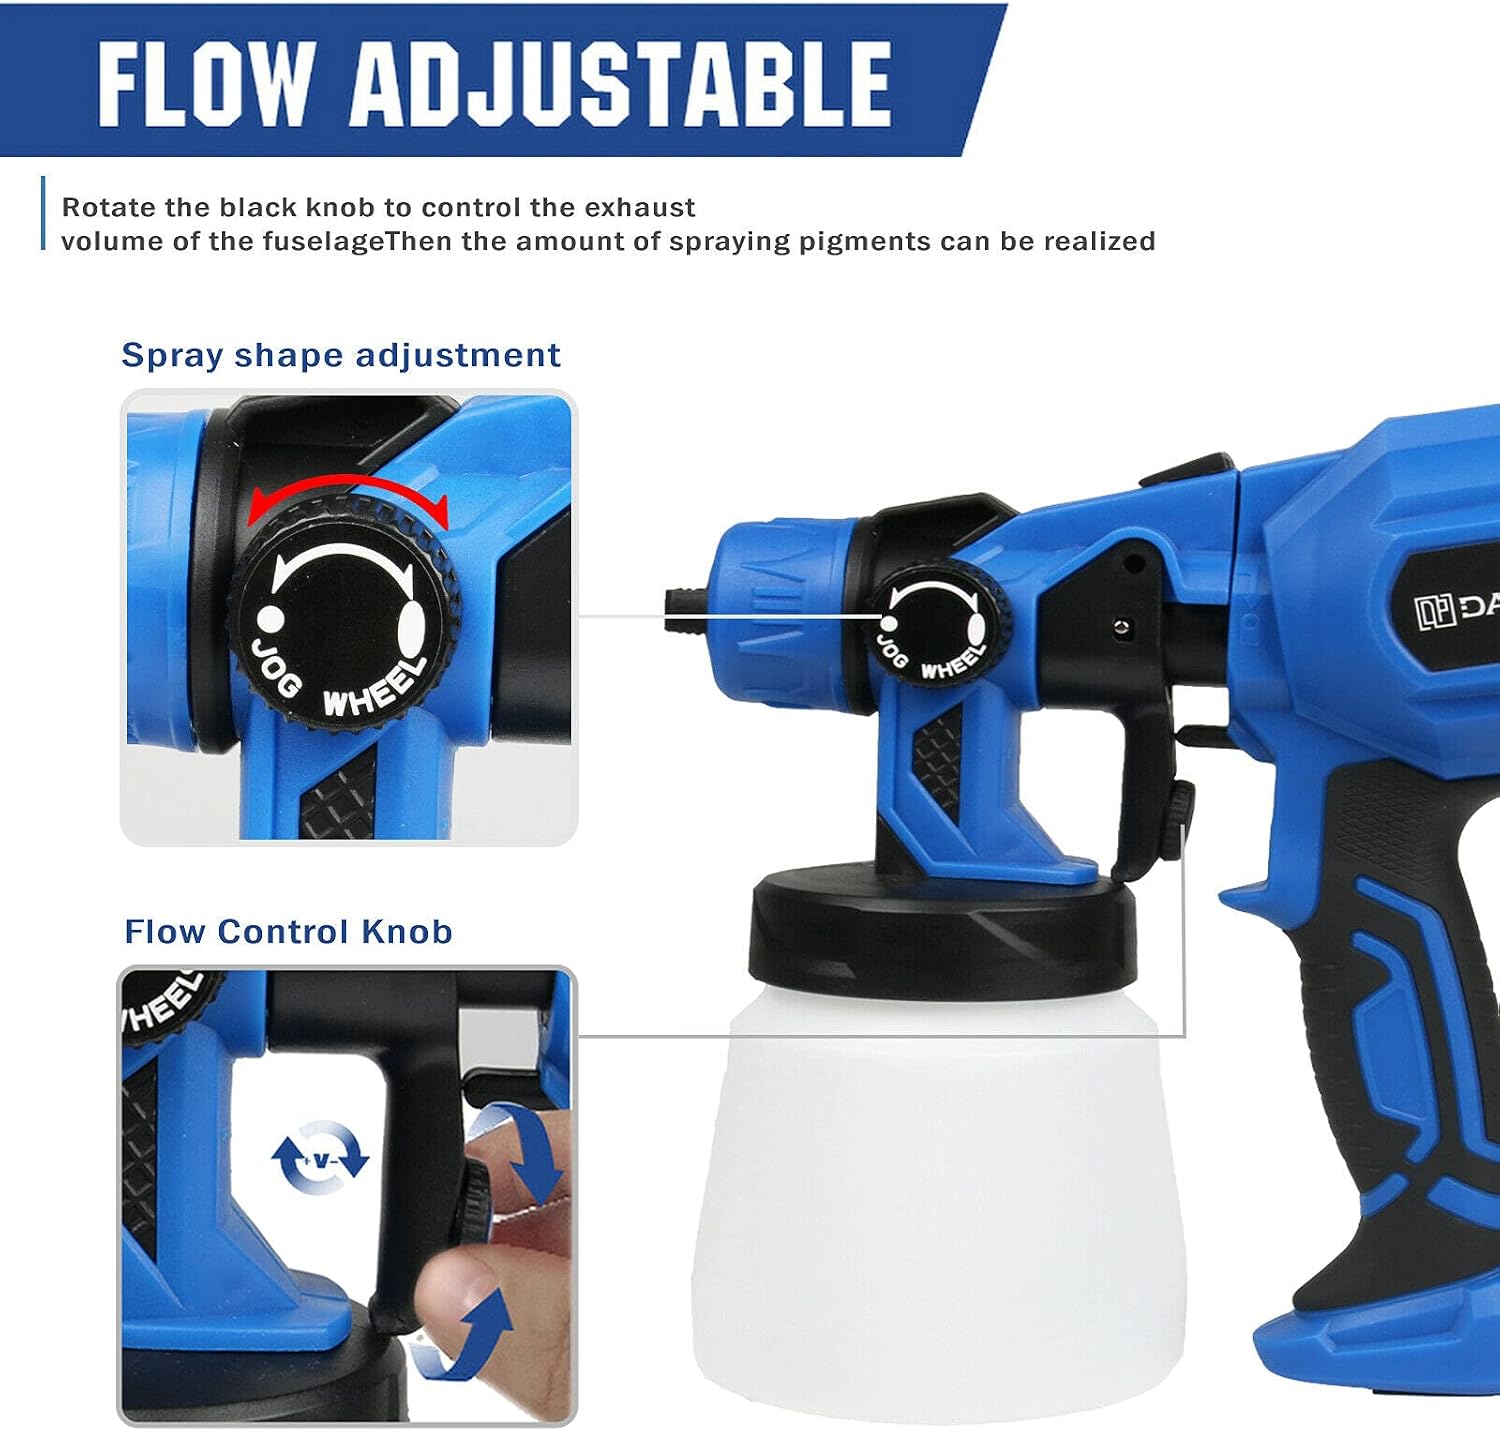
Image: A composite image illustrating how to adjust the spray shape by rotating the nozzle and how to control the flow rate using the flow control knob on the trigger.
2. Adjusting Flow Rate
The flow rate can be adjusted to control the amount of paint being sprayed. This is done via the valve knob located near the trigger. Rotate the knob to increase or decrease the flow. There are markers on the side of the knob to assist with precise adjustments.
3. Spraying Technique
For uniform coverage, maintain a consistent distance (200-250mm) from the surface and move the sprayer at a steady pace. Overlap each pass slightly to ensure complete coverage.

Image: The HSHa Power Paint Sprayer in action, demonstrating uniform paint application on a white chair, highlighting the "Spraying Uniformity" feature.
4. Applications
This paint sprayer is versatile and suitable for various painting tasks, including:
- Indoor and outdoor walls
- Furniture (chairs, tables, cabinets)
- Fences and decks
- Metal surfaces
- Automotive parts (e.g., car body)
- Wooden products

Image: A collage showing various applications of the paint sprayer, including cars, wooden products, furniture, skateboards, bicycles, and chairs, illustrating its "Wide Application" capability.
Maintenance and Cleaning
Regular cleaning and maintenance will extend the life of your paint sprayer and ensure consistent performance.
1. Disassembly for Cleaning
The sprayer is designed for easy disassembly to facilitate thorough cleaning:
- Disconnect Power: Always unplug the sprayer from the power outlet before cleaning.
- Remove Container: Unscrew the paint container cup from the sprayer body. Empty any remaining paint.
- Separate Front Section: Press the housing switch (disassembly switch) and pull out the front spray attachment.
- Remove Nozzle: Loosen the nozzle cap and remove the nozzle and nozzle cap adjustment wheel.

Image: A diagram illustrating the simple disassembly process of the paint sprayer, showing how to remove the nozzle cap, nozzle, and separate the gun body from the container for cleaning.
2. Cleaning Process
- Clean all disassembled parts immediately after use.
- Use the appropriate cleaning solution for the type of paint used (e.g., water for latex, mineral spirits for oil-based paints).
- Thoroughly clean the paint container, suction tube, nozzle, and spray head.
- Use the included cleaning brush and needle to clear any paint residue from the nozzle and other small openings.
- Wipe down the exterior of the motor unit with a damp cloth. Do not submerge the motor unit.
- Ensure all parts are completely dry before reassembly.
3. Storage
Store the cleaned and reassembled paint sprayer in a dry, cool place, away from direct sunlight and extreme temperatures. Keep it out of reach of children.
Troubleshooting
| Problem | Possible Cause | Solution |
|---|---|---|
| Sprayer does not turn on. | No power supply; damaged cord; faulty switch. | Check power connection; inspect cord for damage; contact support if switch is faulty. |
| No paint spray or weak spray. | Clogged nozzle; paint too thick; empty container; suction tube blocked. | Clean nozzle; thin paint to correct viscosity; refill container; clear suction tube. |
| Uneven spray pattern. | Partially clogged nozzle; incorrect spray pattern setting; inconsistent spraying technique. | Clean nozzle thoroughly; adjust spray pattern correctly; practice consistent movement. |
| Paint drips or leaks. | Loose connections; damaged seals; over-thinning paint. | Tighten all connections; inspect and replace damaged seals; adjust paint viscosity. |
| Motor runs but no paint. | Suction tube not immersed in paint; air leak in system; clogged filter. | Ensure tube is in paint; check for tight seals; clean or replace air filter. |
Warranty and Support
For warranty information or technical support, please contact HSHa customer service. Keep your purchase receipt as proof of purchase. Contact details can typically be found on the product packaging or the manufacturer's official website.
Ask a question about this manual
Ask about setup, troubleshooting, compatibility, parts, safety, or missing instructions. Manuals+ will review the question and use this page’s manual context to help answer it.