Product Overview
The SANUS VLT7-B2 Tilting TV Wall Mount is designed to securely hold 42" to 90" televisions, offering a low-profile and universal design. This mount provides advanced tilting and swiveling capabilities to optimize your viewing experience and reduce screen glare. Its robust construction ensures stability and ease of use for a seamless home entertainment setup.

Figure 1: Front view of the SANUS VLT7-B2 Tilting TV Wall Mount.
Key Features
- Extended Reach: Extends 6.8 inches from the wall, providing ample space for easy cable hookup and access to the TV's rear ports.
- Advanced Tilting (Tilt 4D): Offers maximum tilting range for large TVs, allowing adjustment up to 12 degrees down and 7 degrees up to eliminate glare from lights and windows, or to optimize viewing from various heights, such as above a fireplace.
- Swivel Functionality: Swivels up to 15 degrees left and right, enhancing viewing angles and providing flexible positioning.
- Slim Profile Design: Seamlessly places the TV just 2.1 inches from the wall, ensuring a clean and integrated look that blends with your home decor.
- FluidMotion Movement: Allows for smooth and effortless adjustment of the TV to the ideal viewing position with just a touch.
- Open Wall Plate Design: Facilitates mounting directly over in-wall media boxes and electrical outlets for a tidy installation.
- Post-Installation Level Adjustment: Easily adjust the TV's level after installation to ensure perfect alignment.

Figure 2: Mount extended for easy cable access.
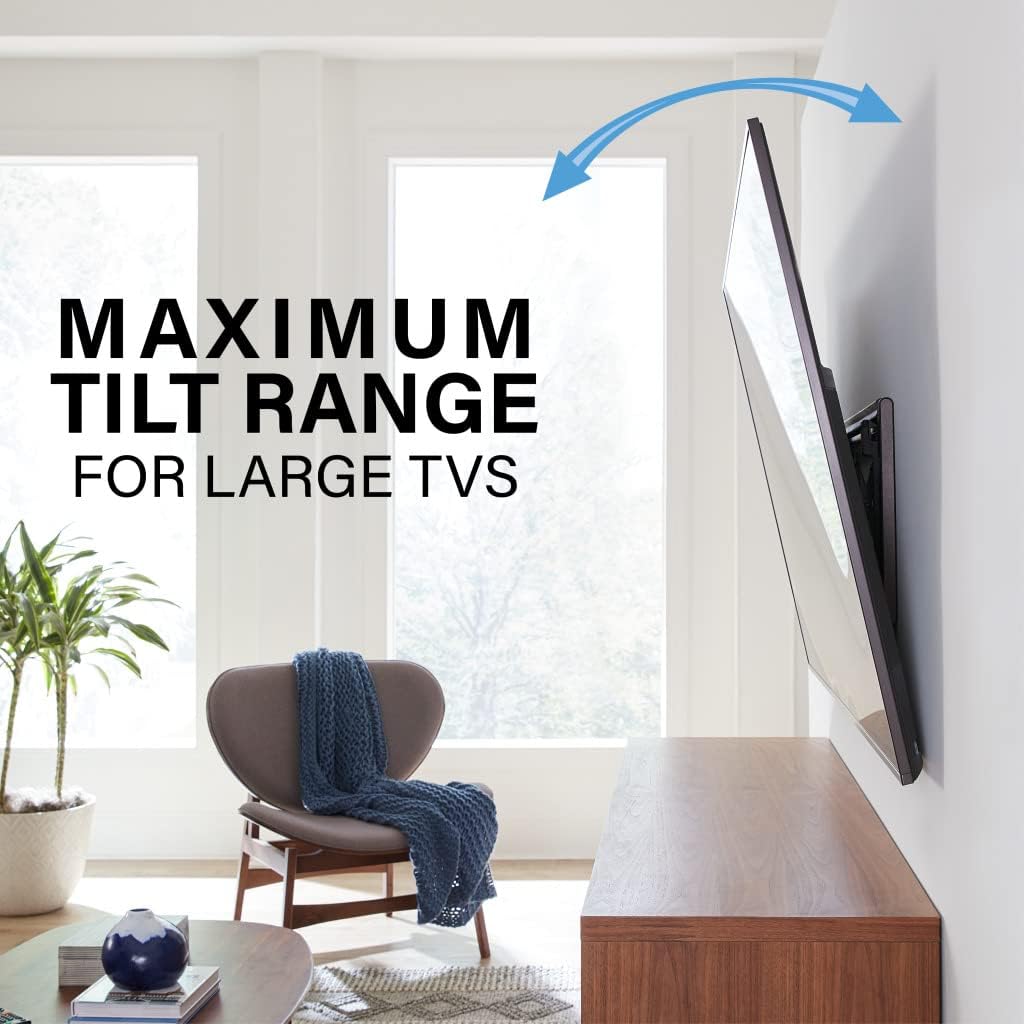
Figure 3: Maximum tilt range for large TVs.

Figure 4: Slim profile keeps TV close to the wall.

Figure 5: Open wall plate for mounting over electrical boxes.
Specifications
| Attribute | Detail |
|---|---|
| Product Dimensions | 2 x 31.3 x 16.8 inches |
| Item Weight | 13.27 pounds |
| Model Number | VLT7-B2 |
| Mounting Type | Wall Mount |
| Movement Type | Tilt, Swivel, Extend |
| Brand | Sanus |
| Material | Metal |
| Maximum Compatible TV Size | 90 Inches |
| Minimum Compatible TV Size | 42 Inches |
| Maximum Tilt Angle | 15 Degrees (down 12°, up 7°) |
| Maximum Swivel Angle | 15 Degrees (left/right) |
| UPC | 793795534675 |
Note: VESA patterns supported include 200x100, 200x200, 200x300, 200x400, 300x200, 300x300, 300x400, 400x200, 400x300, 400x400, 500x200, 500x300, 500x400, 600x200, 600x300, 600x400.
What's in the Box
Your SANUS VLT7-B2 package includes all necessary components for installation:
- Drilling Template (Worry-Free)
- TV Hardware Bag (Comprehensive, labeled and pre-divided)
- Wood Stud and Concrete Installation Hardware
- TV Brackets
- Wall Plate

Figure 6: The mount is compatible with wood stud, steel stud, and concrete walls. Additional hardware may be required for steel stud or concrete installations.
Tools Needed for Installation
Before beginning installation, ensure you have the following tools:
- Tape Measure
- Pencil
- Level
- Tape
- Screwdriver (Phillips head)
- Electric Drill
- 1/2 inch Socket Wrench
Additional Tools for Wood Stud Installation:
- Studfinder
- Awl
- 7/32 inch Wood Drill Bit
Additional Tools for Concrete Installation:
- Hammer
- 3/8 inch Drill Bit
Setup and Installation
The SANUS VLT7-B2 mount is designed for easy installation, typically completed in 20 minutes or less following these three steps. For detailed visual guidance, please refer to the official installation video.
Step 1: Attach Brackets to TV
Carefully place your TV face down on a soft, clean surface to prevent scratches. Attach the provided TV brackets to the back of your TV using a Phillips head screwdriver. Ensure the bolts are tightened securely but do not overtighten.

Figure 7: The scissor mechanism provides smooth in, out, and swivel motion.
Step 2: Secure Wall Plate to Wall
First, use a stud finder to locate your wall studs. Once located, use the included worry-free drilling template to mark the precise drill holes on your wall. Ensure the template is level before marking. Drill the pilot holes according to the template. Then, hold the mount wall plate against the wall, aligning it with the drilled holes. Secure the wall plate using the provided lag bolts and washers. Tighten them with a 1/2 inch socket wrench.

Figure 8: The mount allows for easy level adjustment after installation.
Step 3: Hang Your TV
With assistance, carefully lift your TV. Extend the mount's arm assembly slightly. Hang the TV by aligning the top of the TV brackets with the top rail of the wall plate. Once the top is secure, push the bottom of the TV brackets onto the bottom rail of the wall plate. You will hear an audible click when the TV is securely in position. Finally, secure the TV using the locking tab at the bottom of the TV brackets and close the top wall plate cover.
Installation Video
Video 1: Official SANUS Premium Tilt 4D Mount Installation Guide. This video provides a step-by-step visual walkthrough of the installation process for the SANUS VLT7-B2 TV wall mount.
Operating and Adjustments
The SANUS VLT7-B2 mount offers flexible adjustments for optimal viewing:
- Tilt Adjustment: To adjust the tilt, simply push or pull the TV to your desired angle. The FluidMotion mechanism allows for smooth movement. You can tilt the TV up to 12 degrees down and 7 degrees up. To adjust the tension of the tilt, loosen the tilt knob located on the mount.
- Swivel Adjustment: Gently push or pull the side of the TV to swivel it left or right, up to 15 degrees in either direction. This provides flexibility for viewing from different areas of the room.
- Level Adjustment: If your TV is not perfectly level after installation, use a Phillips head screwdriver to turn the level adjustment screws located on top of either TV bracket. This allows you to raise or lower that side of the TV for precise leveling.
- Cable Management: To manage cables, extend the TV outward from the wall and tilt it up or down to gain better access to the back of the TV. This allows for clean routing of all necessary cords.
Video 2: Best In Class SANUS Premium Tilt TV Mount Overview. This video demonstrates the various movement and adjustment capabilities of the SANUS VLT7-B2 mount, including tilt, swivel, and extension.
Maintenance
To ensure the longevity and optimal performance of your SANUS TV wall mount, follow these simple maintenance guidelines:
- Cleaning: Dust the mount regularly with a soft, dry cloth. For stubborn marks, a slightly damp cloth can be used, followed by a dry cloth. Avoid abrasive cleaners or solvents.
- Periodic Checks: Periodically check all screws and bolts to ensure they remain tight and secure. Over time, vibrations or adjustments can cause them to loosen.
- Movement Check: Occasionally operate the tilt and swivel functions to ensure smooth movement. If any stiffness is noted, ensure no cables are obstructing the mechanism.
Troubleshooting
If you encounter any issues with your SANUS VLT7-B2 mount, consider the following common solutions:
- TV Not Level: Use the level adjustment screws on the TV brackets to fine-tune the horizontal alignment. Refer to the "Operating and Adjustments" section for details.
- Difficulty Tilting/Swiveling:
- Check for any cables or obstructions behind the TV that might be impeding movement.
- Ensure the tilt knob (if applicable) is not overtightened. Loosen it slightly to allow for smoother motion.
- Mount Feels Loose: Re-check all lag bolts securing the wall plate to the wall and the screws attaching the TV brackets to the TV. Tighten any loose fasteners. If the issue persists, consult a professional installer.
- Missing Parts: If any parts were missing from your package, please contact SANUS customer support immediately.
For further assistance, please contact our customer support team.
Warranty and Support
The SANUS VLT7-B2 Tilting TV Wall Mount comes with a 10-year warranty, reflecting our commitment to quality and durability. Our products are rigorously safety tested and UL certified.
For any questions, concerns, or support needs, our expert customer care team is available 7 days a week. Please reach out to us via the following contact information:
- U.S.: 1-800-359-5520 (7 Days a Week)
- U.K.: 0800 056 2853 (7 Days a Week)
- EMEA: +31 (0) 495 580 840
- AUSTRALIA: +61 (0) 3 9768 0861
You can also visit sanus.com for additional resources, including the HeightFinder tool to determine optimal TV placement.


