
1. Introduction
This manual provides essential instructions for the safe and efficient use of your Necchi NL11C Overlock Machine. Please read this manual thoroughly before operating the machine and keep it for future reference. Proper understanding of these instructions will ensure optimal performance and longevity of your overlock machine.
2. Safety Instructions
- Always unplug the machine from the electrical outlet when cleaning, lubricating, or when the machine is not in use.
- Keep fingers away from all moving parts, especially the needle, looper, and cutting blade.
- Never operate the machine with any air openings blocked. Keep ventilation openings of the sewing machine and foot controller free from the accumulation of lint, dust, and loose cloth.
- Do not allow children to operate this machine without supervision.
- Use only the foot controller provided with this machine.
- Do not operate the machine if it has a damaged cord or plug, if it is not working properly, or if it has been dropped or damaged.
3. Package Contents
Upon unpacking, verify that all components are present:
- Necchi NL11C Overlock Machine
- Foot Controller
- Power Cord
- Accessory Kit (includes tweezers, needles, screwdriver, etc.)
- Instruction Manual (this document)
4. Product Overview
Familiarize yourself with the main components of your Necchi NL11C overlock machine.

Figure 4.1: Overall view of the Necchi NL11C overlock machine, showing the thread stand, tension dials, and main body. This image provides a general perspective of the machine's design and layout.

Figure 4.2: Top-down view highlighting the color-coded tension dials and threading guides. Each dial corresponds to a specific thread, allowing precise tension control for different stitch types.

Figure 4.3: View of an internal compartment, likely for storing accessories such as tweezers, a screwdriver, and other small tools essential for maintenance and adjustments.

Figure 4.4: Close-up of the cutting blade mechanism and the integrated waste collector. This area is crucial for trimming fabric edges neatly during overlock stitching.
5. Setup
5.1 Unpacking and Placement
Carefully remove the machine from its packaging. Place the machine on a stable, flat surface, ensuring adequate space for fabric movement and comfortable operation. Ensure the power switch is in the 'OFF' position before connecting to power.
5.2 Power Connection
- Connect the foot controller plug into the machine's receptacle.
- Insert the power cord into the machine's power input.
- Plug the power cord into a suitable electrical outlet.
5.3 Threading the Machine
The Necchi NL11C supports 2, 3, or 4-thread overlock stitching. Refer to the color-coded threading paths indicated on the machine for guidance. Always thread the machine in the correct sequence, typically starting with the upper looper, then lower looper, and finally the needles.
- Preparation: Raise the presser foot and turn the handwheel to raise the needles to their highest position.
- Spool Pins: Place the thread spools onto the designated spool pins on the thread stand.
- Thread Guides: Follow the numbered and color-coded thread guides through the machine.
- Tension Dials: Pass each thread through its corresponding tension dial (see Figure 4.2).
- Loopers and Needles: Guide the threads through the loopers and then the needles according to the machine's internal diagrams. Use the provided tweezers for easier threading of loopers and needles.
6. Operating Instructions
6.1 Basic Operation
- Turn on the power switch.
- Raise the presser foot lever.
- Place the fabric under the presser foot, aligning the edge with the cutting blade if trimming is desired.
- Lower the presser foot.
- Gently press the foot controller to start sewing. The machine will begin stitching and trimming the fabric edge simultaneously.
- Guide the fabric smoothly through the machine.
- To stop, release the foot controller. Raise the presser foot and pull the fabric away from the needles and loopers, cutting the thread chain.

Figure 6.1: A close-up view of the machine in operation, demonstrating the needle and looper action as it creates an overlock stitch on blue fabric.
6.2 Adjusting Stitch Length
The stitch length can be adjusted from 1 mm to 5 mm to suit various fabric types and desired stitch effects. Locate the stitch length dial, usually on the side of the machine, and rotate it to the desired setting. A shorter stitch length creates a denser seam, while a longer stitch length results in a looser seam.
6.3 Adjusting Differential Feed
The differential feed mechanism allows you to adjust the feeding ratio between the front and rear feed dogs. This is crucial for preventing stretching on knit fabrics or gathering on fine fabrics. Adjust the differential feed dial to achieve the desired fabric feed: a higher ratio will gather fabric, and a lower ratio will stretch it slightly.
6.4 Adjusting Cutting Width
The cutting width determines how much fabric is trimmed from the edge during stitching. Adjust this setting to ensure the cutting blade trims the fabric precisely, creating a clean and consistent seam allowance. Refer to the machine's markings for specific cutting width adjustments.
6.5 Sewing Speed
The Necchi NL11C operates at a maximum sewing speed of 1300 stitches per minute (SPM). Control the speed by varying the pressure on the foot controller. For intricate work or beginners, start with a slower speed and gradually increase as comfort and proficiency grow.
6.6 Stitch Types and Fabric Compatibility
This machine is designed for 2, 3, and 4-thread overlock stitches, suitable for a wide range of fabric types, from delicate silks to heavy denim. Experiment with different thread counts and tension settings to achieve optimal results for your specific project.
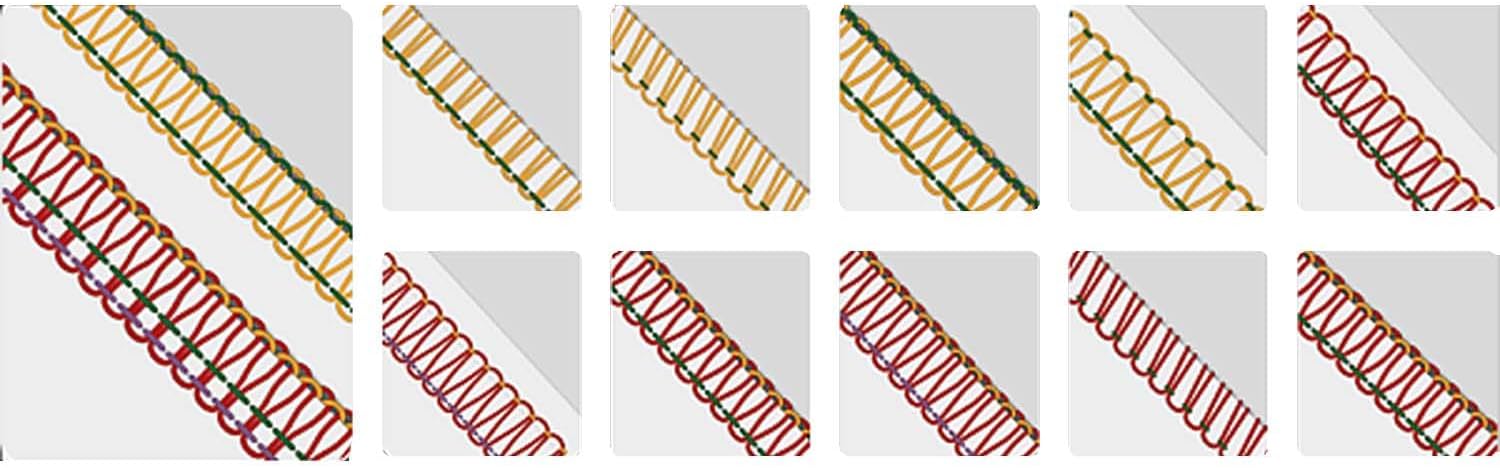
Figure 6.2: Examples of different stitch patterns achievable with an overlock machine, showcasing variations in thread color and stitch density.
7. Maintenance
7.1 Cleaning
Regular cleaning is essential for maintaining your machine's performance. Always unplug the machine before cleaning.
- Lint Removal: Use a small brush to remove lint and dust from the feed dogs, looper area, and under the needle plate.
- Blade Area: Clean around the cutting blade to prevent fabric scraps from interfering with its operation.
- Exterior: Wipe the exterior surfaces with a soft, dry cloth. Do not use harsh chemicals.
7.2 Needle Replacement
Dull or bent needles can cause skipped stitches or thread breakage. Replace needles regularly, especially when working with new projects or after extended use.
- Turn off and unplug the machine.
- Loosen the needle clamp screw(s) using the provided screwdriver.
- Remove the old needle(s).
- Insert new needle(s) with the flat side facing the back of the machine, pushing it up as far as it will go.
- Tighten the needle clamp screw(s) securely.
7.3 Lubrication
Refer to your machine's specific lubrication points indicated in the detailed manual (if provided separately). Generally, a few drops of sewing machine oil on moving metal parts can help ensure smooth operation. Avoid over-oiling.
8. Troubleshooting
This section addresses common issues you might encounter. For more complex problems, consult a qualified technician.
| Problem | Possible Cause | Solution |
|---|---|---|
| Skipped Stitches | Incorrect needle, bent needle, improper threading, incorrect tension. | Replace needle with correct type/size, re-thread machine carefully, adjust tension settings. |
| Thread Breakage | High tension, poor quality thread, burr on thread path, bent needle. | Reduce tension, use quality thread, check thread path for obstructions, replace needle. |
| Uneven Seams | Incorrect differential feed setting, uneven fabric feeding. | Adjust differential feed, ensure consistent fabric guidance. |
| Machine Not Starting | Power cord not connected, power switch off, foot controller issue. | Check power connections, ensure switch is ON, test foot controller. |
9. Specifications
| Feature | Detail |
|---|---|
| Model | NL11C |
| Thread Capability | 2, 3, 4 threads |
| Sewing Speed | Up to 1300 stitches per minute (SPM) |
| Stitch Length Adjustment | 1 mm to 5 mm |
| Differential Feed | Adjustable |
| Cutting Width | Adjustable |
| Dimensions (L x W x H) | 37 x 24 x 24 cm |
| Weight | 7.22 kg |
| Material | Metal chassis |
| Power Source | Electric cable |
10. Warranty and Support
For warranty information, technical support, or service inquiries, please refer to the warranty card included with your product or contact your authorized Necchi dealer or customer service. Keep your purchase receipt as proof of purchase.

