
Introduction
The Pruveeo D90 is an advanced 3-channel dash camera system engineered to provide comprehensive video surveillance for your vehicle. It is equipped with three 1080P cameras, capturing simultaneous footage from the front, interior, and side perspectives. This design ensures a wide 170-degree viewing angle for each camera, enhancing situational awareness and evidence collection. The D90 incorporates features such as superior night vision for clear recordings in low-light conditions, 24/7 parking monitoring for continuous protection, automatic loop recording to manage storage efficiently, and an emergency accident lock function that secures critical footage upon impact detection.
This manual serves as a comprehensive guide to help you set up, operate, and maintain your Pruveeo D90 dash cam, ensuring optimal performance and longevity.
Key Features

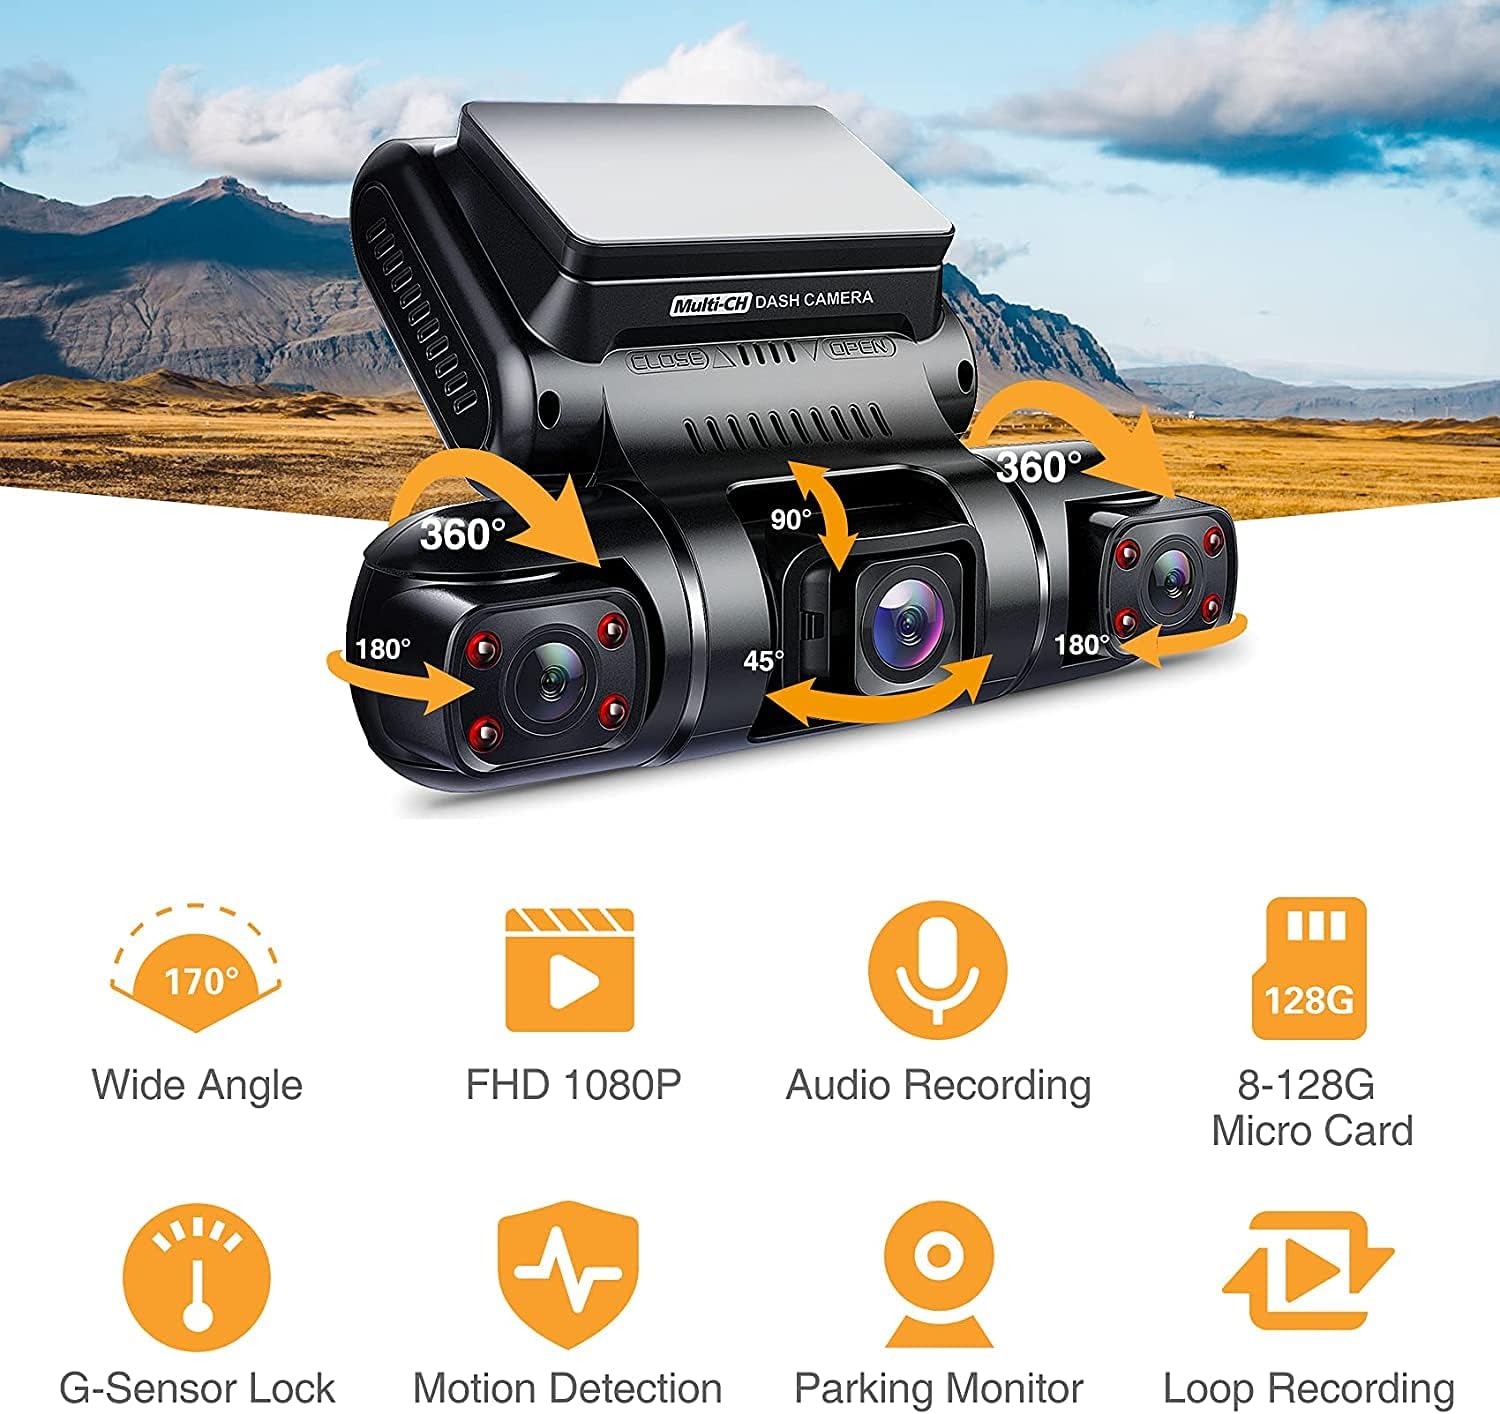
Overall Product View: The Pruveeo D90 dash cam features a central display unit with two adjustable side cameras, allowing for flexible recording angles. The main unit includes control buttons for easy navigation.

Triple Channel Recording: The dash cam records simultaneously from three perspectives: front, interior, and side (left/right), each in 1080P resolution with a 170° wide angle, providing comprehensive coverage.
- Triple 1080P Recording: Captures video at 1920x1080P resolution from three independent channels (front, interior, and side).
- 170° Super Wide Angle Lens: Each camera provides a broad field of view, minimizing blind spots and capturing more of the surrounding environment.
- Adjustable Interior Cameras: The two cabin cameras can rotate back and forth, and left and right, allowing users to customize recording angles for specific needs, such as monitoring the left and right sides of the car or the interior.
- Superior Night Vision: Equipped with 4 infrared lights and an F1.8 aperture on the cabin cameras, along with a highly sensitive night vision image sensor, ensuring clear video capture even in dark conditions.
- 24/7 Parking Monitoring: Provides continuous surveillance of your vehicle when parked, automatically detecting and recording moving objects or impacts.
- Loop Recording: Automatically overwrites the oldest unlocked footage when the memory card reaches its maximum capacity, ensuring continuous recording without manual intervention. Supports 1, 2, or 3-minute loop recording segments.
- Emergency Accident Lock (G-Sensor): A built-in G-sensor detects sudden collisions and automatically locks the current recording, preventing it from being overwritten.
- Wide Memory Card Support: Compatible with Class 10 or higher micro-SD cards up to 128GB.
- Supercapacitor: Utilizes a supercapacitor for power, offering enhanced durability and reliability in extreme temperatures compared to traditional lithium-ion batteries.

Flexible Recording Angles: The D90's design allows for multiple recording configurations, enabling users to capture various perspectives inside and around the vehicle for comprehensive evidence.

Feature Overview: Visual representation of the dash cam's core functionalities including wide-angle recording, Full HD 1080P resolution, audio recording, extensive micro SD card support, G-sensor lock, motion detection, parking monitor, and loop recording.
Super Night Vision & 24 Hours Parking Monitor: The dash cam provides clear images even in low light. When parked, it detects moving objects and automatically begins recording, ensuring continuous protection.

Loop Recording Functionality: When the micro SD card's storage is full, the oldest non-protected files are automatically overwritten, allowing for continuous recording without interruption.
What's in the Box
Upon opening the package, please verify that all the following components are included:
- Pruveeo D90 3-Channel Dash Cam Unit
- Memory Card
- Suction Mount
- User Manual (this document)
- Car Charger (typically included for power)
- USB Cable (for data transfer/power)
Note: Specific accessories may vary slightly. Please refer to the product packaging for the most accurate list.
Setup Guide
1. Prepare the Memory Card
- Insert a Class 10 or higher micro SD card (up to 128GB) into the dash cam's memory card slot. Ensure the card is inserted correctly until it clicks into place.
- It is highly recommended to format the memory card within the dash cam's settings before first use and periodically thereafter (e.g., once a month) to ensure optimal performance and prevent data corruption.
2. Mount the Dash Cam
- Clean the chosen area on your windshield thoroughly. Ensure it is free of dust and grease.
- Attach the suction mount to the dash cam unit.
- Press the suction cup firmly against the cleaned windshield surface and engage the locking mechanism to secure it. Position the dash cam so that the front camera has a clear view of the road ahead, and the interior/side cameras can capture their intended areas.
- Adjust the angle of the dash cam and individual cameras as needed to achieve the desired recording coverage.
3. Power Connection
- Connect the provided car charger to the dash cam's power input port.
- Plug the other end of the car charger into your vehicle's 12V power outlet (cigarette lighter socket).
- Route the power cable neatly along the windshield and dashboard edges to avoid obstructing your view or interfering with driving.
Operating Instructions
Power On/Off
- Automatic Power: The dash cam will automatically power on and begin recording when your vehicle's ignition is turned on (and the 12V outlet receives power). It will power off automatically shortly after the ignition is turned off.
- Manual Power: To manually power on or off, press and hold the Power button located on the dash cam unit.
Recording Modes
- Loop Recording: Once powered on, the dash cam will automatically start loop recording. Video files are saved in segments (e.g., 1, 2, or 3 minutes). When the memory card is full, the oldest unlocked files will be overwritten.
- Emergency Recording (G-Sensor): In the event of a sudden impact or collision, the built-in G-sensor will automatically trigger emergency recording. These files are locked and protected from being overwritten by loop recording. You can also manually trigger emergency recording by pressing the designated button (refer to your device's button layout).
- Parking Monitor: When the vehicle is parked and the dash cam is connected to a continuous power source (e.g., hardwire kit, not included), the parking monitor function will activate. It uses motion detection or G-sensor triggers to record events while the vehicle is stationary.
Playback and File Management
- To view recorded videos on the dash cam's screen, enter playback mode via the menu. Navigate through files using the directional buttons and select a video to play.
- To transfer files to a computer, remove the micro SD card and insert it into a card reader connected to your computer, or connect the dash cam directly to your computer via USB (if supported for data transfer).
Settings Adjustment
Access the menu settings to customize various parameters:
- Video Resolution: Adjust the recording resolution for each channel.
- Loop Recording Duration: Set the length of video segments (1/2/3 minutes).
- G-Sensor Sensitivity: Adjust the sensitivity of the G-sensor to prevent accidental emergency recordings or ensure proper detection.
- Parking Monitor: Enable/disable and configure parking monitor settings.
- Date/Time Stamp: Ensure the correct date and time are set for accurate record-keeping.
- Audio Recording: Enable or disable audio recording.
- Language: Select your preferred language for the menu interface.
Maintenance
- Memory Card Formatting: Regularly format your micro SD card (e.g., once a month) using the dash cam's format function. This helps maintain card health and prevents data corruption. Back up any important files before formatting.
- Cleaning: Use a soft, dry cloth to clean the dash cam's lenses and screen. Avoid using abrasive cleaners or solvents that could damage the device.
- Firmware Updates: Periodically check the Pruveeo official website for any available firmware updates. Firmware updates can improve performance, add new features, or fix bugs. Follow the instructions provided with the firmware update carefully.
- Temperature Considerations: Avoid exposing the dash cam to extreme temperatures for prolonged periods. While the supercapacitor offers better heat resistance, prolonged exposure to direct sunlight in a hot car can still affect its lifespan.
Troubleshooting
| Problem | Possible Solution |
|---|---|
| Dash cam does not power on. |
|
| Dash cam turns off unexpectedly. |
|
| Video recording stops or freezes. |
|
| Poor video quality or blurry images. |
|
| G-sensor is too sensitive/not sensitive enough. |
|
Specifications
| Feature | Detail |
|---|---|
| Product Dimensions | 2 x 3 x 5 inches |
| Item Weight | 1.28 pounds |
| Model Name | D90 |
| Item Model Number | 1080P Front +1080P Inside +1080P Inside |
| Video Capture Resolution | 1080p (for each channel) |
| Special Feature | Night Vision, G-Sensor, Parking Monitor, Loop Recording |
| Connectivity Technology | USB |
| Mounting Type | Suction Mount |
| Color | Black |
| Power Source | Supercapacitor |
| Max SD Card Support | 256GB (Class 10 or higher) |
Warranty and Support
Pruveeo products are designed and manufactured to the highest quality standards. For specific warranty information regarding your D90 dash cam, please refer to the warranty card included in your product packaging or visit the official Pruveeo website. The warranty typically covers manufacturing defects for a specified period from the date of purchase.
For technical support, troubleshooting assistance beyond this manual, or warranty claims, please contact Pruveeo customer service through the contact information provided on their official website or the product packaging. When contacting support, please have your product model (D90) and purchase details readily available.


