
NuFlush GLACIER-BAY-DUAL-FLUSH-TOP-BU-1e48243147
Glacier Bay Replacement Top Button 3 inch Two Piece Flush Valve and Fill Valve Kit
Model: GLACIER-BAY-DUAL-FLUSH-TOP-BU-1e48243147 | Brand: NuFlush
Introduction
This manual provides comprehensive instructions for the installation, operation, and maintenance of your NuFlush Glacier Bay Replacement Top Button 3 inch Two Piece Flush Valve and Fill Valve Kit. This kit is specifically designed for two-piece toilets with a 3-inch flush hole, commonly found in Glacier Bay models. The canister-style dual flush valve is 9 inches tall, and the anti-siphon fill valve is adjustable from 7 to 14 inches in height. Proper installation and care will ensure efficient and reliable performance.
Package Contents
Please verify that all components listed below are included in your package before beginning installation:
- Canister Style Dual Flush Valve (9-inch tall overflow tube)
- Adjustable Anti-Siphon Fill Valve (7-14 inch height)
- Rubber Grommet
- Nylon Bolts (for securing the toilet tank)
- Refill Tube
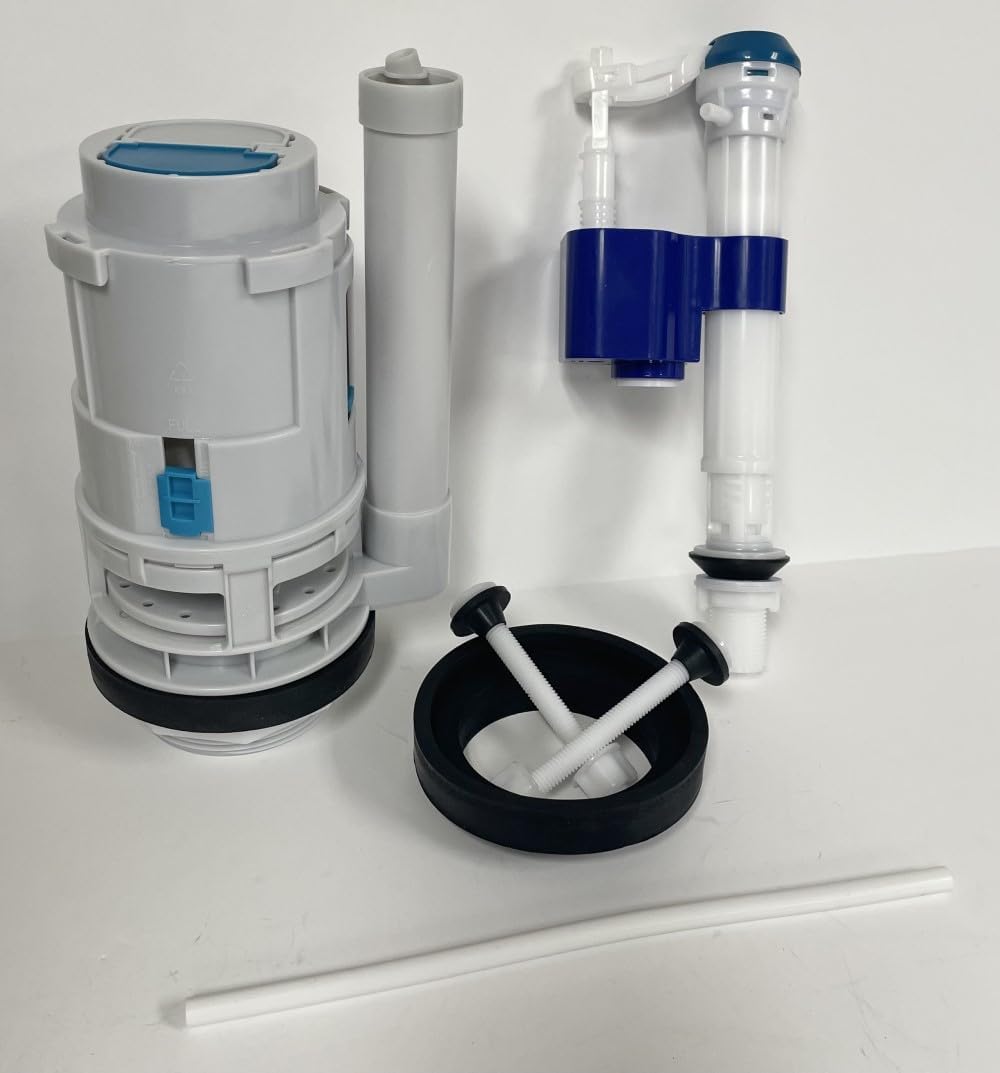
Figure 1: Overview of all components included in the NuFlush Glacier Bay Replacement Kit.

Figure 2: Detailed view of the kit's components, including the canister flush valve, adjustable fill valve, tank-to-bowl gasket, and mounting bolts.
Installation Guide
Preparation
- Turn off the water supply to the toilet at the shut-off valve located near the base of the toilet.
- Flush the toilet to empty the tank. Hold the handle down to drain as much water as possible.
- Use a sponge or towel to remove any remaining water from the tank.
- Disconnect the water supply line from the bottom of the fill valve.
- Unscrew the nuts securing the toilet tank to the bowl and carefully lift the tank off. Place it on a protected surface.
Flush Valve Installation
- Remove the old flush valve from the toilet tank. Clean the flush hole area thoroughly.
- Place the new rubber grommet onto the base of the NuFlush canister flush valve. Ensure it is seated correctly.
- Insert the flush valve into the 3-inch flush hole at the bottom of the toilet tank. Ensure the overflow tube is positioned correctly.
- From the underside of the tank, secure the flush valve with the large plastic nut provided. Hand-tighten firmly, but do not overtighten.

Figure 3: Detail of the flush valve base, designed for a 3-inch flush hole.
Fill Valve Installation
- Remove the old fill valve. Clean the fill valve hole.
- Insert the new NuFlush adjustable fill valve into the smaller hole in the toilet tank.
- Secure the fill valve from the underside of the tank with the plastic nut. Hand-tighten.
- Adjust the height of the fill valve by twisting the upper section. The fill valve is adjustable from 7 to 14 inches to fit various tank heights. Ensure the critical level mark is above the overflow tube.
- Attach the refill tube from the fill valve to the overflow tube of the flush valve.

Figure 4: The flush valve and adjustable fill valve assembled, ready for tank installation.
Tank Reassembly and Final Steps
- Carefully place the toilet tank back onto the toilet bowl, aligning the bolt holes.
- Insert the nylon bolts through the tank and bowl holes. Secure with washers and nuts from underneath the bowl. Tighten evenly until the tank is stable, but do not overtighten to avoid cracking the porcelain.
- Reconnect the water supply line to the bottom of the fill valve. Hand-tighten, then use a wrench for a quarter turn to ensure a leak-free connection.
- Slowly turn on the water supply. Allow the tank to fill. Check for any leaks around the connections and the base of the tank.
- Test the flush mechanism.
Video 1: A demonstration of the NuFlush Canister Kit with Fill Valve, showing its features and basic assembly. This video provides a visual aid for understanding the components and their functions.
Operating Instructions
The NuFlush Glacier Bay Replacement Flush Valve features a dual-flush mechanism, allowing for water conservation. The top button typically has two sections for different flush volumes:
- Partial Flush: Press the smaller button or the smaller section of the dual button for liquid waste. This uses less water.
- Full Flush: Press the larger button or the larger section of the dual button for solid waste. This uses the full tank volume.
Ensure the button is fully depressed and released for proper operation. The fill valve will automatically refill the tank to the set water level after each flush.

Figure 5: Top view of the dual flush button mechanism on the canister flush valve.
Maintenance
Regular maintenance helps prolong the life of your toilet components. The NuFlush flush valve is designed for easy seal replacement without needing to replace the entire valve.
- Cleaning: Periodically inspect the flush valve and fill valve for mineral buildup or debris. Clean with a non-abrasive cleaner and a soft brush if necessary.
- Seal Replacement: If you notice a slow leak or constant running water from the flush valve, the seal may need replacement. The canister design allows for easy removal and replacement of the bottom seal. Refer to the manufacturer's guidelines for specific seal replacement procedures.
- Fill Valve Adjustment: If the water level in the tank is too high or too low, adjust the fill valve height as described in the installation section.
Troubleshooting
Refer to the table below for common issues and their potential solutions:
| Problem | Possible Cause | Solution |
|---|---|---|
| Toilet runs continuously | Flush valve seal worn or dirty; Fill valve set too high; Fill valve faulty. | Clean or replace flush valve seal. Adjust fill valve height. Replace fill valve if necessary. |
| Weak or incomplete flush | Water level too low; Obstruction in flush valve. | Adjust fill valve to increase water level. Check flush valve for debris. |
| Tank not filling | Water supply off; Fill valve clogged or faulty. | Check water supply valve. Inspect fill valve for obstructions or replace. |
| Leak at tank-to-bowl connection | Nylon bolts loose; Rubber grommet not seated correctly or damaged. | Tighten nylon bolts evenly. Re-seat or replace rubber grommet. |
Specifications
| Feature | Detail |
|---|---|
| Product Type | Flush Valve and Fill Valve Kit |
| Brand | NuFlush |
| Model Number | GLACIER-BAY-DUAL-FLUSH-TOP-BU-1e48243147 |
| Material | Acrylonitrile Butadiene Styrene (ABS), Rubber |
| Flush Valve Type | Canister Style Dual Flush |
| Flush Hole Compatibility | 3 Inches |
| Flush Valve Overflow Tube Height | 9 Inches |
| Fill Valve Type | Anti-Siphon |
| Fill Valve Adjustable Height | 7-14 Inches |
| Included Accessories | Rubber Grommet, Nylon Bolts |
| Product Dimensions | 9 x 3 x 9 inches (L x W x H) |
| Item Weight | 2.37 pounds |
| Country of Origin | USA |
Warranty and Support
For specific warranty information or technical support regarding your NuFlush product, please refer to the documentation included with your purchase or visit the official NuFlush website. Contact information for customer service is typically available on the manufacturer's packaging or website.
Ask a question about this manual
Ask about setup, troubleshooting, compatibility, parts, safety, or missing instructions. Manuals+ will review the question and use this page’s manual context to help answer it.