
1. Introduction
Thank you for choosing the BenQ DVD-2019 DVD Player. This manual provides essential information for the safe and efficient use of your new device. Please read it thoroughly before operating the player and retain it for future reference.
Important Safety Information:
- Do not expose the unit to rain or moisture.
- Do not open the casing; refer all servicing to qualified personnel.
- Ensure proper ventilation around the unit.
- Use only the power supply specified for this device.
2. Package Contents
Please check that all items are present in the package:
- BenQ DVD-2019 DVD Player
- Remote Control
- AV Cable (RCA)
- Power Cable
- Instruction Manual (this document)
3. Product Overview
3.1 Front Panel

Figure 1: Front Panel of the DVD-2019 Player
The front panel features the disc tray, power button, play/pause, stop, and skip buttons. It also includes a USB port and an SD card slot for playing media from external storage devices.
3.2 Rear Panel

Figure 2: Rear Panel of the DVD-2019 Player
The rear panel provides various connection ports for audio and video output, including HDMI, RCA (composite video and stereo audio), and component video outputs. The power input is also located here.
3.3 Remote Control
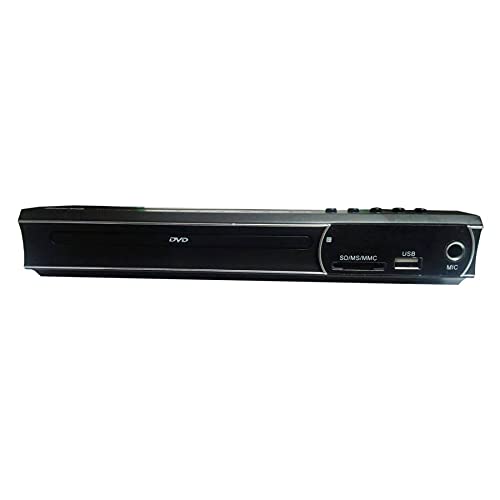
Figure 3: Remote Control for the DVD-2019 Player
The remote control allows you to operate all functions of the DVD player from a distance. It requires two AAA batteries (not included).
4. Setup
4.1 Connecting to a Television
Choose one of the following connection methods:
- HDMI Connection (Recommended for best quality):
Connect one end of an HDMI cable (not included) to the HDMI OUT port on the DVD player and the other end to an HDMI IN port on your television. Select the corresponding HDMI input on your TV. - RCA Connection:
Connect the yellow video cable to the VIDEO OUT port on the DVD player and the yellow video input on your TV. Connect the red and white audio cables to the AUDIO OUT (R/L) ports on the DVD player and the corresponding red and white audio input ports on your TV. Select the AV input on your TV.
4.2 Power Connection
After connecting the video and audio cables, plug the power cable into the AC IN port on the rear of the DVD player and then into a wall outlet.
5. Operating Instructions
5.1 Basic DVD Playback
- Turn on your TV and the DVD player.
- Select the correct input source on your TV (e.g., HDMI 1, AV).
- Press the OPEN/CLOSE button on the front panel or remote to open the disc tray.
- Place a DVD disc gently into the tray with the label side facing up.
- Press the OPEN/CLOSE button again to close the tray. The disc will load automatically.
- Playback should begin automatically. If a menu appears, use the arrow keys and OK button on the remote to navigate.
5.2 USB/SD Card Playback
- Insert a USB flash drive into the USB port or an SD card into the SD card slot on the front panel.
- The player should automatically detect the device and display a media browser. If not, press the SOURCE or USB/CARD button on the remote.
- Use the arrow keys and OK button to navigate through your files (videos, music, photos).
- Select a file and press OK to start playback.
5.3 Audio and Video Settings
Access the player's setup menu by pressing the SETUP button on the remote control. Here you can adjust settings such as:
- Video Settings: Aspect ratio (4:3, 16:9), video output resolution.
- Audio Settings: Audio output mode (Stereo, Dolby Digital, DTS), dynamic range control.
- Language Settings: OSD language, audio language, subtitle language.
6. Maintenance
6.1 Cleaning the Unit
- Wipe the exterior of the player with a soft, dry cloth.
- Do not use liquid cleaners or aerosol sprays.
- For the disc tray, use a soft, lint-free cloth to gently remove dust.
6.2 Disc Handling
- Always hold discs by their edges.
- Keep discs clean and free from scratches. Use a soft cloth to wipe from the center outwards.
- Store discs in their cases when not in use.
7. Troubleshooting
| Problem | Possible Cause | Solution |
|---|---|---|
| No power | Power cable not connected; power outlet faulty. | Ensure power cable is securely connected. Try a different outlet. |
| No picture | Incorrect TV input selected; video cable loose or faulty. | Select the correct HDMI/AV input on your TV. Check video cable connections. |
| No sound | Audio cables loose or faulty; TV volume muted. | Check audio cable connections. Increase TV volume and ensure it's not muted. |
| Disc not playing | Disc is dirty, scratched, or incompatible format. | Clean the disc. Try a different disc. Ensure the disc format is supported (DVD). |
| Remote control not working | Batteries are dead or inserted incorrectly; obstruction between remote and player. | Replace batteries. Ensure correct polarity. Remove any obstructions. |
8. Specifications
| Feature | Detail |
|---|---|
| Model Number | DVD-2019 |
| Brand | BenQ |
| Media Type | DVD |
| Connector Type | HDMI, RCA |
| Connectivity Technology | HDMI, RCA, USB |
| Supported Audio Formats | Dolby Digital, DTS, PCM |
| Compatible Devices | Television |
9. Warranty and Support
This BenQ DVD-2019 DVD Player comes with a standard manufacturer's warranty. Please refer to the warranty card included in your package for specific terms and conditions, including the warranty period and coverage details.
For technical support, service inquiries, or to obtain replacement parts, please contact BenQ customer service through their official website or the contact information provided on your warranty documentation. Keep your purchase receipt as proof of purchase for warranty claims.


