
1. Introduction
Thank you for choosing the CT CAPETRONIX LED Grow Lights Strips. This product is designed to provide optimal lighting conditions for your indoor plants, promoting healthy growth and vitality. Featuring full-spectrum LEDs, multiple working modes, dimmable brightness levels, and an automatic timer, these grow lights offer a versatile solution for various plant types and growth stages.
2. Safety Information
- Ensure the product is installed in a dry environment. Avoid exposure to water or high humidity.
- Do not look directly into the LED lights when they are on, as this may cause eye strain.
- Keep out of reach of children and pets.
- Use only the provided 12V3A power adapter. Using an incompatible adapter may damage the product or pose a safety risk.
- Do not attempt to disassemble or modify the product. This will void the warranty and may lead to malfunction or injury.
- Ensure proper ventilation around the lights to prevent overheating. The aluminum back shell provides efficient heat dissipation.
3. Package Contents
Please verify that all components are present in your package:
- 6 x LED Grow Light Strips (16 inches each)
- 1 x Power Adapter (12V3A)
- 1 x Power Cord with Controller (5.3 ft)
- 4 x Extension Cables (5 inches each)
- 2 x Double-sided Tape Rolls (6.5ft/Roll)
- 20 x Mounting Clips
- 20 x Screws
- 20 x Cable Ties

Image: Overview of all included components for the grow light kit.
4. Specifications
| Feature | Description |
|---|---|
| Model Number | TS0ZW06 |
| Light Source Type | LED (12 Red + 6 Blue + 18 Warm White per strip) |
| Total LEDs | 216 (36 LEDs per strip x 6 strips) |
| Power Source | Corded Electric |
| Voltage | 12 Volts (DC) |
| Wattage | 36 Watts (Total) |
| Color Temperature | 3000 Kelvin (Warm White) |
| Dimmable Levels | 10 adjustable brightness levels |
| Lighting Modes | 3 (Red+Blue+Warm Light, Full Spectrum, Red+Blue Light) |
| Timer Settings | 3H / 9H / 12H Auto Cycle Timer |
| Material | Aluminum, Plastic, Rubber |
| Dimensions (L x W x H) | 17.32"L x 4.13"W x 2.56"H (Overall package) |
| Compliance | RoHS |
5. Setup and Installation
The CT CAPETRONIX LED Grow Lights Strips offer flexible installation options to suit various indoor environments. You can connect the light strips serially or in parallel, from 1 to 6 pieces, to customize your lighting setup.
5.1 Installation Methods
Choose from the following methods to install your grow light strips:
- Mounting Clips & Screws: Securely attach the strips to wooden boards, shelves, or cabinets using the provided clips and screws.
- Double-sided Tape: For smooth surfaces, use the included double-sided tape for a quick and easy attachment.
- Cable Ties: Utilize the cable ties to fasten the strips to wire racks or other suitable structures.
5.2 Connecting the Strips
- Connect the individual light strips using the short connectors.
- Use the 5-inch extension cables to create wider spacing between strips or to reach different areas.
- Connect the power cord with the controller to one end of your assembled light strip configuration.
- Plug the 12V3A power adapter into the power cord, then plug the adapter into a standard electrical outlet.
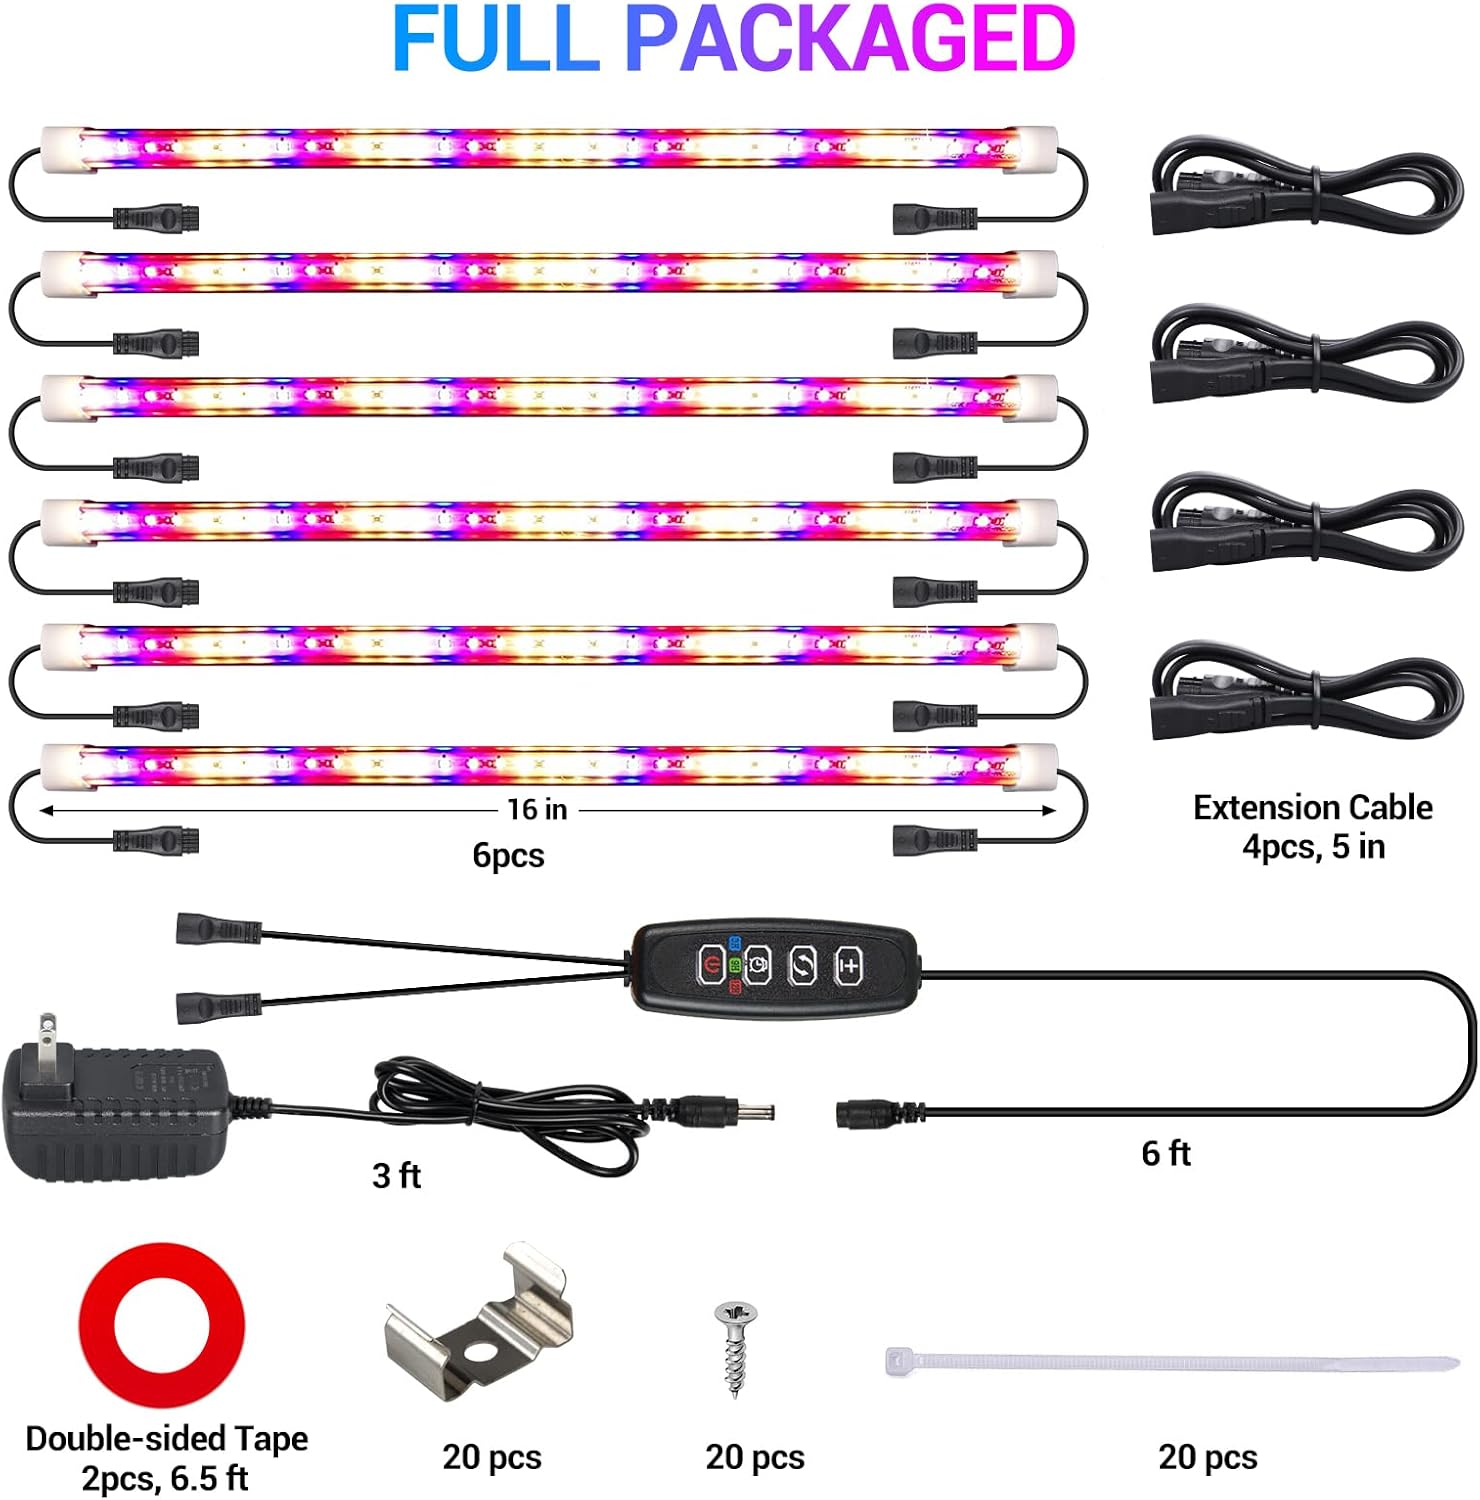
Image: Demonstrates installation using clips, double-sided tape, and cable ties on shelves and walls.
6. Operating Instructions
The integrated controller allows for easy adjustment of brightness, lighting modes, and timer settings.

Image: Close-up of the intelligent controller showing buttons for brightness, mode, and timer.
6.1 Power On/Off
- Press the Power Button (
 ) to turn the lights on or off.
6.2 Brightness Adjustment
- Use the +/- Buttons (
 ) to cycle through 10 dimmable brightness levels (10% to 100%). Adjust according to your plants' needs and growth stage.
6.3 Lighting Modes
Press the Mode Button ( ) to switch between the 3 available lighting modes:
- Red+Blue+Warm Light: Full spectrum for all growing stages.
- Full Spectrum (Warm White): Promotes photosynthesis, ideal for seedling growth.
- Red+Blue Light: Enhances flowering and fruiting.

Image: Visual representation of the three distinct lighting modes for plant growth.
6.4 Auto Cycle Timer
Press the Timer Button () to activate the auto-cycle timer. The indicator light will show the selected duration:
- Blue: 3 Hours
- Green: 9 Hours
- Red: 12 Hours
Once set, the lights will automatically turn on and off at the same time each day. The timer setting will be invalid if the power is manually turned off or disconnected.
7. Maintenance
To ensure optimal performance and longevity of your CT CAPETRONIX LED Grow Lights Strips, follow these simple maintenance guidelines:
- Cleaning: Gently wipe the light strips with a soft, dry cloth to remove dust and debris. Do not use abrasive cleaners or solvents. Ensure the lights are unplugged before cleaning.
- Inspection: Periodically check the cables and connections for any signs of wear or damage. If any damage is found, discontinue use and contact customer support.
- Storage: If storing the lights for an extended period, unplug them, clean them thoroughly, and store them in a cool, dry place away from direct sunlight.
8. Troubleshooting
If you encounter any issues with your grow lights, please refer to the following common problems and solutions:
| Problem | Possible Cause | Solution |
|---|---|---|
| Lights do not turn on. | Power connection issue, faulty adapter/controller. | Ensure all connections are secure and the power adapter is plugged into a working outlet. Check if the power button on the controller is pressed. |
| Lights are dim or not bright enough. | Brightness level set too low, insufficient number of strips for the area. | Increase the brightness using the '+' button on the controller. Consider adding more light strips or adjusting their placement for better coverage. |
| Timer function is not working correctly. | Timer was manually turned off or power disconnected. | Re-set the timer by pressing the timer button to your desired duration. Avoid manually turning off the lights or disconnecting power if you wish to maintain the daily auto-cycle. |
| Lights are flickering or intermittently turning off. | Loose connection, power supply issue, or product defect. | Check all connections for tightness. Ensure the power adapter is functioning correctly. If the issue persists, contact customer support. |
9. Warranty Information
This CT CAPETRONIX LED Grow Lights Strips product comes with a 1-year manufacturer's warranty from the date of purchase. This warranty covers defects in materials and workmanship under normal use. It does not cover damage caused by misuse, accident, unauthorized modification, or improper installation.
Please retain your proof of purchase for warranty claims.
10. Customer Support
If you have any questions, require technical assistance, or need to make a warranty claim, please contact CT CAPETRONIX customer support through the retailer where you purchased the product or visit the official CT CAPETRONIX website for contact information.
We are committed to providing high-quality products and excellent customer service.