1. Introduction
Thank you for choosing the TOTAL TG109136 13mm 850W Drill. This instruction manual provides essential information for the safe and efficient operation, maintenance, and troubleshooting of your new power tool. Please read this manual thoroughly before first use and keep it for future reference.

Figure 1: The TOTAL TG109136 13mm 850W Drill, showcasing its main body, chuck, auxiliary handle, and depth gauge.
2. General Safety Instructions
Always observe basic safety precautions when using power tools to reduce the risk of fire, electric shock, and personal injury.
- Work Area Safety: Keep the work area clean and well-lit. Cluttered or dark areas invite accidents. Do not operate power tools in explosive atmospheres, such as in the presence of flammable liquids, gases, or dust.
- Electrical Safety: Power tool plugs must match the outlet. Never modify the plug in any way. Avoid body contact with earthed or grounded surfaces such as pipes, radiators, ranges, and refrigerators.
- Personal Safety: Always wear eye protection. Use hearing protection when operating noisy tools. Dress properly; avoid loose clothing or jewelry. Secure long hair.
- Tool Use and Care: Do not force the power tool. Use the correct power tool for your application. Disconnect the plug from the power source before making any adjustments, changing accessories, or storing power tools.
- Maintenance: Maintain power tools. Check for misalignment or binding of moving parts, breakage of parts, and any other condition that may affect the power tool’s operation.
3. Product Overview
The TOTAL TG109136 is a corded electric drill designed for various drilling tasks. Key components include:
- Keyed Chuck: Holds drill bits securely. Requires a chuck key for tightening and loosening.
- Auxiliary Handle: Provides additional grip and control during operation.
- Depth Gauge: Used to set the desired drilling depth.
- Trigger Switch: Activates the drill.
- Lock-on Button: For continuous operation without holding the trigger.
- Forward/Reverse Switch: Changes the rotation direction of the chuck.
- Mode Selector (Hammer/Drill): Switches between rotary drilling and hammer drilling functions.
4. Setup
4.1 Unpacking
- Carefully remove the drill and all accessories from the packaging.
- Inspect the tool for any damage that may have occurred during transit. Do not operate a damaged tool.
- Ensure all components listed in the packaging are present.
4.2 Attaching the Auxiliary Handle and Depth Gauge
- Loosen the auxiliary handle by rotating it counter-clockwise.
- Slide the handle onto the front of the drill body.
- Insert the depth gauge into the hole on the auxiliary handle.
- Adjust the handle to a comfortable position and tighten it by rotating clockwise.
4.3 Installing Drill Bits
- Ensure the drill is unplugged from the power source.
- Insert the chuck key into one of the holes on the chuck.
- Rotate the chuck key counter-clockwise to open the chuck jaws.
- Insert the drill bit into the chuck, ensuring it is centered and fully seated.
- Rotate the chuck key clockwise to tighten the chuck jaws firmly around the drill bit. Remove the chuck key before operating the drill.
5. Operating Instructions
5.1 Powering On/Off
- To start the drill, press the trigger switch.
- To stop the drill, release the trigger switch.
- For continuous operation, press the trigger switch and then press the lock-on button. To release, press the trigger switch again.
5.2 Selecting Rotation Direction
The forward/reverse switch is located near the trigger.
- Push the switch to the left for forward (clockwise) rotation, suitable for drilling.
- Push the switch to the right for reverse (counter-clockwise) rotation, useful for removing screws or freeing a jammed drill bit.
- Always ensure the drill is stopped before changing the rotation direction.
5.3 Selecting Drilling Mode (Hammer/Drill)
The mode selector switch is typically located on the top or side of the drill.
- Drill Mode (Drill Bit Icon): For drilling into wood, metal, plastics, and other non-masonry materials.
- Hammer Drill Mode (Hammer Icon): For drilling into masonry, concrete, and brick. This mode combines rotary action with a hammering motion.
- Select the appropriate mode before starting your task.
5.4 Drilling Techniques
- Always secure the workpiece to prevent it from moving.
- Start drilling at a low speed to create a pilot hole, then increase speed as needed.
- Apply steady, even pressure. Do not force the drill.
- For deep holes, periodically withdraw the drill bit to clear debris.
6. Maintenance
Regular maintenance ensures the longevity and optimal performance of your drill. Always unplug the tool before performing any maintenance.
- Cleaning: Keep the ventilation openings clear and free of dust. Use a soft brush or compressed air to clean the tool. Do not use water or chemical cleaners.
- Chuck Maintenance: Periodically clean the chuck jaws to ensure proper grip on drill bits. Apply a small amount of light machine oil to the chuck jaws if they become stiff.
- Cord Inspection: Regularly inspect the power cord for damage. If damaged, have it replaced by a qualified technician.
- Storage: Store the drill in a dry, secure location out of reach of children.
7. Troubleshooting
| Problem | Possible Cause | Solution |
|---|---|---|
| Drill does not start | No power supply; faulty switch; damaged cord. | Check power outlet and cord. If problem persists, contact service. |
| Drill bit slips in chuck | Chuck not tightened sufficiently; worn chuck jaws; dirty chuck. | Ensure chuck is tightened with the key. Clean chuck jaws. |
| Excessive vibration/noise | Bent drill bit; loose components; internal damage. | Replace bent drill bit. Check for loose parts. If severe, seek professional service. |
| Overheating | Blocked ventilation; excessive load; continuous use. | Clear vents. Reduce load. Allow tool to cool down. |
8. Specifications
| Model: | TOTAL TG109136 |
| Power Input: | 850 Watts |
| Chuck Size: | 13 mm (Keyed) |
| No-Load Speed: | 2700 RPM |
| Voltage: | 220 Volts |
| Weight: | 2.7 Kilograms |
| Dimensions (L x W x H): | 37 x 20 x 10 cm (approximate) |
| Material: | Metal |
| Power Source Type: | Corded Electric |
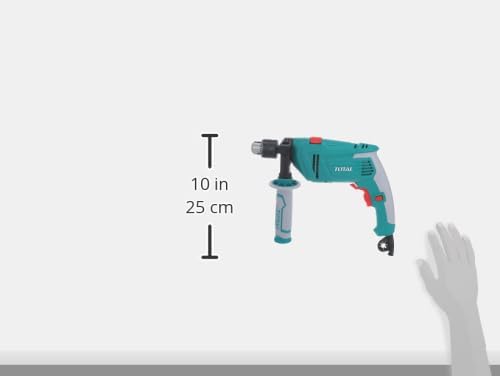
Figure 2: A side profile view of the TOTAL TG109136 Drill, indicating a height of approximately 25 cm (10 inches).
9. Warranty and Support
For warranty information, technical support, or service inquiries, please refer to the warranty card included with your product or contact your local TOTAL dealer or authorized service center. Keep your purchase receipt as proof of purchase.


