1. Introduction
Thank you for choosing the BetterSub CoolSub-5in1 Industrial Heat Press Machine. This versatile machine is designed for various heat transfer applications, including T-shirts, mugs, and other sublimation projects. It is suitable for industrial, professional studio, and personal use. This manual provides essential information for safe operation, setup, and maintenance to ensure optimal performance and longevity of your device.
2. Safety Instructions
Please read and understand all safety instructions before operating the heat press machine. Failure to follow these instructions may result in injury or damage to the equipment.
- Electrical Safety: Ensure the machine is connected to a grounded 110V power outlet. Do not operate with wet hands or in damp conditions. Unplug the machine from the power source when not in use or before cleaning/maintenance.
- Heat Hazard: The heating plate and mug press attachments reach very high temperatures. Always use heat-resistant gloves when handling hot items or adjusting components. Avoid direct contact with hot surfaces.
- Ventilation: Operate the machine in a well-ventilated area to dissipate heat and any fumes from materials being pressed.
- Children and Pets: Keep the machine out of reach of children and pets.
- Stable Surface: Place the machine on a stable, heat-resistant, and level surface to prevent tipping.
- Emergency: In case of malfunction or unusual odors, immediately turn off the power switch and unplug the machine.
3. Product Overview
3.1 Components Diagram
Familiarize yourself with the main components of your BetterSub CoolSub-5in1 heat press machine:

Image 3.1: Labeled diagram showing the Handle, Temp/Time Controller, Pressure Knob, Stainless Steel Spring, Anti-scald Handle, Power Switch, Air Interface, Heater, High-temp Resistant Silicone Pad, White Foam Pad, and Cover.
- Handle: Used to open and close the heating platen.
- Temp/Time Controller: Digital display and buttons for setting temperature and time.
- Pressure Knob: Adjusts the downward pressure of the heating platen.
- Stainless Steel Spring: Provides even pressure distribution.
- Anti-scald Handle: Ergonomically designed for safe operation.
- Power Switch: Turns the machine on and off.
- Air Interface: Connection point for accessories.
- Heater: The main heating element.
- High-temp Resistant Silicone Pad: Provides a stable and heat-resistant base for pressing.
- White Foam Pad: Additional padding for even pressure.
- Cover: Protective casing for internal components.
3.2 Key Features
- Multi-functional Design: Includes a T-shirt press, 11oz cylindrical mug press, and 15oz cylindrical mug press.
- Digital Control: Convenient LCD control panel for precise temperature and time settings.
- Even Heating: 30.5 x 35.5 cm (12 x 14 inch) heating plate with 1000W power for quick and consistent heat distribution.
- Adjustable Pressure: Full-range pressure adjustment knob to accommodate various material thicknesses.
- Safety Features: Designed with user safety in mind, including anti-scald handles and stable construction.
3.3 Specifications

Image 3.2: Diagram illustrating the dimensions of the main heat press unit (15 inches long, 12 inches wide, 14.6 inches high) and the cylindrical mug press attachments (11oz and 15oz).
| Specification | Detail |
|---|---|
| Model Number | CoolSub-5in1 |
| Brand | BetterSub |
| Main Platen Size | 30.5 x 38.1 cm (12 x 15 inches) |
| Mug Press Attachments | 11oz Cylindrical, 15oz Cylindrical |
| Power | 1000 Watts |
| Voltage | 110 Volts |
| Temperature Range | Up to 227°C (440°F) |
| Time Range | 0-999 seconds |
| Overall Dimensions (approx.) | 51.43 x 47.62 x 41.91 cm (20.25 x 18.75 x 16.5 inches) |
| Item Weight | 20.52 kg (45.24 lbs) |
4. Setup
- Unpacking: Carefully remove all components from the packaging. Inspect for any shipping damage. Retain packaging for future transport or storage.
- Placement: Place the heat press machine on a sturdy, level, and heat-resistant workbench or table. Ensure there is adequate space around the machine for safe operation and ventilation.
- Power Connection: Connect the power cord to the machine and then to a grounded 110V electrical outlet.
- Initial Inspection: Before first use, ensure all screws are tight and the heating platen moves smoothly.
5. Operating Instructions
5.1 Digital Controller Operation
The digital controller allows precise setting of temperature and time for various heat transfer materials.
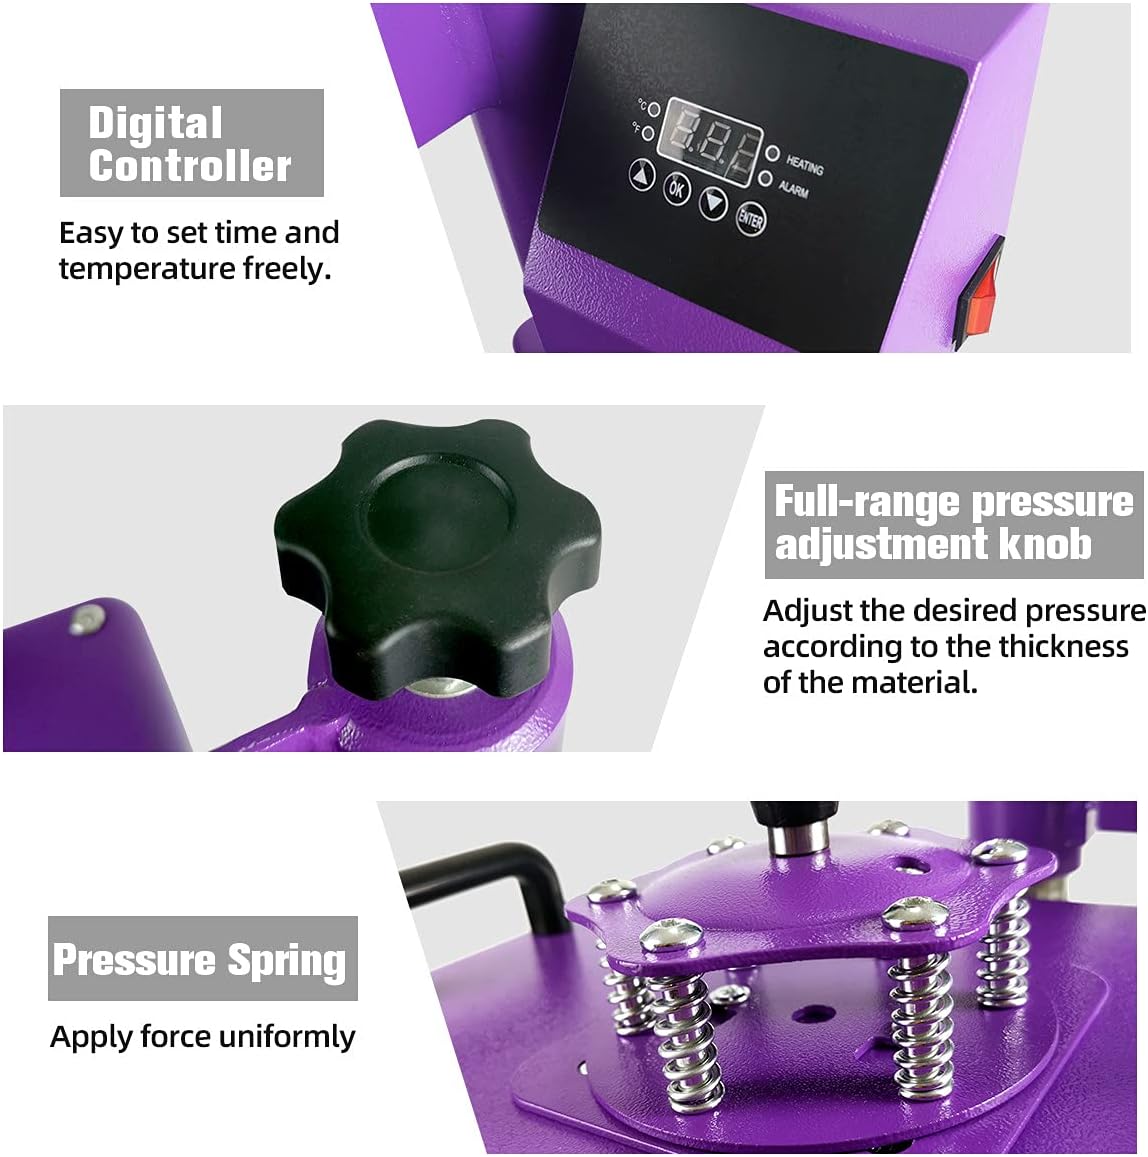
Image 5.1: Close-up of the digital controller for setting time and temperature, the full-range pressure adjustment knob, and the pressure springs for uniform force application.
- Power On: Flip the red power switch located on the side of the control box to the 'ON' position. The digital display will light up.
- Setting Temperature: Press the 'SET' button. The temperature display will flash. Use the 'UP' and 'DOWN' arrows to adjust the desired temperature. Press 'SET' again to confirm.
- Setting Time: After setting the temperature, press 'SET' again. The time display will flash. Use the 'UP' and 'DOWN' arrows to adjust the desired time in seconds. Press 'SET' one more time to confirm and exit the setting mode.
- Heating: The machine will begin to heat up to the set temperature. The 'HEATING' indicator light will be on. Once the set temperature is reached, an 'ALARM' may sound, and the 'HEATING' light may turn off or flash.
5.2 Pressure Adjustment
The pressure knob on top of the machine allows you to adjust the downward force applied during pressing. Turn the knob clockwise for more pressure and counter-clockwise for less pressure. Adjust according to the thickness of your material and the requirements of your transfer medium.
5.3 T-shirt Press Operation
- Pre-heat: Turn on the machine and set the desired temperature and time using the digital controller. Allow the platen to reach the set temperature.
- Prepare Garment: Place the T-shirt or fabric onto the silicone pad. Ensure it is flat and free of wrinkles. You may pre-press the garment for a few seconds to remove moisture and wrinkles.
- Position Transfer: Place your sublimation paper or heat transfer vinyl onto the garment in the desired position. Secure with heat-resistant tape if necessary.
- Press: Swing the heating platen over the garment and firmly press down the handle until it locks. The timer will start automatically.
- Remove: Once the timer sounds, lift the handle to release the pressure and swing the heating platen away. Carefully remove the transfer paper/vinyl according to its specific instructions (hot peel or cold peel).
5.4 Mug Press Operation
The machine comes with two cylindrical mug press attachments (11oz and 15oz).

Image 5.2: Illustrations showing the updated thumb screw type mug press design for easy attachment and how to change the mug press attachment by unscrewing and sliding it off.
- Attach Mug Press: Ensure the main heat press is off and cool. Locate the air interface connection point. Slide the desired mug press attachment onto the arm and secure it using the thumb screws. Connect the electrical plug from the mug press to the corresponding port on the main unit.
- Pre-heat: Turn on the machine and set the desired temperature and time for mug sublimation. Allow the mug press to reach the set temperature.
- Prepare Mug: Wrap your sublimation print around the mug and secure it tightly with heat-resistant tape.
- Press: Place the prepared mug into the mug press. Close the handle firmly. The timer will start.
- Remove: Once the timer sounds, open the mug press handle. Carefully remove the hot mug using heat-resistant gloves and place it on a heat-resistant surface to cool. Once cool, remove the transfer paper.
6. Maintenance
- Cleaning: Regularly clean the heating platen and silicone pad with a soft, damp cloth when the machine is cool. Do not use abrasive cleaners or solvents.
- Inspection: Periodically check all electrical connections and moving parts for wear or damage.
- Storage: When not in use, store the machine in a clean, dry, and dust-free environment.
7. Troubleshooting
| Problem | Possible Cause | Solution |
|---|---|---|
| Machine does not power on | Power cord not connected; Power switch off; Outlet malfunction | Check power cord connection; Ensure power switch is ON; Test outlet with another device. |
| Uneven heating | Faulty heating element; Incorrect pressure | Contact customer support; Adjust pressure knob for even distribution. |
| Transfer not adhering | Incorrect temperature/time; Insufficient pressure; Wrong transfer material | Verify temperature and time settings; Increase pressure; Ensure compatibility of transfer material with garment. |
| Digital display error | Sensor issue; Electrical fault | Turn off and restart the machine. If the error persists, contact customer support. |
8. Warranty and Support
The BetterSub CoolSub-5in1 Heat Press Machine typically comes with a One Year Warranty. For specific warranty details, technical support, or service inquiries, please refer to your purchase documentation or contact BetterSub customer service directly. Comprehensive instructions and support resources are available to assist users.


