
1. Introduction
This manual provides detailed instructions for the installation and maintenance of the Xitomer Foot Peg Lowering Kit, designed for Suzuki DL650 and V-Strom 650 motorcycles manufactured between 2004 and 2024. This kit is an aftermarket product intended to lower the footpeg position, offering a more comfortable riding posture and a lower center of gravity for the rider.
2. Safety Information
Always prioritize safety when working on your motorcycle. Improper installation can lead to serious injury or damage. If you are unsure about any step, consult a qualified motorcycle mechanic.
- Ensure the motorcycle is stable on a stand before beginning work.
- Wear appropriate personal protective equipment, including gloves and eye protection.
- Use the correct tools for each step.
- Do not overtighten fasteners, as this can strip threads or damage components. Refer to your motorcycle's service manual for torque specifications where applicable.
- After installation, thoroughly check all connections and ensure proper function of the footpegs, brake, and shifter before riding.
3. Package Contents
Verify that all components listed below are present and undamaged before proceeding with installation.
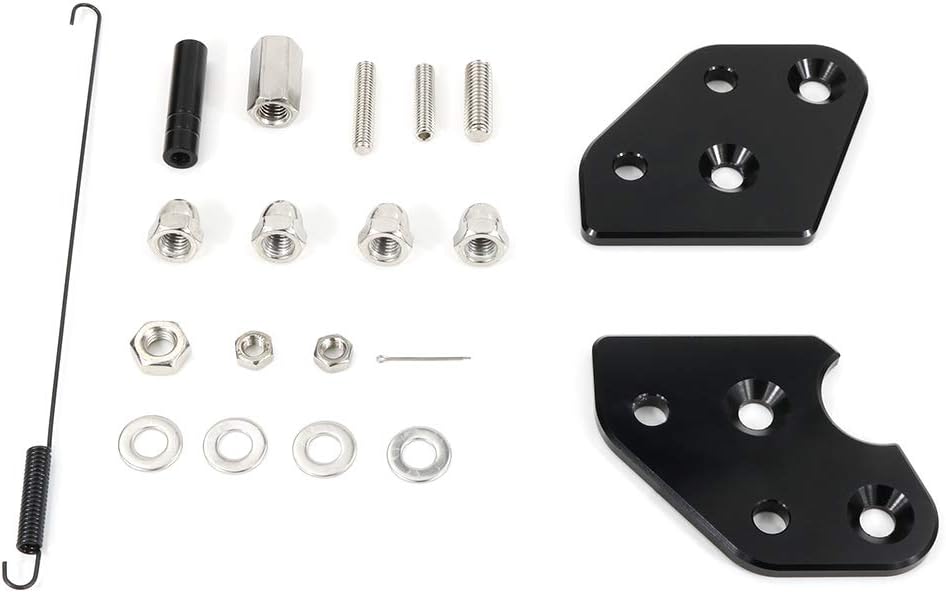
Image 3.1: All components included in the Xitomer Foot Peg Lowering Kit. This includes two lowering plates, various nuts, bolts, washers, a cotter pin, and a spring.
- 1 Pair of Footpeg Lowering Plates (7075-T6 Aluminum Alloy, Black)
- Associated Fasteners (nuts, bolts, washers, cotter pin)
- Shift Linkage Rod and Adjuster (if applicable to specific kit variant)
- Brake Pedal Extension (if applicable to specific kit variant)
Note: The exact components may vary slightly depending on the specific kit variant and motorcycle model year. Refer to the image for a general overview.
4. Setup and Installation
Installation requires basic mechanical skills and common tools. It is recommended to have your motorcycle's service manual available for reference, especially for torque specifications.
4.1 Tools Required (Not Included)
- Socket wrench set
- Hex key set
- Pliers (for cotter pins)
- Thread-locking compound (e.g., Loctite, medium strength)
- Torque wrench (recommended)
4.2 Installation Steps
- Prepare the Motorcycle: Park the motorcycle on a level surface and secure it on a center stand or paddock stand to ensure stability. Allow the engine and exhaust to cool completely.
- Remove Original Footpegs: Carefully remove the bolts and pins securing the original footpegs and their mounting brackets. Note the orientation of all components for reassembly.
- Install Lowering Plates: Attach the Xitomer lowering plates to the original footpeg mounting points using the provided hardware. Ensure the plates are oriented correctly (left and right sides). Apply a small amount of thread-locking compound to the bolts before tightening.
- Reattach Footpegs: Mount the original footpegs to the newly installed lowering plates using the appropriate hardware. Secure with new cotter pins if provided, or reuse original ones if in good condition.
- Adjust Shift Lever (Left Side):
- Due to the lowered footpeg position, the shift lever may need adjustment. Disconnect the shift linkage rod from the shift lever.
- Install the new, longer shift linkage rod and adjuster if included in your kit. Note that some adjusters may have reverse threads on one end.
- Adjust the length of the linkage rod to achieve a comfortable and functional shift lever position relative to the lowered footpeg. Ensure smooth operation through all gears.
- Secure all connections with thread-locking compound and ensure proper torque.
- Adjust Brake Pedal (Right Side):
- The rear brake pedal may also require adjustment or the installation of an extension if provided.
- Adjust the brake pedal height to match the new footpeg position, ensuring comfortable and effective braking. Refer to your motorcycle's service manual for brake pedal free play specifications.
- Secure all fasteners.
- Final Inspection: Before riding, double-check all bolts and fasteners for tightness. Verify that the shift lever and brake pedal operate freely and do not interfere with any other motorcycle components. Ensure there is no binding or excessive play.

Image 4.1: Close-up view of one of the Xitomer foot peg lowering plates, showing the mounting holes.

Image 4.2: Angled view of the Xitomer foot peg lowering plates, highlighting the precision-machined edges.
5. Operating Benefits
The Xitomer Foot Peg Lowering Kit is designed to enhance your riding experience by:
- Improved Comfort: Lowers the footpeg position, reducing the angle of your knees and providing a more relaxed and comfortable seating position, especially beneficial for taller riders or during long tours.
- Lower Center of Gravity: Contributes to a slightly lower center of gravity for the rider, which can improve stability and ease of handling at low speeds.
- Easier Foot Placement: Allows for easier and more confident foot placement on the ground when stopped.
6. Maintenance
Regular inspection and maintenance are crucial for the longevity and safe operation of your motorcycle and its aftermarket components.
- Periodic Inspection: Regularly check all bolts and fasteners securing the lowering plates and footpegs for tightness. Vibrations from riding can cause fasteners to loosen over time.
- Cleanliness: Keep the footpeg area clean from dirt, mud, and debris to prevent corrosion and ensure smooth operation of moving parts.
- Functionality Check: Periodically check the free play and operation of the shift lever and brake pedal to ensure they remain within your motorcycle's specifications and operate smoothly.
- Damage Assessment: In case of a fall or impact, inspect the lowering plates and footpegs for any signs of damage, bending, or cracks. Replace damaged components immediately.
7. Troubleshooting
- Difficulty with Shift/Brake Adjustment:
If you encounter difficulty adjusting the shift lever or brake pedal to a comfortable position, ensure that the linkage rods are correctly installed and that any adjusters are threaded properly. Some adjusters may have reverse threads. If the provided linkage rod is too long, minor modifications may be necessary, or consult with a professional.
- Loose Components:
If any part of the kit feels loose after installation, re-check all fasteners. Ensure thread-locking compound was applied where appropriate and that all bolts are torqued to specification. Do not ride with loose components.
- Interference with Other Parts:
After installation, check for any interference between the lowered footpegs, shift lever, brake pedal, and other motorcycle components (e.g., exhaust, frame, swingarm) throughout the full range of suspension travel and steering. Adjust as necessary to prevent contact.
8. Specifications
| Model Number | FPL01-X |
| Material | 7075-T6 Aluminum Alloy |
| Color | Black |
| Fitment | Suzuki DL650 / V-Strom 650 (2004-2024) |
| Item Weight | Approximately 9.9 ounces (280 grams) |
9. Warranty and Support
Xitomer products are designed for quality and performance. For any questions regarding installation, product defects, or warranty claims, please contact Xitomer customer support through the retailer where the product was purchased. Keep your proof of purchase for warranty purposes.
For additional support and product information, visit the official Xitomer store or website.