
Metabo 602358850
Metabo BS 18 LTX BL I 18V Brushless Cordless Drill Driver User Manual
Model: 602358850
Introduction
This manual provides essential instructions for the safe and effective operation, maintenance, and troubleshooting of your Metabo BS 18 LTX BL I 18V Brushless Cordless Drill Driver. Please read these instructions carefully before using the tool and keep them for future reference.
General Safety Instructions
WARNING: Read all safety warnings, instructions, illustrations, and specifications provided with this power tool. Failure to follow all instructions listed below may result in electric shock, fire, and/or serious injury.
- Always wear appropriate personal protective equipment, including eye protection, hearing protection, and gloves.
- Ensure the work area is well-lit and free from obstructions.
- Keep children and bystanders away while operating a power tool.
- Do not operate power tools in explosive atmospheres, such as in the presence of flammable liquids, gases, or dust.
- Disconnect the battery pack from the tool before making any adjustments, changing accessories, or storing the tool.
- Use only battery packs and chargers specified by the manufacturer.
- Maintain power tools. Check for misalignment or binding of moving parts, breakage of parts, and any other condition that may affect the power tool’s operation.
Product Overview
Familiarize yourself with the components of your Metabo BS 18 LTX BL I drill driver.

Figure 1: Metabo BS 18 LTX BL I Cordless Drill Driver. This image displays the complete drill driver unit, including the main body, chuck, trigger, and detachable side handle. The tool features a green and black housing with red accents.

Figure 2: Technical drawing illustrating the dimensions of the Metabo BS 18 LTX BL I drill driver. This diagram provides precise measurements for the tool's length, height, and width, including the chuck diameter (43mm Euro collar).
Key Components:
- Chuck: For securing drill bits and other accessories.
- Torque Adjustment Ring: To set the desired torque level.
- Gear Selector: For high-speed drilling or high-torque driving.
- Trigger Switch: Activates the tool and controls speed.
- Forward/Reverse Selector: Changes rotation direction.
- Battery Pack Interface: For attaching the 18V battery pack.
- LED Work Light: Illuminates the work area.
- Belt Hook: For convenient temporary storage.
- Side Handle: Provides additional control for demanding applications.
Setup
1. Battery Installation and Removal
- To Install: Align the battery pack with the tool's battery interface and slide it in until it clicks securely into place.
- To Remove: Press the battery release button (if present) and slide the battery pack out.
Note: This tool is part of the CAS (Cordless Alliance System) and is compatible with all 18V battery packs and chargers from CAS brands. Ensure the battery is fully charged before use.

Figure 3: Illustration of the Cordless Alliance System (CAS) battery compatibility. This image shows a CAS battery pack at the center, surrounded by numerous power tools from various brands, all compatible with the same 18V battery system.
2. Attaching Accessories (Drill Bits/Driver Bits)
- Ensure the tool is switched off and the battery pack is removed.
- Rotate the chuck counter-clockwise to open the jaws.
- Insert the drill bit or driver bit fully into the chuck.
- Rotate the chuck clockwise to tighten the jaws securely around the accessory. Hand-tighten firmly.
3. Attaching the Side Handle
For demanding applications, attach the auxiliary side handle for improved control and safety. Slide the handle onto the Euro collar (43 mm diameter) and tighten it securely in the desired position.
Operating Instructions
1. Selecting Rotation Direction
Use the forward/reverse selector switch located above the trigger to choose the desired rotation direction. Push left for forward (drilling/driving screws in) and right for reverse (removing screws).
2. Adjusting Torque and Speed
- Torque Adjustment: Rotate the torque adjustment ring to select the appropriate torque setting for your application. Lower settings are for driving small screws or working with soft materials, while higher settings are for larger screws or harder materials. The "Precision Stop" feature provides electronic torque control for accurate work.
- Gear Selection: Use the gear selector switch on top of the tool to choose between two speed ranges. Gear 1 provides higher torque and lower speed, suitable for driving screws. Gear 2 provides lower torque and higher speed, ideal for drilling.
3. Using the Impulse Mode
The selectable "impulse" mode is designed for specific tasks:
- Removing damaged screws.
- Spot-drilling on smooth surfaces to prevent the drill bit from wandering.
Refer to the tool's specific controls for activating the impulse function.
4. Electronic Safety Shutdown (Kickback Control)
The tool features an electronic safety shutdown system to prevent kickback if the drill bit jams unexpectedly. This enhances user safety by stopping the motor instantly.

Figure 4: Visual representation of the Anti-Kickback safety feature. This image shows the drill driver preventing rotational force from being transferred to the user when the bit jams, indicated by red arrows showing the tool stopping instead of twisting.
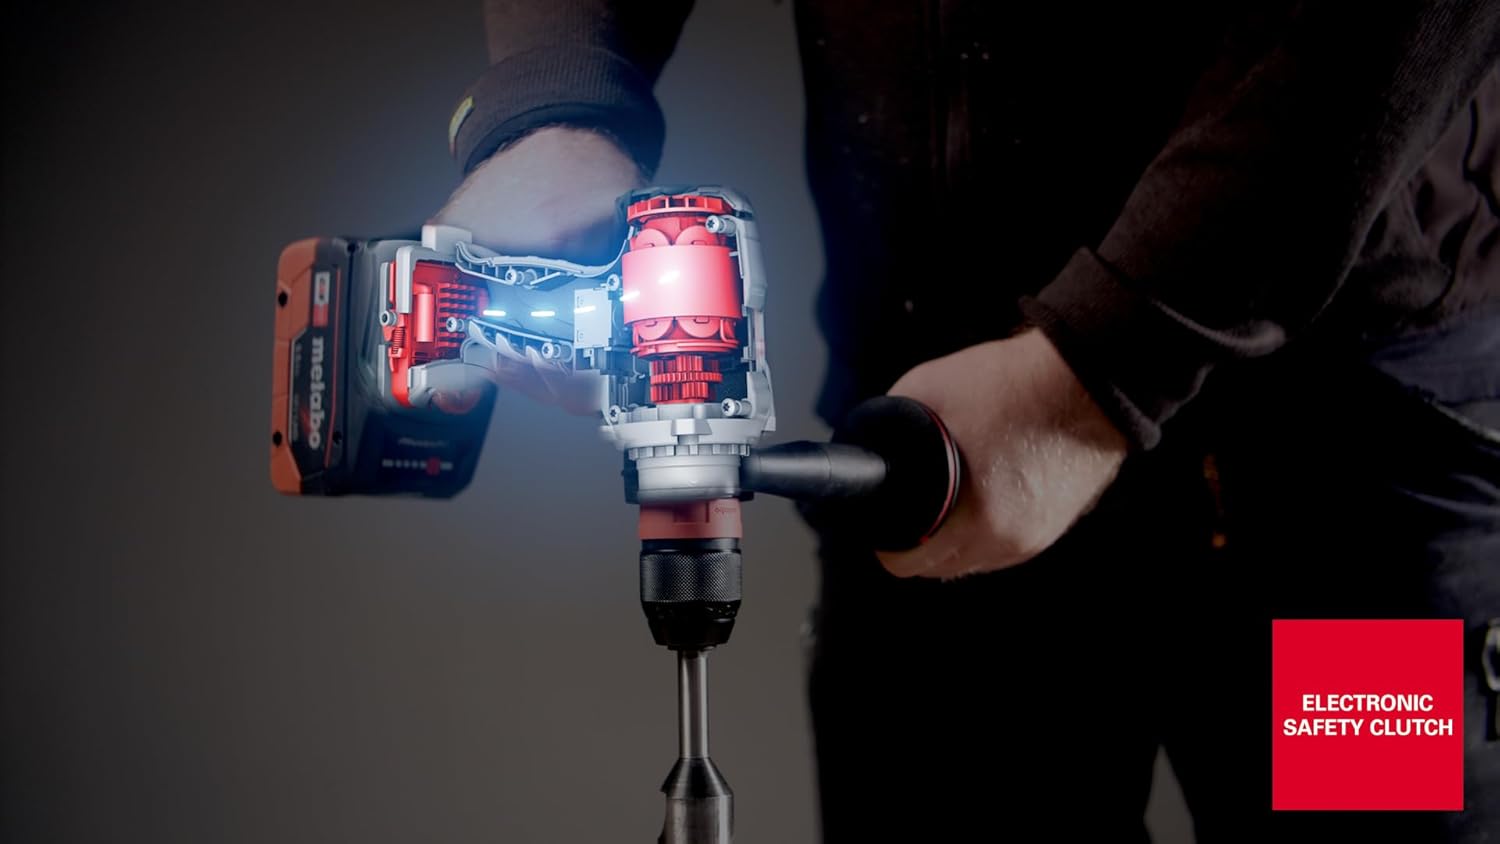
Figure 5: Internal view of the Metabo drill driver, illustrating the Electronic Safety Clutch mechanism. This cutaway view highlights the internal components responsible for the electronic safety shutdown, ensuring user protection during operation.
5. Integrated LED Work Light
The integrated LED work light illuminates the work area when the trigger is pressed. It also features an afterglow function, remaining lit for a short period after the trigger is released to provide continued visibility.
6. Using the Belt Hook and Bit Case
The tool includes a handy belt hook and bit case, which can be attached to either the right or left side of the tool for convenient access and temporary storage.
Maintenance
- Cleaning: Regularly clean the ventilation openings of the tool to prevent dust buildup. Use a soft, dry cloth. Do not use water or chemical cleaning agents.
- Inspection: Periodically inspect the tool for any signs of damage, loose screws, or worn parts. If damage is found, have the tool repaired by a qualified service technician.
- Battery Care: Store battery packs in a cool, dry place. Do not expose them to extreme temperatures or direct sunlight.
- Storage: When not in use, store the tool and accessories in a secure, dry place, out of reach of children.
Troubleshooting
| Problem | Possible Cause | Solution |
|---|---|---|
| Tool does not start. | Battery not inserted correctly or discharged. | Ensure battery is fully inserted. Charge or replace battery. |
| Reduced power or performance. | Battery low, incorrect torque setting, or tool overheating. | Charge battery. Adjust torque setting. Allow tool to cool down (overload protection). |
| Chuck not holding bit securely. | Bit not inserted fully or chuck worn. | Re-insert bit and tighten chuck firmly. If issue persists, chuck may need replacement. |
| Tool stops unexpectedly (kickback control). | Drill bit jammed or overloaded. | This is a safety feature. Remove the tool from the workpiece, clear any obstruction, and restart. Reduce pressure or use a different bit. |
If you encounter problems not listed here or if solutions do not resolve the issue, contact Metabo customer support or an authorized service center.
Specifications
| Feature | Detail |
|---|---|
| Brand | Metabo |
| Model Number | 602358850 |
| Power Source | Battery Powered |
| Voltage | 18 Volts |
| Motor Type | Brushless |
| Item Torque | 177 Inch Pounds |
| Maximum Power | 850 Watts |
| Chuck Type | Keyless |
| Euro Collar Diameter | 43 mm |
| Item Weight | 1.7 Kilograms (3.74 pounds) |
| Product Dimensions | 5.51 x 2.36 x 4.72 inches |
| Sound Level | 87 Decibels |
| Special Features | Wireless, Impulse Mode, Precision Stop, Overload Protection, Electronic Safety Shutdown, Integrated LED Work Light, Belt Hook, Bit Case |
| Battery Compatibility | CAS (Cordless Alliance System) 18V battery packs |
Warranty and Support
For information regarding warranty coverage, service, or technical support, please refer to the official Metabo website or contact your authorized Metabo dealer. Keep your purchase receipt as proof of purchase for warranty claims.
You can visit the official Metabo store for more information: Metabo Store on Amazon
Related documents602358850


Ask a question about this manual
Ask about setup, troubleshooting, compatibility, parts, safety, or missing instructions. Manuals+ will review the question and use this page’s manual context to help answer it.