
Introduction
This manual provides instructions for the installation, operation, maintenance, and troubleshooting of your new Mintu Refrigerator Ice Maker Replacement. This unit is designed to replace the original ice maker in various Whirlpool refrigerator models, ensuring continued ice production. Please read these instructions carefully before beginning installation or operation.
Safety Information
- Always disconnect power to the refrigerator before attempting any installation or maintenance.
- Wear appropriate personal protective equipment, such as gloves, during installation.
- Ensure all connections are secure to prevent water leaks.
- If you are unsure about any step, consult a qualified appliance technician.
Package Contents
Verify that all components are present before beginning installation:
- Mintu Refrigerator Ice Maker Replacement unit
- Instruction Manual (this document)
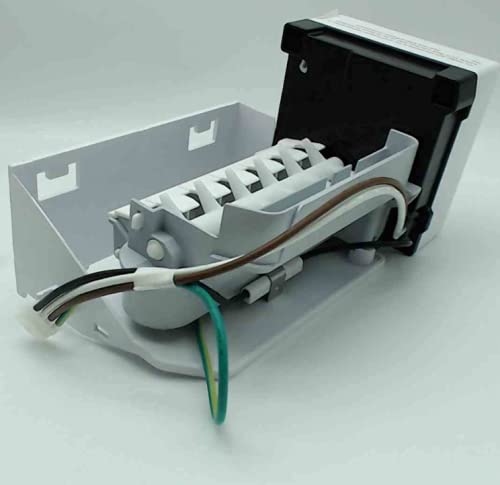
Image 1: Front view of the Mintu Refrigerator Ice Maker Replacement unit, showing the ice mold and wiring harness.

Image 2: Angled view of the Mintu Refrigerator Ice Maker Replacement, highlighting the internal components.

Image 3: Another side view of the Mintu Refrigerator Ice Maker Replacement, showing the motor housing.
Setup and Installation
This section outlines the general steps for replacing your refrigerator's ice maker. Specific steps may vary slightly depending on your refrigerator model. Refer to your refrigerator's original service manual for detailed instructions if needed.
- Disconnect Power: Unplug the refrigerator from the electrical outlet or turn off the circuit breaker supplying power to the refrigerator.
- Access Old Ice Maker: Locate the existing ice maker inside the freezer compartment. It is typically mounted on the side wall or ceiling.
- Remove Old Ice Maker:
- Carefully disconnect the wiring harness from the old ice maker.
- Unscrew any mounting screws holding the old ice maker in place.
- Remove the old ice maker from the freezer.
- Install New Ice Maker:
- Position the new Mintu ice maker in the same location as the old one.
- Secure it with the mounting screws. Ensure it is level.
- Connect the wiring harness from the refrigerator to the new ice maker. Ensure the connection is firm and correct.
- Restore Power: Plug the refrigerator back into the electrical outlet or turn on the circuit breaker.
- Initial Operation: Allow several hours for the freezer to reach its operating temperature and for the ice maker to begin producing ice. The first few batches of ice may be smaller or irregular; discard them.

Image 4: Side view of the Mintu Refrigerator Ice Maker Replacement, showing mounting points for installation.
Operating Instructions
Once installed and powered, the ice maker operates automatically. It will fill with water, freeze the water into cubes, and then eject the cubes into the ice bin. The ice maker has a shut-off arm that will stop ice production when the ice bin is full.
- First Use: Discard the first 2-3 batches of ice to ensure any manufacturing residues are flushed out and the water lines are clear.
- Ice Production Rate: Ice production can vary based on freezer temperature, water pressure, and frequency of door openings.
- Shut-Off Arm: Ensure the shut-off arm is in the down position for ice production. Lift the arm to stop ice production (e.g., when cleaning the ice bin or if you don't need ice).
Maintenance
- Cleaning the Ice Bin: Periodically remove and wash the ice bin with mild soap and warm water. Rinse thoroughly and dry completely before returning it to the freezer.
- Cleaning the Ice Maker: If mineral deposits build up on the ice maker components, disconnect power and gently wipe the surfaces with a damp cloth. Do not use abrasive cleaners or harsh chemicals.
- Water Filter: Ensure your refrigerator's water filter is replaced regularly according to the manufacturer's recommendations to maintain water quality and ice taste.
Troubleshooting
| Problem | Possible Cause | Solution |
|---|---|---|
| Ice maker not producing ice. |
|
|
| Ice cubes are small or hollow. |
|
|
| Ice has an unusual taste or odor. |
|
|
Specifications
- Brand: Mintu
- Product Type: Refrigerator Ice Maker Replacement
- ASIN: B097BV1RJ1
- UPC: 017015811163
- Compatibility: Designed for various Whirlpool refrigerator models, including WSF26C3EXW01, WSF26C3EXY01, WCG55US6HW00, WCG77US0HS00, WCG97US0HS00, WCG97US6HS00, WRL767SIAM00, WRS526SIAE00, WRS526SIAH00, WRS537SIAB00, WRS537SIAF00, and others.
Warranty and Support
For warranty information or technical support regarding your Mintu Refrigerator Ice Maker Replacement, please contact the retailer or manufacturer directly. Keep your purchase receipt as proof of purchase.
Manufacturer: Mintu
For further assistance, you may visit the Mintu Store on Amazon.