
1. Introduction
This manual provides detailed instructions for the proper use, setup, and maintenance of your Greaval UV-5R Ham Radio. The UV-5R is a dual-band UHF/VHF handheld two-way radio designed for reliable communication. Please read this manual thoroughly before operating the device to ensure safe and efficient use.
2. What's in the Box
Carefully unpack your Greaval UV-5R radio and verify that all items listed below are present:
- 3 x Greaval UV-5R Ham Radio Units
- 6 x 1800mAh Li-ion Batteries
- 3 x Programming Cables
- 3 x RH-771 High Gain Antennas
- 3 x SRH805S Short Antennas
- 3 x Original Antennas
- 3 x Hand Microphones
- 3 x Car Charger Adapters
- 3 x Power Adapters
- 3 x Earpieces
- 3 x Belt Clips
- 3 x Hand Straps
- 3 x User's Manuals

3. Product Overview
The Greaval UV-5R radio features a compact design with a clear LCD display and a full keypad for easy operation.
3.1 Front View

3.2 Side Views


3.3 Rear View (Battery Compartment)

4. Setup
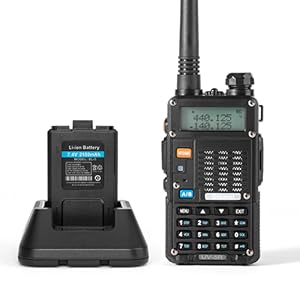
4.1 Battery Installation and Charging
- Align the battery pack with the grooves on the back of the radio.
- Slide the battery upwards until it clicks into place.
- To charge, place the radio (with battery installed) into the charging cradle. Connect the power adapter to the cradle and a power outlet. The indicator light on the charger will show charging status.
- For optimal battery life, fully charge the battery before first use. If storing the radio for extended periods, charge the battery approximately every 6 months.
4.2 Antenna Attachment
- Screw the desired antenna (original, short, or high-gain) clockwise onto the antenna connector at the top of the radio until it is finger-tight. Do not overtighten.

4.3 Programming
The Greaval UV-5R radio is programmable. For advanced channel and frequency settings, use the provided programming cable and compatible software. Refer to the software's instructions for detailed programming procedures.

5. Operating Instructions
5.1 Power On/Off and Volume Control
- To power on, rotate the volume knob clockwise until you hear a click.
- To power off, rotate the volume knob counter-clockwise until you hear a click.
- Adjust the volume by rotating the same knob.
5.2 Channel Selection and Frequency Range
The UV-5R supports 128 channel memories and operates within the UHF frequency range. You can switch between VFO (Variable Frequency Oscillator) mode for direct frequency input and Channel mode for pre-programmed channels using the appropriate function keys.
5.3 Transmitting and Receiving
- To transmit, press and hold the PTT (Push-to-Talk) button on the side of the radio. Speak clearly into the microphone.
- Release the PTT button to receive.
- The radio features a dual-band display, allowing you to monitor two frequencies simultaneously. Use the A/B button to switch between the primary (transmit) and secondary (monitor) frequencies.
5.4 Power Output Adjustment
The radio offers High, Medium, and Low power output settings. Adjusting the power output can help conserve battery life and comply with local regulations. Consult your local amateur radio regulations for appropriate power levels.
5.5 Special Features
- VOX (Voice Operated Transmission): Allows hands-free transmission when enabled.
- Integrated Flashlight: Activate the built-in flashlight for illumination in low-light conditions.

Important Note:
This device is fully compliant with FCC Part 15B and Part 90 regulations. Operation of this device may require an amateur radio license. It is the user's responsibility to ensure compliance with all applicable local and national regulations regarding radio operation.
6. Maintenance
6.1 Cleaning
Wipe the radio's surface with a soft, damp cloth. Do not use harsh chemicals or abrasive cleaners. Ensure the radio is dry before use.
6.2 Battery Care
To prolong battery life, avoid overcharging or completely discharging the Li-ion battery. If the radio is not used for an extended period, charge the battery every six months to maintain its capacity.
6.3 Water Resistance
The Greaval UV-5R is water resistant, meaning it can withstand light splashes or rain. It is not waterproof and should not be submerged in water.
7. Troubleshooting
| Problem | Possible Cause | Solution |
|---|---|---|
| Radio does not power on | Low or dead battery; improperly installed battery | Charge the battery; ensure battery is correctly installed. |
| Cannot transmit or receive | Incorrect frequency/channel; antenna not connected; low battery; squelch level too high | Verify frequency/channel settings; ensure antenna is securely attached; charge battery; adjust squelch level. |
| Poor audio quality | Weak signal; antenna issue; volume too low/high | Move to an area with better signal; check antenna connection; adjust volume. |
| Keypad unresponsive | Keypad lock activated | Disable keypad lock (refer to radio's specific key combination for unlock). |
8. Specifications
- Item Weight: 6.7 ounces
- Product Dimensions: 1.3 x 2.3 x 4.3 inches
- Item Model Number: UV 5R
- Batteries: 1 Lithium Ion battery required (included)
- Brand: Greaval
- Number of Channels: 128
- Special Features: Digital Display, Dual Band, Integrated Flashlight, Long Range, Voice Operated Transmission
- Frequency Range: UHF
- Talking Range Maximum: 30 Mile (under ideal conditions)
- Voltage: 7.4 Volts
- Water Resistance Level: Water Resistant
9. Warranty and Support
Your Greaval UV-5R Ham Radio comes with the following warranty and support:
- Return Policy: 30-day hassle-free return.
- Main Unit Warranty: 18-month warranty on the main radio unit.
- Parts Warranty: 12-month warranty on parts.
- Battery Pack Replacement: 6-month free replacement on the battery pack.
For technical support or warranty claims, please refer to the contact information provided with your purchase documentation or visit the official Greaval website.