
1. Introduction
This manual provides comprehensive instructions for the proper installation, care, and troubleshooting of your new Mintu Washer Door Gasket. Adhering to these guidelines will ensure optimal performance and longevity of the replacement part.
This gasket is designed as a direct replacement for various LG and Kenmore washing machine models. Please verify compatibility with your appliance before proceeding with installation.
Compatible Washer Models:
- LG Washing Machine models: 41372, 41373, 41379, F1298FYNP, F1298FYNP9, F12A4FNP, F12A4FNP7, F12A4FNP9, WM3070HWA, WM3070RD, WM3770HVA
- Kenmore Washing Machine models: 79641373210, 79641373211, 79641379211, 796.41373210, 796.41373211, 796.41379211
2. Safety Information
Always prioritize safety when performing maintenance or repairs on appliances. Failure to follow these safety instructions could result in personal injury or property damage.
- Disconnect Power: Before beginning any installation or maintenance, ensure the washing machine is unplugged from the electrical outlet.
- Water Supply: Turn off the water supply to the washing machine to prevent leaks.
- Wear Protective Gear: Use gloves to protect your hands from sharp edges or residues.
- Professional Assistance: If you are unsure about any step, consult a qualified appliance technician.
- Original Parts: Use only genuine or approved replacement parts to ensure proper fit and function.
3. Product Overview
The Mintu Washer Door Gasket is a critical component that creates a watertight seal between the washing machine's drum and the door. This prevents water leakage during wash cycles and contributes to the overall efficiency of the appliance.
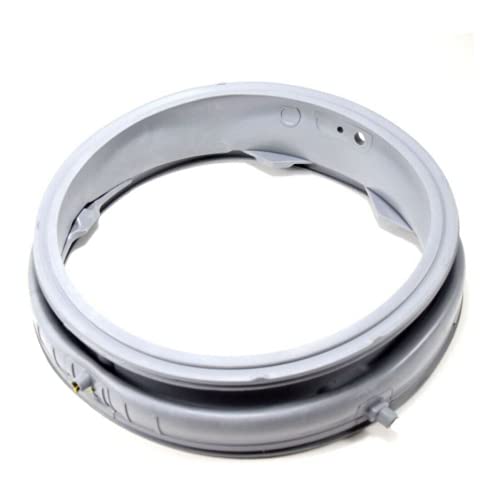
Figure 1: Mintu Washer Door Gasket. This image shows the flexible rubber seal with its characteristic folds, essential for creating a tight seal in front-load washing machines.
The gasket is constructed from durable alloy steel, designed to withstand the rigorous conditions inside a washing machine, including exposure to water, detergents, and varying temperatures.
4. Setup and Installation
4.1. Before You Begin
- Ensure the washing machine is completely empty and dry.
- Gather necessary tools: screwdriver (Phillips and flathead), pliers, spring expansion tool (if applicable), and a clean cloth.
- Crucially, disconnect the washing machine from its power source and turn off the water supply.
4.2. Installation Steps
- Remove Outer Clamp: Open the washer door. Locate the outer spring clamp or wire retaining ring around the door opening, holding the old gasket in place. Carefully pry it off using a flathead screwdriver or pliers.
- Peel Back Old Gasket: Gently pull the front lip of the old gasket away from the washer's front panel.
- Access Inner Clamp: You may need to remove the washer's top panel or front panel to access the inner clamp that secures the gasket to the wash tub. Refer to your specific washer model's service manual for panel removal instructions.
- Remove Inner Clamp: Once accessible, remove the inner spring clamp or retaining ring from around the wash tub opening.
- Remove Old Gasket: Carefully pull the old gasket completely out of the washing machine. Note its orientation for reference.
- Clean Area: Clean the area where the gasket sits, removing any mold, mildew, or debris. This ensures a proper seal for the new gasket.
- Install New Gasket: Position the new Mintu gasket, ensuring the drain holes (if present) are at the bottom. Carefully stretch and fit the inner lip of the new gasket around the wash tub opening.
- Secure Inner Clamp: Reinstall the inner spring clamp or retaining ring, ensuring it is securely seated around the gasket and wash tub.
- Fit Outer Lip: Stretch the outer lip of the new gasket over the front panel opening. Ensure it is evenly seated.
- Secure Outer Clamp: Reinstall the outer spring clamp or wire retaining ring, ensuring it holds the gasket firmly against the front panel. A spring expansion tool can be helpful here.
- Reassemble Washer: Reattach any panels removed during the process.
5. Post-Installation Checks
After installing the new door gasket, perform the following checks to ensure proper function and prevent leaks:
- Visual Inspection: Close the washer door and visually inspect the gasket. It should sit flush and evenly around the door opening, without any visible gaps or twists.
- Manual Check: Gently press around the entire circumference of the gasket to ensure it is securely seated and feels firm.
- Leak Test: Reconnect the water supply and power. Run a short, empty wash cycle (e.g., rinse and spin) and carefully observe the door area for any signs of water leakage. If leaks occur, immediately disconnect power and re-examine the gasket installation.
6. Maintenance
Regular maintenance of your washer door gasket can significantly extend its lifespan and prevent issues like mold growth and leaks.
- Wipe Down After Use: After each wash cycle, wipe the inside of the door gasket with a clean, dry cloth to remove any trapped water, lint, or detergent residue.
- Leave Door Ajar: When the washer is not in use, leave the door slightly ajar to allow air circulation and prevent moisture buildup, which can lead to mold and mildew.
- Deep Clean Periodically: Periodically clean the gasket thoroughly using a mixture of warm water and mild detergent, or a specialized washing machine cleaner. Pay attention to the folds and crevices where residue can accumulate.
- Inspect for Damage: Regularly inspect the gasket for any signs of wear, tears, cracks, or hardening. Replace the gasket if significant damage is observed to prevent leaks.
7. Troubleshooting
If you encounter issues after installing the new gasket, refer to the table below for common problems and their solutions.
| Problem | Possible Cause | Solution |
|---|---|---|
| Water leaking from door | Gasket not seated correctly; outer or inner clamp loose; gasket twisted during installation; damage to new gasket. | Disconnect power, re-inspect gasket seating and clamps. Ensure no twists. Check for damage. Run another leak test. |
| Mold or mildew on gasket | Moisture trapped in gasket folds; insufficient air circulation. | Clean gasket thoroughly. Wipe dry after each use. Leave door ajar when not in use. |
| Door difficult to close | Gasket not fully seated; gasket too stiff (new). | Ensure gasket is fully pushed into place. It may soften slightly with use. |
8. Specifications
- Brand: Mintu
- Part Numbers (Gasket Model): 79641373210, 79641373211, 79641379211
- Material: Alloy Steel
- UPC: 017015805223
- Compatibility: Designed for specific LG and Kenmore front-load washing machine models (refer to Section 1 for a detailed list).
9. Warranty and Support
Mintu products are manufactured to high-quality standards. While specific warranty details may vary, generally, replacement parts are covered against manufacturing defects for a limited period from the date of purchase. Please retain your proof of purchase for warranty claims.
For technical assistance, troubleshooting beyond this manual, or warranty inquiries, please contact Mintu customer support through the retailer where the product was purchased or visit the official Mintu website for contact information.
Note: Unauthorized repairs or improper installation may void the product warranty.