
WiMiUS K3
WiMiUS K3 4K Projector User Manual
Model: K3
1. Introduction
Thank you for purchasing the WiMiUS K3 4K Projector. This manual provides detailed instructions for setting up, operating, and maintaining your projector. Please read this manual thoroughly before use to ensure proper operation and to extend the lifespan of your device. Keep this manual for future reference.
Package Contents
- WiMiUS K3 Projector
- Remote Control
- Lens Cover
- Cleaning Cloth
- VGA Cable
- AV Cable
- Power Cable
- HDMI Cable
- User Manual (this document)
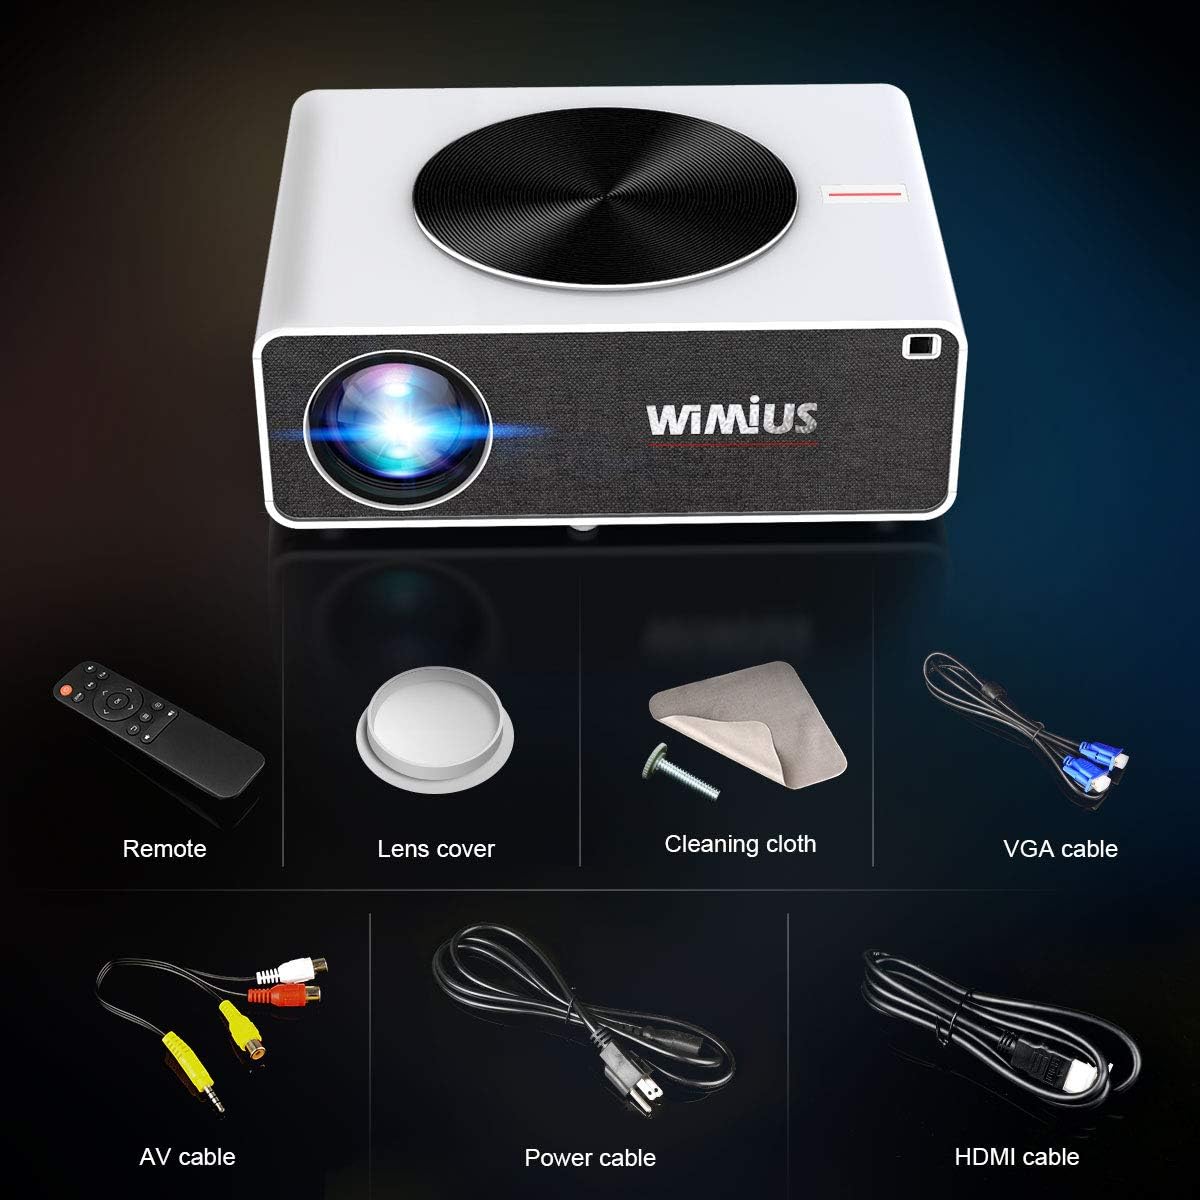
Figure 1.1: Included Accessories with the WiMiUS K3 Projector.
2. Safety Information
To ensure safe operation and prevent damage, please observe the following safety precautions:
- Do not look directly into the projector lens when the lamp is on.
- Do not block the ventilation openings. Ensure adequate airflow around the projector.
- Do not place the projector on unstable surfaces.
- Keep the projector away from water or other liquids.
- Do not attempt to repair the projector yourself. Refer all servicing to qualified personnel.
- Use only the power adapter supplied with the projector.
- Unplug the projector during lightning storms or when unused for long periods.
3. Product Overview
Familiarize yourself with the various parts and controls of your WiMiUS K3 projector.

Figure 3.1: WiMiUS K3 Projector Front View.
Key Components:
- Lens: Projects the image onto the screen.
- Focus Ring: Adjusts image clarity.
- Keystone Correction: Corrects trapezoidal distortion (manual adjustment).
- Control Panel: Buttons for basic navigation and settings.
- Input Ports: HDMI, USB, AV, VGA.
- Audio Output: For external speakers or headphones.
- Ventilation Grilles: For heat dissipation.
- Power Input: Connects to the power adapter.
4. Setup
4.1 Placement and Projection Size
Choose a flat, stable surface for your projector. The projection distance affects the image size. The WiMiUS K3 supports a flexible projection size from 50 to 300 inches.

Figure 4.1: Flexible Projection Size and Distance.
For optimal viewing, ensure the projector is centered with the screen or wall. You can adjust the image size and focus after placement.
4.2 Power Connection
- Connect the power cable to the projector's power input port.
- Plug the other end of the power cable into a power outlet.
- Press the power button on the projector or remote control to turn on the device.
4.3 Focus and Keystone Correction
After powering on, adjust the focus and keystone to achieve a clear, rectangular image.
- Focus: Rotate the focus ring near the lens until the image appears sharp and clear.
- Keystone Correction: If the image appears trapezoidal (wider at the top or bottom), use the keystone correction dial or digital keystone settings in the menu to square the image.
5. Operating Instructions
5.1 Connecting Devices
The WiMiUS K3 projector offers multiple connectivity options:
HDMI Connection
Connect your laptop, game console (PS5), TV stick, or other HDMI-enabled devices to the projector's HDMI port using an HDMI cable.
USB Connection
Insert a USB drive into the USB port to play media files directly from the drive.
AV Connection
Use the provided AV cable to connect older devices with AV output.
VGA Connection
Connect your PC or laptop using the VGA cable for video output.
Wireless Screen Mirroring (2.4G+5G WiFi)
The projector supports wireless screen mirroring for both Android and iOS devices, utilizing fast 2.4G and 5G WiFi connectivity.

Figure 5.1: Wireless and Wired Screen Mirroring Options.
- Navigate to the "Screen Mirroring" or "Wireless Display" option in the projector's menu.
- For iOS devices, connect to the projector's WiFi network and use AirPlay/Screen Mirroring.
- For Android devices, use the "Cast" or "Wireless Display" feature in your device settings.

Figure 5.2: Enjoying Home Theater with Screen Mirroring.
5.2 Adjusting Settings
Use the remote control or the control panel buttons to navigate the projector's menu and adjust settings.
- Picture Mode: Select from standard, vivid, soft, or user-defined modes.
- Brightness/Contrast: Fine-tune image brightness and contrast for optimal viewing. The K3 offers enhanced brightness and a 10000:1 contrast ratio for clear images even with some ambient light.
- Zoom Function: Adjust the image size from 100% down to 75% without moving the projector.
- Aspect Ratio: Choose between 16:9 or 4:3.
- Sound Settings: Adjust volume, bass, and treble. The projector features dual built-in 10W speakers with SRS HiFi sound.

Figure 5.3: Image Clarity in Different Lighting Conditions.

Figure 5.4: Dual Built-in 10W Speakers with SRS HiFi Sound.
6. Maintenance
6.1 Cleaning the Lens
Use the provided cleaning cloth or a soft, lint-free cloth to gently wipe the projector lens. Do not use abrasive cleaners or solvents.
6.2 Cleaning the Dust Filter
Regularly clean the removable dust filter to maintain optimal performance and prevent overheating. Refer to the diagram for filter location.
Figure 6.1: Removable Dust Filter for Easy Cleaning.
Note: The image used for Figure 6.1 is the same as Figure 5.2, but the context here is to highlight the dust filter feature. A more specific image would be ideal if available.
6.3 Storage
When not in use, store the projector in a cool, dry place, away from direct sunlight and extreme temperatures. Use the lens cover to protect the lens from dust and scratches.
7. Troubleshooting
| Problem | Possible Cause | Solution |
|---|---|---|
| No image displayed | Power cable disconnected; Incorrect input source; Lens cap on. | Check power connection; Select correct input source (HDMI, USB, etc.); Remove lens cap. |
| Image is blurry | Focus not adjusted; Projector too far/close. | Adjust the focus ring; Adjust projection distance. |
| Image is trapezoidal | Projector not perpendicular to screen. | Adjust keystone correction. |
| No sound | Volume too low; Muted; External audio device not connected. | Increase volume; Unmute; Check external audio connections. |
| Wireless mirroring issues | Weak WiFi signal; Device compatibility; Incorrect setup steps. | Ensure strong WiFi signal; Check device compatibility; Re-follow wireless mirroring instructions. |
8. Specifications
| Feature | Detail |
|---|---|
| Brand | WiMiUS |
| Model | K3 |
| Display Resolution | 1920 x 1080 (Native 1080P, supports 4K input) |
| Connectivity Technology | Bluetooth, USB, HDMI, AV, VGA, 5G WiFi |
| Special Features | Wireless, Portable, Built-In Wi-Fi, Zoom Function, Removable Dust Filter |
| Recommended Uses | Home Cinema, Business |
| Speaker Type | Stereo (Dual Built-in 10W with SRS HiFi Sound) |
| Item Weight | 7.98 pounds |
| Package Dimensions | 15.83 x 11.69 x 6.54 inches |
| Visible Screen Diagonal | 500" / 1270 cm (Max Display) |
9. Warranty and Support
WiMiUS products come with a standard manufacturer's warranty. For detailed warranty information, product support, or technical assistance, please contact WiMiUS customer service through their official website or the retailer where you purchased the product.
Please retain your proof of purchase for warranty claims.
Related documentsK3

Ask a question about this manual
Ask about setup, troubleshooting, compatibility, parts, safety, or missing instructions. Manuals+ will review the question and use this page’s manual context to help answer it.