1. Introduction
This manual provides comprehensive instructions for the setup, operation, and maintenance of your ZTE MC801A HyperBox 5G WiFi Router. Please read this manual thoroughly before using the device to ensure proper functionality and safety.
1.1 Product Overview
The ZTE MC801A HyperBox 5G WiFi Router is a stationary 5G router designed to provide high-speed internet connectivity using 5G networks and Wi-Fi 6 technology. It features a premium design, efficient cooling, and supports multiple devices.

Figure 1: ZTE MC801A HyperBox 5G WiFi Router (Front View)
This image displays the front of the ZTE MC801A HyperBox 5G WiFi Router, highlighting its sleek white design and indicator lights for signal, network, Wi-Fi, and power status.
1.2 Package Contents
Ensure all items are present in the package:
- ZTE MC801A HyperBox 5G WiFi Router
- Power Adapter
- Ethernet Cable
- Quick Start Guide (This User Manual)
2. Setup
2.1 Device Layout and Ports

Figure 2: ZTE MC801A HyperBox 5G WiFi Router (Rear View)
This image shows the rear panel of the ZTE MC801A HyperBox 5G WiFi Router, detailing the WPS button, PHONE port, LAN ports, and power input.
Familiarize yourself with the ports and buttons on the device:
- WPS Button: For quick Wi-Fi Protected Setup.
- PHONE Port (RJ11): For connecting a telephone for voice services (if supported by your SIM card and service provider).
- LAN Ports (RJ45): Two Gigabit Ethernet ports for wired connections.
- Power Input: Connects to the provided power adapter.
- SIM Card Slot: Located at the bottom or side, for Nano-SIM (4FF) card.
- USB-C Port: For service purposes only.
- TS9 MiMo Antenna Connections: Two ports for optional external 5G antennas.
2.2 SIM Card Installation
- Ensure the router is powered off.
- Locate the Nano-SIM (4FF) card slot, typically on the bottom or side of the device.
- Insert your Nano-SIM card into the slot with the gold contacts facing down and the notched corner aligned correctly. Push until it clicks into place.
2.3 Power Connection
- Connect one end of the power adapter to the Power Input port on the router.
- Plug the other end of the power adapter into a wall outlet.
- The router will power on automatically. Wait for the indicator lights to stabilize.
3. Operating
3.1 Connecting Devices via Wi-Fi
The ZTE MC801A supports Wi-Fi 6 and can connect up to 32 devices simultaneously.
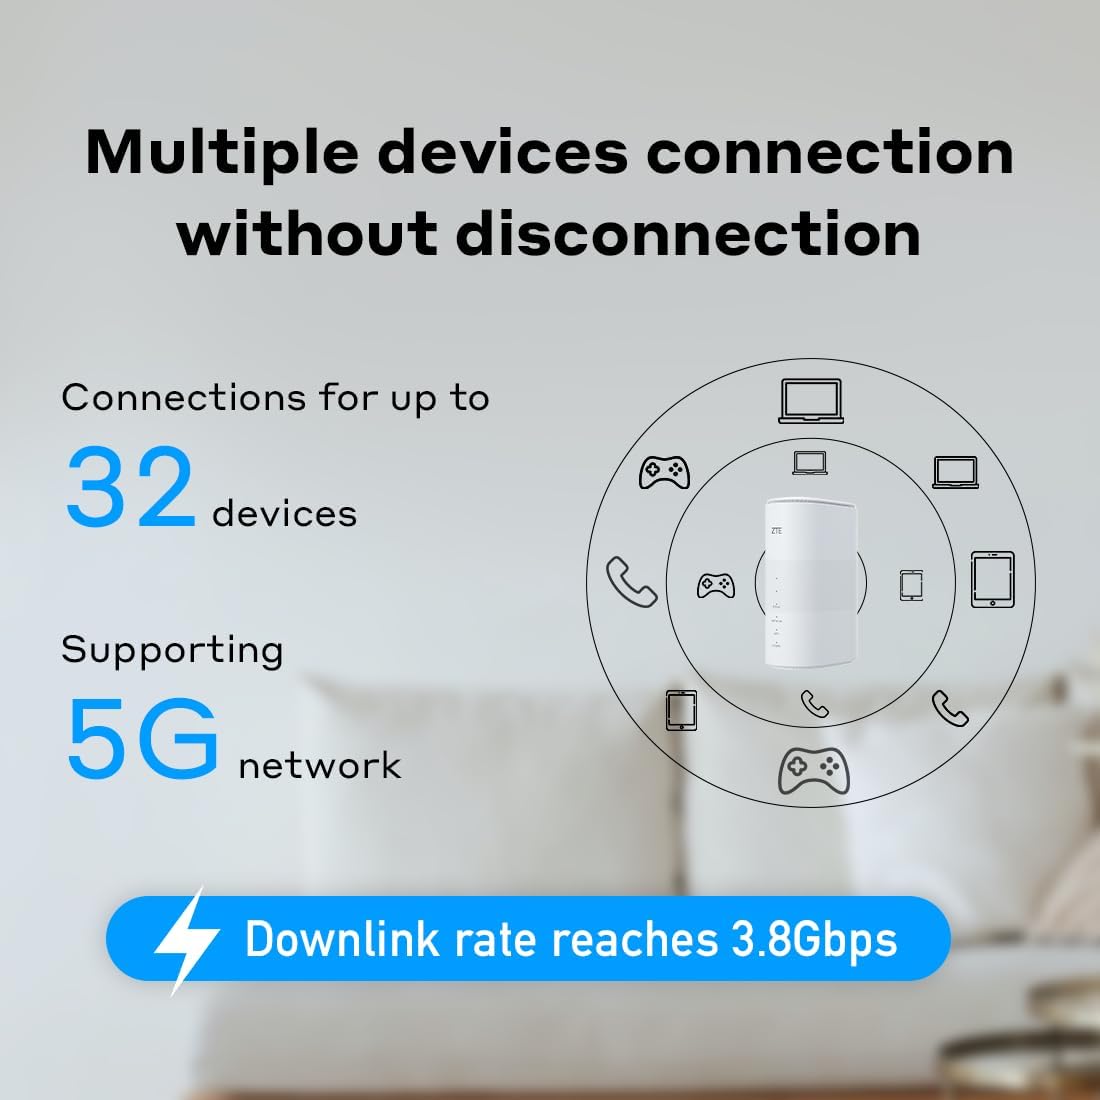
Figure 3: Multiple Device Connection Capability
This graphic illustrates the ZTE MC801A router's ability to connect up to 32 devices, including laptops, tablets, phones, and gaming consoles, with a downlink rate reaching 3.8Gbps.
- On your Wi-Fi enabled device (smartphone, laptop, etc.), search for available Wi-Fi networks.
- Select the Wi-Fi network name (SSID) printed on the label at the bottom of your router.
- Enter the Wi-Fi password (Key) also found on the router's label.
- Alternatively, press the WPS button on the router and then activate WPS on your device within two minutes for a quick connection.
3.2 Connecting Devices via Ethernet
Use the Ethernet ports for stable, high-speed wired connections.
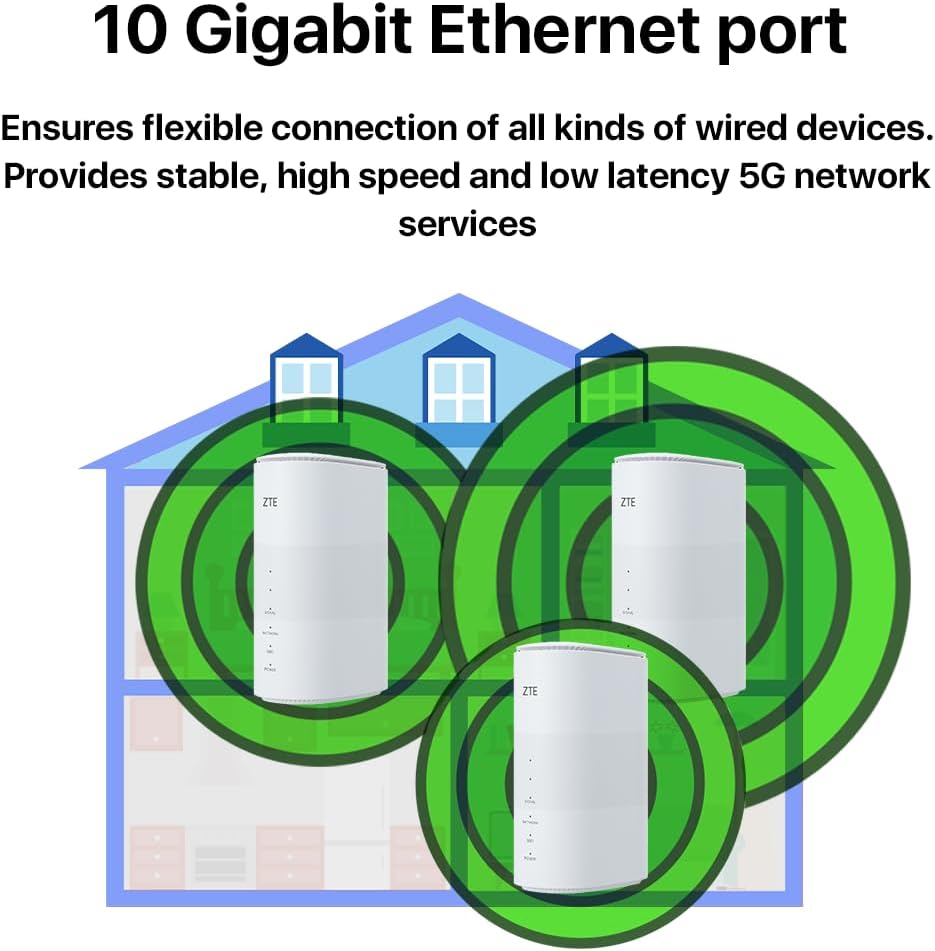
Figure 4: 10 Gigabit Ethernet Port
This image highlights the 10 Gigabit Ethernet port on the ZTE MC801A router, emphasizing its capability for flexible and high-speed wired device connections, providing stable, low-latency 5G network services.
- Connect one end of an Ethernet cable to a LAN port on the router.
- Connect the other end of the Ethernet cable to the Ethernet port on your device (e.g., computer, gaming console).
3.3 Accessing the Web Management Interface
To configure advanced settings, access the router's web interface:
- Ensure your device is connected to the router via Wi-Fi or Ethernet.
- Open a web browser (e.g., Chrome, Firefox, Edge).
- In the address bar, type the default IP address (usually
192.168.0.1or192.168.1.1) and press Enter. Refer to the router's label for the exact IP address. - Enter the default username and password (also found on the router's label).
- You can now manage network settings, Wi-Fi configurations, security, and more.
4. Features
4.1 5G High-Speed Connectivity
Equipped with the Qualcomm Snapdragon X55 modem, the MC801A supports advanced 5G networks, enabling LTE+5G EN-DC downlink rates up to 3.8Gbps for ultra-fast internet access.
4.2 Wide Wi-Fi Coverage

Figure 5: Wide Coverage with 4MIMO Antennas
This visual demonstrates the wide Wi-Fi coverage provided by the ZTE MC801A router, emphasizing its 4MIMO antennas that achieve optimal wireless performance and can expand mesh router flexibility for enhanced indoor Wi-Fi coverage.
The router incorporates 4MIMO antennas to achieve optimal wireless performance and expand Wi-Fi coverage. It supports Wi-Fi 6 (802.11ax) for improved efficiency and speed, especially in environments with many connected devices.
4.3 Advanced Cooling System
The MC801A features a special ventilation design with a "chimney effect" for effective cooling, ensuring stable performance even under heavy load and prolonged use.
4.4 External Antenna Support
Two TS9 MiMo antenna connections are available for optional external 5G antennas, which can further improve 5G reception in areas with weaker signal strength.
5. Specifications
| Feature | Detail |
|---|---|
| Product Type | Mobile Router (Stationary 5G Router) |
| Model | MC801A |
| Modem Type | 5G (Qualcomm Snapdragon X55) |
| 5G Bands | n1, n3, n7, n28, n38, n78 |
| LTE Bands | B1, B7, B8, B9, B20 |
| UMTS Bands | B1, B8 |
| Wi-Fi Standard | IEEE 802.11a/b/g/n/ac/ax (Wi-Fi 6) |
| Wi-Fi Frequency Band | Dual-Band |
| Max Wi-Fi Speed | Up to 1.775 Gbit/s |
| Max Connected Devices | Up to 32 |
| Ethernet Ports | 2 x RJ45 (Gigabit Ethernet) |
| Phone Port | 1 x RJ11 |
| SIM Card Size | Nano-SIM (4FF) |
| External Antenna Ports | 2 x TS9 MiMo |
| USB Port | 1 x USB-C (service purposes only) |
| Dimensions (H x L x W) | 182 mm x 124 mm x 70 mm |
| Weight | 632 g |
| Color | White |
| Operating System | Linux 4 (RouterOS) |
| Processor | Qualcomm SDX55 + QCA6391, ARM Cortex A7 single core with 1.5 GHz |
| Memory | 4 GB RAM, 1 GB Data Storage |
6. Troubleshooting
6.1 No Internet Connection
- Check SIM Card: Ensure the Nano-SIM card is correctly inserted and active with your service provider.
- Signal Strength: Check the Signal indicator light on the router. If it's red or blinking, the 5G/LTE signal might be weak. Try repositioning the router or consider external antennas.
- Network Status: Verify the Network indicator light. If it's off or red, there might be an issue with the cellular network.
- Reboot Router: Power off the router, wait 10 seconds, then power it back on.
- APN Settings: Access the web management interface and verify that the APN settings are correct for your service provider.
6.2 Wi-Fi Connection Issues
- Incorrect Password: Double-check the Wi-Fi password (Key) from the router's label.
- Wi-Fi Indicator: Ensure the Wi-Fi indicator light on the router is on.
- Device Limit: The router supports up to 32 devices. If you have too many devices connected, some might experience issues.
- Signal Interference: Move the router away from other electronic devices that might cause interference.
6.3 Slow Speed
- Signal Strength: A weak 5G/LTE signal will result in slower speeds. Optimize router placement.
- Network Congestion: Performance can be affected by network congestion from your service provider, especially during peak hours.
- Device Capabilities: Ensure your connected devices support Wi-Fi 6 for optimal wireless performance.
- Firmware Update: Check the web management interface for available firmware updates, which can improve performance and stability.
7. Maintenance
- Cleaning: Use a soft, dry cloth to clean the router's exterior. Do not use liquid cleaners or aerosols.
- Ventilation: Ensure the router's ventilation openings are not blocked to allow for proper airflow and cooling.
- Firmware Updates: Regularly check for and install firmware updates via the web management interface to ensure optimal performance, security, and new features.
- Placement: Place the router in a central location, away from direct sunlight, heat sources, and strong electromagnetic fields.
8. Warranty and Support
For warranty information and technical support, please refer to the warranty card included with your product or visit the official ZTE website. Keep your purchase receipt as proof of purchase for warranty claims.
For further assistance, you may contact ZTE customer support through their official channels.


