
1. Introduction
The Future Call FC-2804 is a corded landline telephone designed with ease of use in mind, particularly for seniors. It features extra-large buttons, picture memory keys for quick dialing, and a speakerphone function to simplify communication. This manual provides detailed instructions for setting up, operating, and maintaining your FC-2804 telephone.
2. Safety Information
- Do not expose the telephone to water or moisture.
- Avoid placing the telephone in direct sunlight or near heat sources.
- Use only the provided cords and accessories.
- Do not attempt to open or repair the telephone yourself. Refer to qualified service personnel.
- Keep the telephone away from strong magnetic fields.
3. Package Contents
Verify that all items are present in the package:
- Future Call FC-2804 Telephone Unit
- Handset
- Coiled Handset Cord (approximately 12 feet long)
- Telephone Line Cord
4. Product Overview
4.1 Front Panel Features
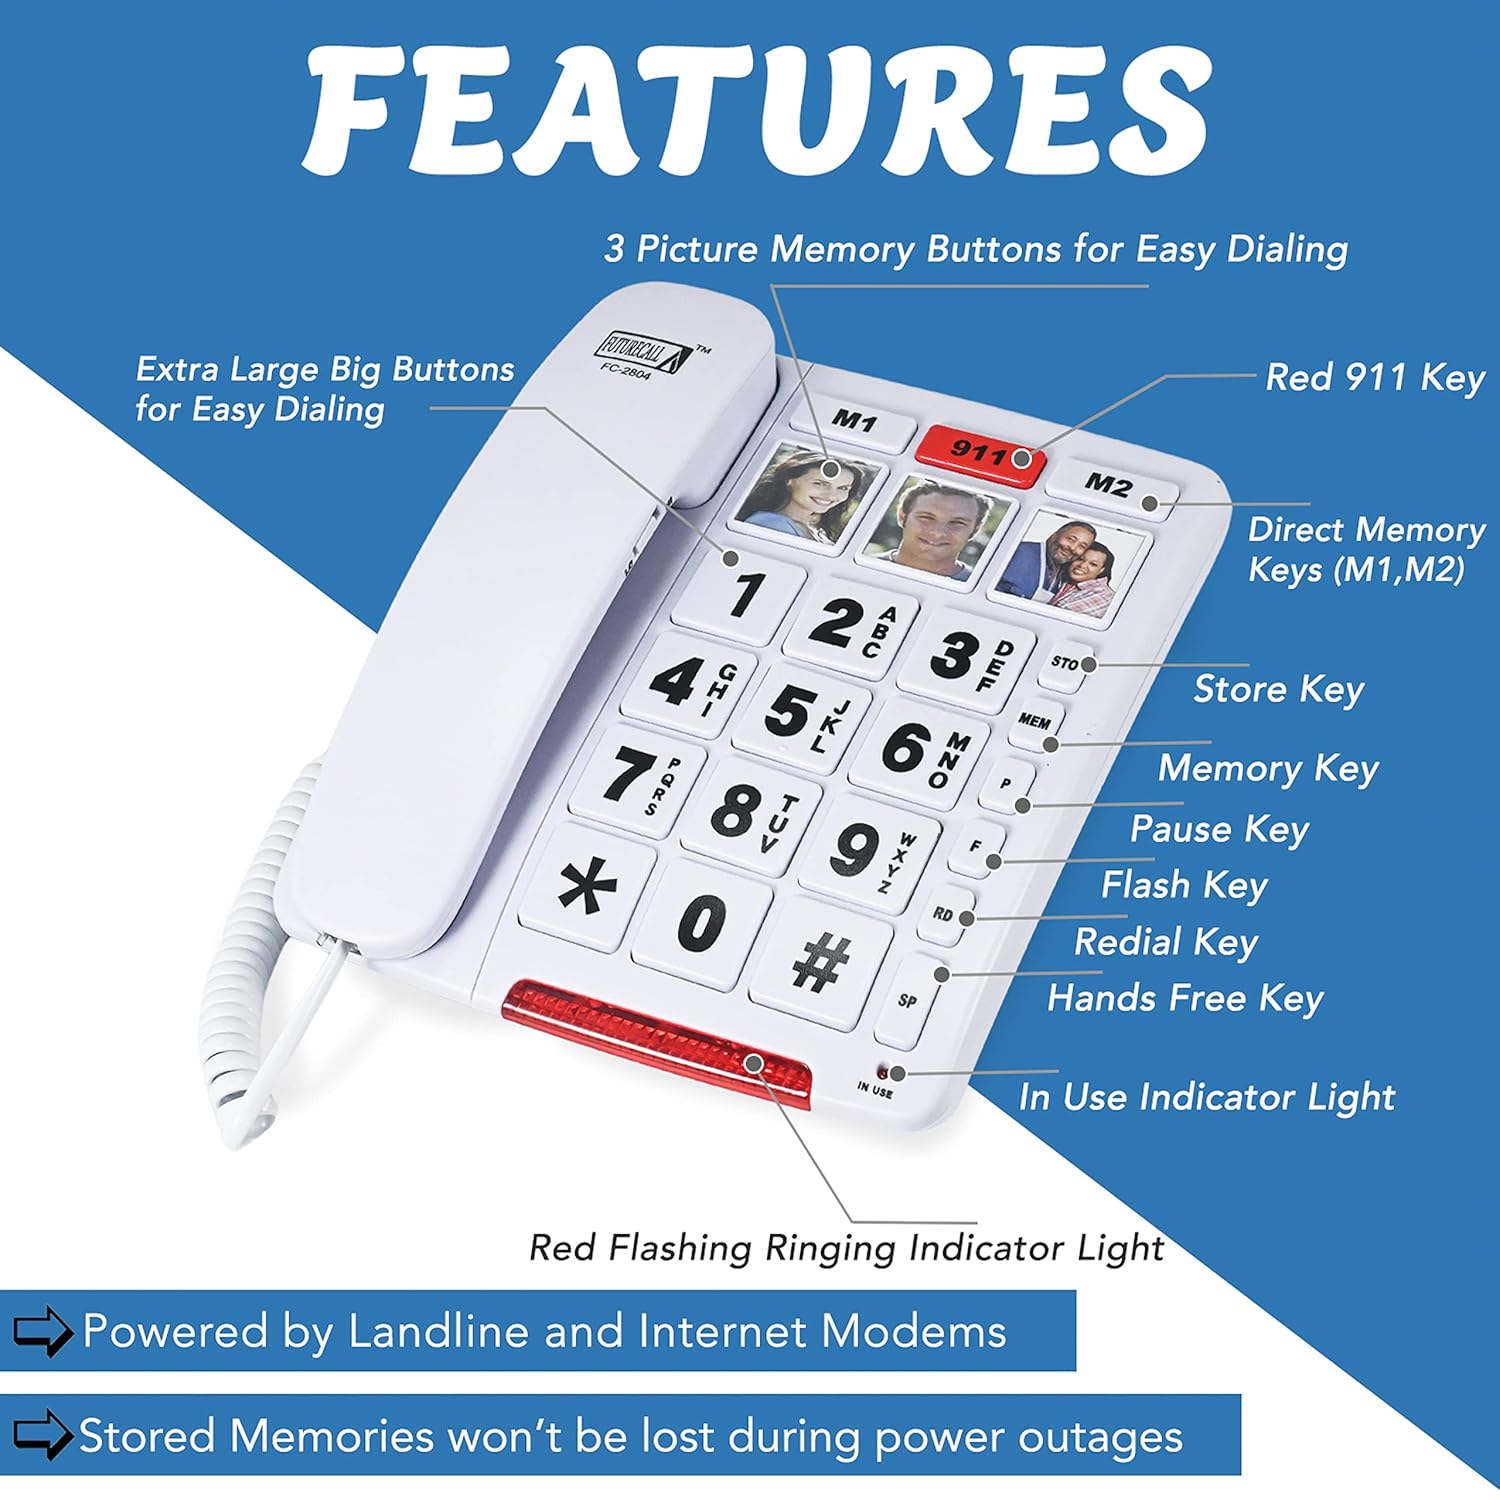
Image: Front view of the Future Call FC-2804 telephone, highlighting its large buttons, picture memory keys, and various function buttons.
- Big Dial Buttons (0-9, *, #): Extra-large buttons for easy visibility and dialing.
- Picture Memory Buttons (M1, 911, M2): Three dedicated buttons for storing and quick-dialing frequently called numbers, with space for a photo. The 911 button is reprogrammable.
- STO (Store) Key: Used to save telephone numbers into memory.
- MEM (Memory) Key: Used to recall stored numbers.
- P (Pause) Key: Inserts a pause in the dialing sequence.
- F (Flash) Key: Used for call waiting or transferring calls (if supported by your phone service).
- RD (Redial) Key: Dials the last number called.
- SP (Speakerphone) Key: Activates or deactivates the speakerphone function.
- In Use Indicator Light: Illuminates when the phone is in use.
- Red Flashing Ringing Indicator Light: Flashes to indicate an incoming call.
4.2 Back Panel Functions
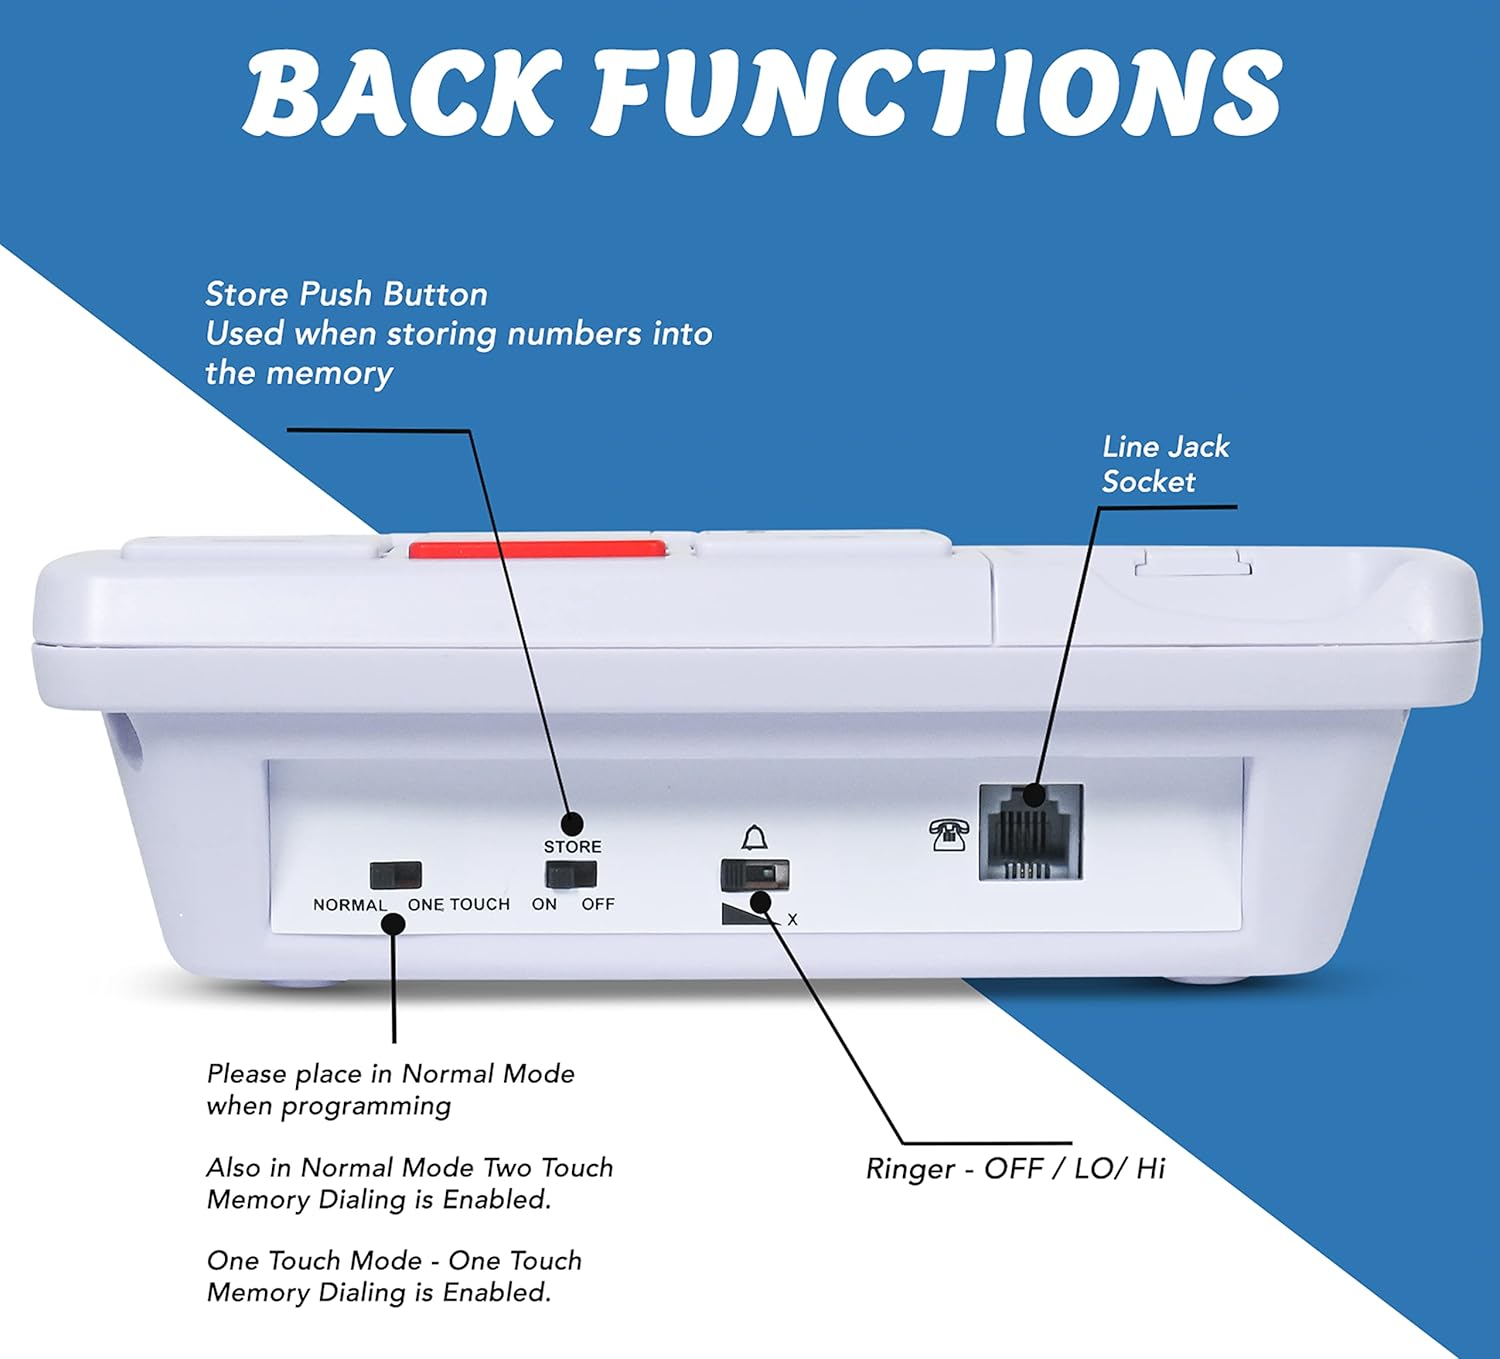
Image: Rear view of the Future Call FC-2804 telephone, showing the line jack, ringer switch, and memory store switch.
- Line Jack Socket: Connects the telephone to the wall phone jack using the telephone line cord.
- Ringer OFF/LO/HI Switch: Adjusts the volume of the incoming call ringer or turns it off.
- Store Push Button: Used in conjunction with the STO key for programming memory numbers.
- Normal/One Touch ON/OFF Switch: Controls the memory dialing mode. Set to 'Normal' for programming and two-touch memory dialing. Set to 'One Touch ON' for one-touch memory dialing. Set to 'OFF' to prevent accidental memory storage.
5. Setup
Follow these steps to set up your Future Call FC-2804 telephone:
- Connect the Handset: Plug one end of the coiled handset cord into the handset and the other end into the handset jack on the left side of the telephone unit.
- Connect to Phone Line: Plug one end of the telephone line cord into the Line Jack Socket on the back of the telephone unit. Plug the other end into your wall phone jack.
- Position the Phone: Place the telephone on a flat, stable surface or mount it on a wall using the integrated wall mount holes (mounting hardware not included).
- Set Ringer Volume: Adjust the Ringer OFF/LO/HI switch on the back of the unit to your desired volume level.
6. Operating Instructions
6.1 Making a Call
- Lift the handset or press the SP (Speakerphone) key.
- Listen for a dial tone.
- Dial the desired telephone number using the large number buttons.
- To end the call, replace the handset or press the SP key again if using speakerphone.
6.2 Receiving a Call
When the phone rings and the Red Flashing Ringing Indicator Light flashes:
- Lift the handset or press the SP (Speakerphone) key to answer the call.
- To end the call, replace the handset or press the SP key again.
6.3 Redial Function
To redial the last number called:
- Lift the handset or press the SP key.
- Press the RD (Redial) key. The phone will automatically dial the last number.
7. Memory Programming
The FC-2804 allows you to store frequently used numbers for quick dialing. Ensure the 'Store Push Button' on the back of the phone is pressed in (engaged) when programming.
7.1 Setting the Memory Mode Switch
Locate the 'Normal/One Touch ON/OFF' switch on the back of the phone:
- Normal: Enables two-touch memory dialing and is the recommended setting for programming.
- One Touch ON: Enables one-touch memory dialing for the programmed keys.
- OFF: Prevents accidental storage or modification of memory numbers. Set to OFF after programming is complete to protect stored numbers.
7.2 Programming Picture Memory Buttons (M1, 911, M2)
These buttons allow you to store a number and place a photo of the person you are calling for easy identification.
- Ensure the 'Normal/One Touch ON/OFF' switch is set to Normal.
- Lift the handset or press the SP key.
- Press the STO (Store) key.
- Dial the telephone number you wish to store (up to 16 digits).
- Press the STO (Store) key again.
- Press the desired Picture Memory Button (M1, 911, or M2) to save the number.
- Replace the handset or press SP to hang up.
- To insert a photo, carefully lift the clear plastic cover on the button, insert a small photo, and replace the cover.
7.3 Programming One-Touch Memory Buttons (0-9, *, # for 15 numbers)
The phone supports programming up to 15 one-touch memory numbers using the numeric keypad in conjunction with the MEM key.
- Ensure the 'Normal/One Touch ON/OFF' switch is set to Normal.
- Lift the handset or press the SP key.
- Press the STO (Store) key.
- Dial the telephone number you wish to store.
- Press the STO (Store) key again.
- Press the MEM (Memory) key.
- Press one of the numeric keys (0-9, *, #) to assign the number to that memory location.
- Replace the handset or press SP to hang up.
7.4 Reprogramming the 911 Key
The 911 key can be reprogrammed to a different emergency number if needed. Follow the same steps as programming a Picture Memory Button (Section 7.2), selecting the 911 button as the destination.
7.5 Using Memory Dialing
After programming, set the 'Normal/One Touch ON/OFF' switch to One Touch ON for simplified dialing.
- For Picture Memory Buttons (M1, 911, M2): Lift the handset or press SP, then press the desired Picture Memory Button.
- For One-Touch Memory Buttons (0-9, *, #): Lift the handset or press SP, then press the MEM key, followed by the numeric key (0-9, *, #) corresponding to the stored number.
8. Maintenance
- Cleaning: Wipe the telephone surface with a soft, damp cloth. Do not use abrasive cleaners or solvents.
- Storage: If storing the phone for an extended period, disconnect it from the phone line and store it in a cool, dry place.
9. Troubleshooting
| Problem | Possible Solution |
|---|---|
| No dial tone | Check if the telephone line cord is securely connected to both the phone and the wall jack. Ensure your landline service is active. |
| Cannot hear caller / Caller cannot hear me | Ensure the handset cord is securely connected. If using speakerphone, ensure you are speaking towards the microphone. |
| Phone does not ring | Check the Ringer OFF/LO/HI switch on the back of the phone and set it to LO or HI. |
| Memory numbers are not saving or dialing correctly | Ensure the 'Store Push Button' on the back is engaged during programming. Verify the 'Normal/One Touch ON/OFF' switch is set to 'Normal' for programming and 'One Touch ON' for dialing. |
| Redial function not working | Ensure a call was made recently for the redial memory to be active. |
10. Specifications
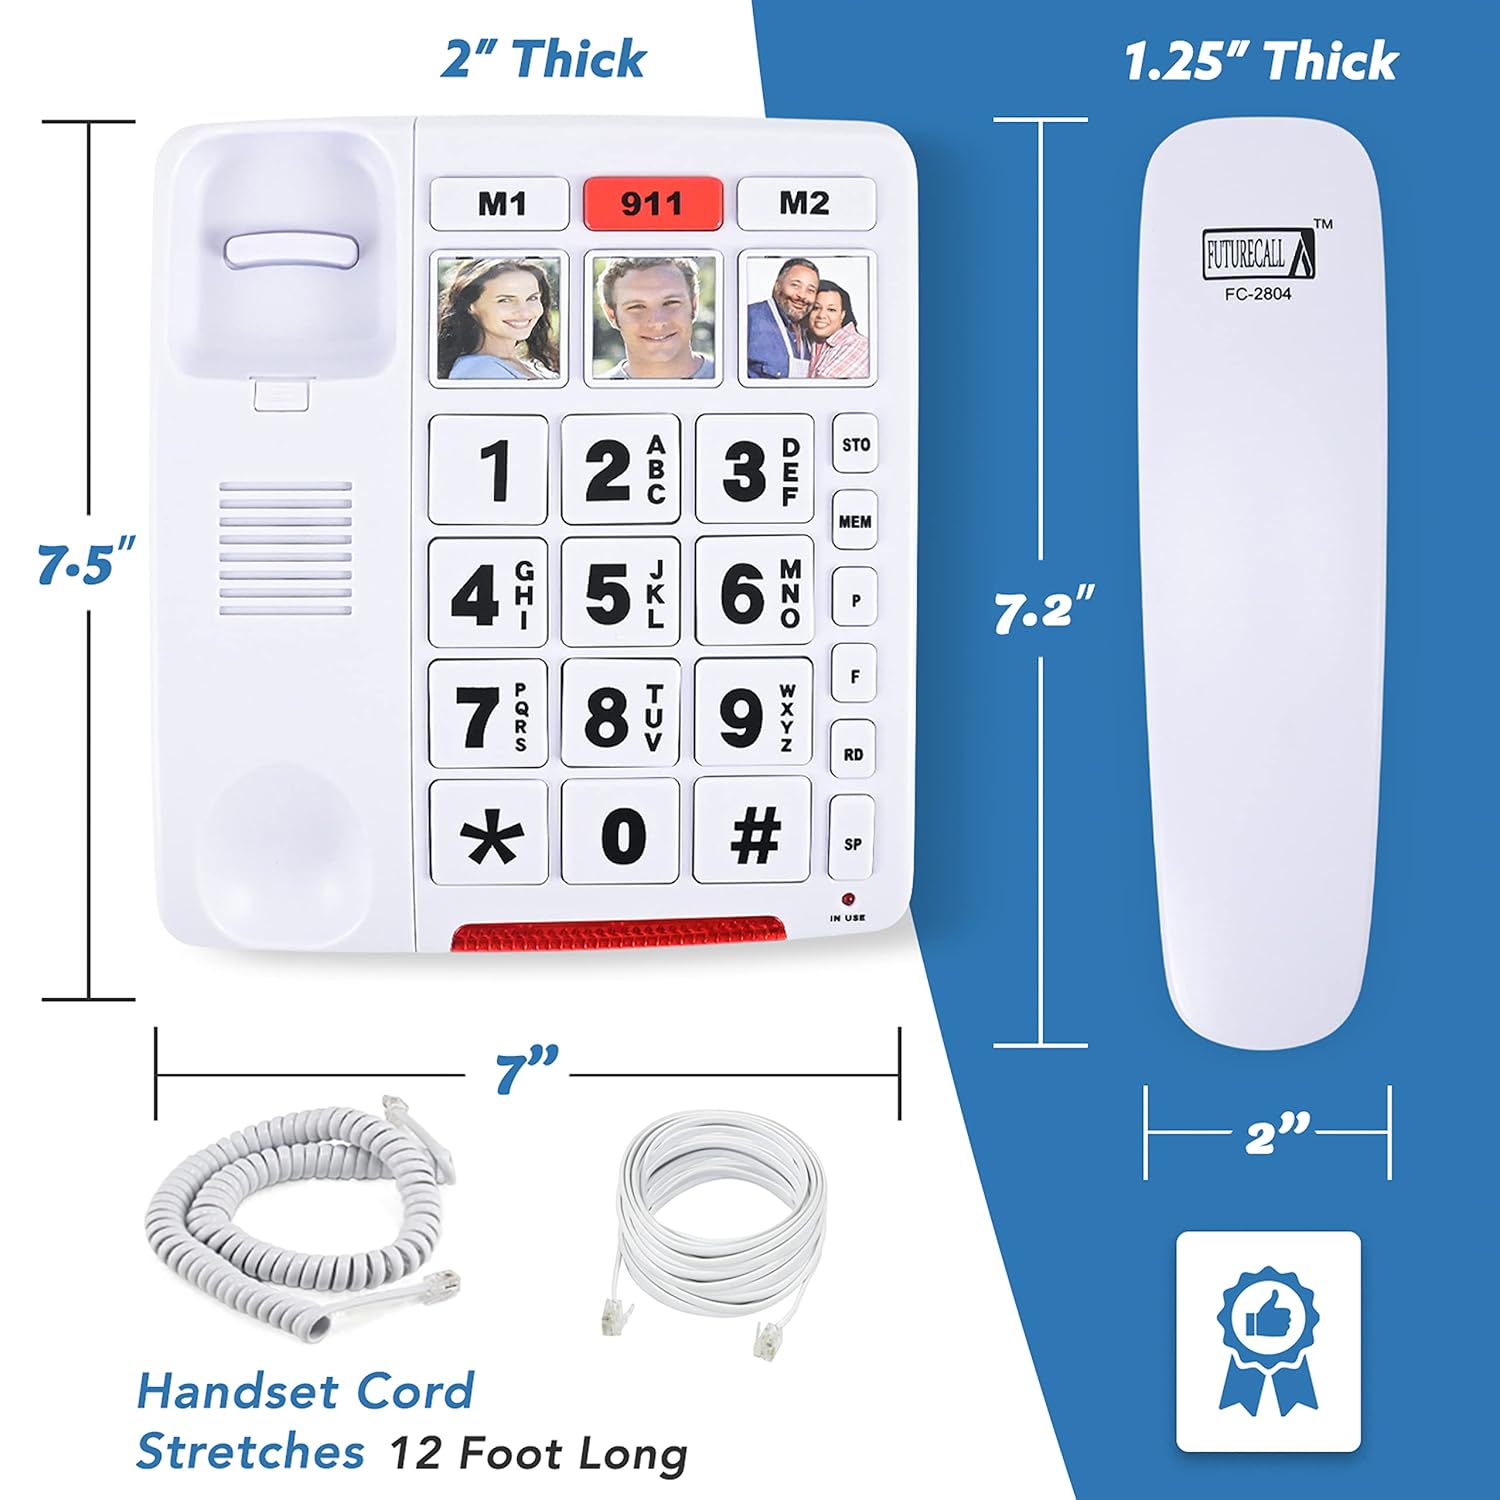
Image: Diagram illustrating the dimensions of the Future Call FC-2804 telephone and its handset.
| Feature | Detail |
|---|---|
| Model | FC-2804 |
| Dimensions (L x W x H) | Approximately 20.3 x 17.8 x 7.6 cm (8 x 7 x 3 inches) |
| Item Weight | Approximately 658 g (1.45 lbs) |
| Material | Plastic |
| Power Source | Corded Electric (Line Powered) |
| Handset Cord Length | 12 feet (extended) |
| Memory Capacity | 3 Picture Memory Buttons, 15 One-Touch Memory Buttons |
| Mounting Type | Tabletop or Wall Mount |
11. Warranty and Support
For warranty information and customer support, please refer to the documentation included with your purchase or contact your retailer. Keep your proof of purchase for warranty claims.


