
EVTSCAN TA802A
EVTSCAN TA802A Pocket Pen Multimeter User Manual
Model: TA802A
Brand: EVTSCAN
1. Introduction
This user manual provides detailed instructions for the safe and effective operation of the EVTSCAN TA802A Pocket Pen Multimeter. Please read this manual thoroughly before using the device and keep it for future reference.
Product Overview
The TA802A is a compact, portable, and intelligent digital multimeter designed for automatic detection of various electrical parameters. Its pen-style design makes it easy to carry and use for a wide range of electrical measurements.
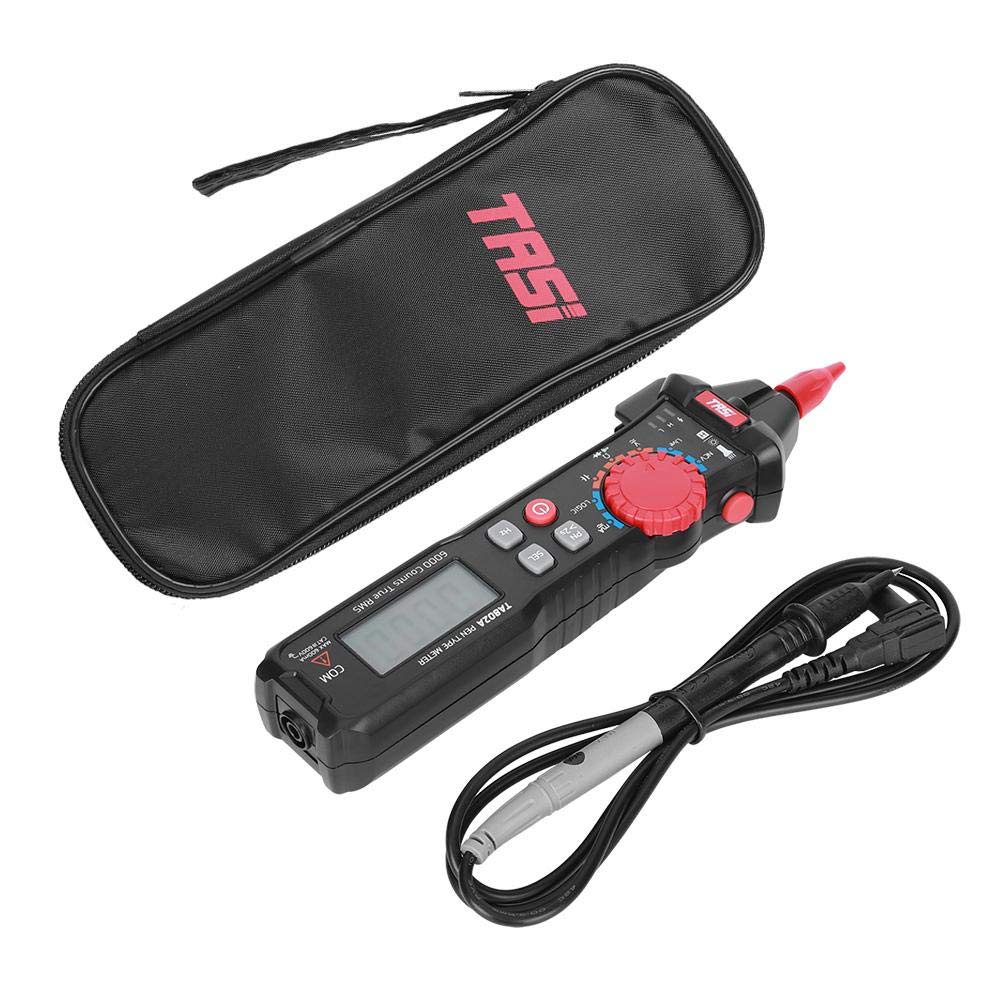
Figure 1.1: The TA802A Pocket Pen Multimeter, showing the device, its carrying case, and included test leads.
2. Safety Information
Always observe basic safety precautions when using this product to reduce the risk of injury, fire, or electric shock. Read all instructions before use.
- Do not exceed the maximum input values specified for each measurement range.
- Ensure the test leads are properly connected and in good condition before making any measurements.
- Do not use the multimeter if it appears damaged or is not operating correctly.
- Exercise extreme caution when working with voltages above 30V AC RMS, 42V peak, or 60V DC. These voltages pose a shock hazard.
- Remove the test leads from the circuit before changing functions or ranges.
- Replace batteries when the low battery indicator appears to ensure accurate readings.
3. Package Contents
Verify that all items listed below are present in your package:
- 1 x EVTSCAN TA802A Pocket Pen Multimeter
- 1 x Cloth Bag
- 1 x User Manual (this document)

Figure 3.1: The included cloth carrying bag for the multimeter.
4. Product Features
- Automatic Range: Simplifies operation by automatically selecting the correct measurement range.
- High Measurement Accuracy: Provides precise readings for various electrical parameters.
- Bi-directional Screen Display: Allows viewing from multiple angles for convenience.
- Flashlight Function: Integrated flashlight for working in dimly lit environments.
- Maximum Display: 6000 counts for detailed readings.
- Compact Pen-Style Design: Easy to carry and use in tight spaces.
- Large Screen Backlight: Enhances readability in various lighting conditions.
- NCV Measurement: Non-Contact Voltage detection for identifying live wires and breakpoints.
- Intelligent Combustion Protection: Enhances safety during operation.
- Anti-skid Waist and Sensitive Dial Design: Improves grip and ease of use.

Figure 4.1: Detailed view of the multimeter's display and function dial.
5. Setup
5.1 Battery Installation
The TA802A multimeter requires 2 x AAA batteries (not included). Follow these steps to install the batteries:
- Locate the battery compartment cover on the back of the multimeter.
- Use a screwdriver to open the battery compartment.
- Insert two AAA batteries, ensuring correct polarity (+ and -).
- Replace the battery compartment cover and secure it with the screw.

Figure 5.1: Rear view of the multimeter, indicating the battery compartment location.
5.2 Connecting Test Leads
The multimeter comes with integrated test leads. Ensure they are securely connected to the appropriate input jacks for your measurement type.

Figure 5.2: The multimeter with its integrated test leads ready for use.
6. Operating Instructions
The TA802A features an automatic range function, simplifying most measurements. Turn the rotary dial to select the desired measurement mode.
6.1 Power On/Off
Press the Power button (Ⓘ) to turn the multimeter on or off.
6.2 AC/DC Voltage Measurement (V)
- Turn the rotary dial to the V position. The multimeter will automatically detect AC or DC voltage.
- Connect the test leads across the circuit or component to be measured.
- Read the voltage value on the display.
6.3 AC/DC Current Measurement (mA)
- Turn the rotary dial to the mA position.
- Connect the multimeter in series with the circuit to measure current.
- Read the current value on the display.
6.4 Resistance Measurement (Ω)
- Turn the rotary dial to the Ω position.
- Ensure the circuit is de-energized before measuring resistance.
- Connect the test leads across the component.
- Read the resistance value on the display.
6.5 Capacitance Measurement (F)
- Turn the rotary dial to the F position.
- Ensure the capacitor is discharged before measurement.
- Connect the test leads across the capacitor.
- Read the capacitance value on the display.
6.6 Frequency Measurement (Hz)
- Turn the rotary dial to the Hz position.
- Connect the test leads to the signal source.
- Read the frequency value on the display.
6.7 NCV (Non-Contact Voltage) Detection
- Turn the rotary dial to the NCV position.
- Move the tip of the multimeter close to the wire or power outlet.
- The device will indicate the presence of AC voltage through an audible beep and/or visual indicator.

Figure 6.1: The multimeter in use, measuring components on a circuit board.
7. Maintenance
7.1 Cleaning
Wipe the case with a damp cloth and mild detergent. Do not use abrasives or solvents. Keep the display clean for optimal readability.
7.2 Battery Replacement
When the low battery indicator appears on the display, replace the batteries as described in Section 5.1. Always use fresh AAA batteries.
7.3 Storage
If the multimeter is not used for an extended period, remove the batteries to prevent leakage and damage. Store the device in a cool, dry place, away from direct sunlight and extreme temperatures.
8. Troubleshooting
| Problem | Possible Cause | Solution |
|---|---|---|
| Multimeter does not power on. | Dead or incorrectly installed batteries. | Check battery polarity; replace batteries. |
| Inaccurate readings. | Low battery; incorrect function selected; poor test lead connection. | Replace batteries; select correct function; ensure secure test lead connection. |
| Display shows "OL" (Overload). | Measurement exceeds the selected range. | Switch to a higher range (if applicable) or verify the circuit is within the meter's capabilities. |
9. Specifications
| Parameter | Value |
|---|---|
| Product Model | TA802A (Automatic Range) |
| AC Voltage | 0.001V~600V |
| DC Voltage | 0.1mV~600V |
| AC Current | 0.01mA~600mA |
| DC Current | 0.01mA~600mA |
| Capacitance Measurement | 1nF~60000uF |
| Frequency Measurement | 40Hz~6MHz |
| Resistance Measurement | 0.1Ω~60MΩ |
| Maximum Display | 6000 counts |
| Product Size | Approx. 198 x 51 x 32mm / 7.8 x 2 x 1.3in |
| Product Power Supply | 2 x AAA batteries (not included) |
| Product Weight | Approx. 110g (without battery) |
10. Warranty and Support
For warranty information and technical support, please refer to the contact details provided by your retailer or visit the official EVTSCAN website. Keep your purchase receipt as proof of purchase.
Manufacturer: EVTSCAN
ASIN: B095P3MFDY
Ask a question about this manual
Ask about setup, troubleshooting, compatibility, parts, safety, or missing instructions. Manuals+ will review the question and use this page’s manual context to help answer it.