
1. Introduction
This user manual provides detailed instructions for the installation, operation, and maintenance of your Revotech HD 3MP Mini Security POE IP Camera. Please read this manual thoroughly before using the product to ensure proper functionality and safety. This camera is designed for indoor surveillance, offering high-resolution video and flexible connectivity options.

Figure 1: Revotech HD 3MP Mini Security POE IP Camera (Front View)
This image displays the compact, black metal casing of the Revotech HD 3MP Mini Security POE IP Camera, featuring its pinhole lens and adjustable mounting bracket.
2. Safety Information
Important Safety Precautions:
- Ensure the camera is powered by a compatible 802.3AF Standard 48V POE Switch or a 12V 2A DC power supply. Using an incorrect power source may damage the device.
- This camera is designed for indoor use only. Do not expose it to water, moisture, or extreme temperatures.
- The camera may generate heat during operation. This is normal and safe due to its compact design.
- Do not attempt to disassemble or modify the camera. This will void the warranty and may cause damage or injury.
- Keep the camera and its accessories out of reach of children.
- Clean the camera with a soft, dry cloth. Do not use liquid cleaners or aerosols.
3. Package Contents
Verify that all items listed below are included in your package. If any items are missing or damaged, please contact customer support.
- 1 x Revotech HD 3MP Mini Security POE IP Camera: The main camera unit.
- 1 x User Manual (English): This document, providing instructions.
- 1 x Screws Set: For mounting the camera.

Figure 2: Included Package Contents
This image illustrates the items typically found in the product package: the camera, its box, a set of screws, and the user manual.
4. Product Overview
4.1 Key Features
- High Resolution: 3.0 Megapixel (2304 x 1296P) 1/3'' CMOS Sensor at 20 frames per second for clear and smooth images.
- POE Support: Power Over Ethernet (802.3af standard) reduces cable arrangement complexity.
- Dual Power Option: Can be powered by POE or a conventional 12V 2A DC power supply.
- Pinhole Lens: 3.7mm pinhole lens with approximately 80-degree viewing angle, ideal for discreet surveillance.
- H.265/H.264 Encode: Supports H.265 encoding for efficient bandwidth and storage usage, offering similar quality to H.264 with half the resources.
- Remote Viewing: Supports P2P remote viewing via smartphone (iPhone, Android) and CMS software for Windows.
- Motion Detection: Includes Email Alarm function for motion detection alerts.
- Durable Construction: Features a metal material shell for enhanced durability.
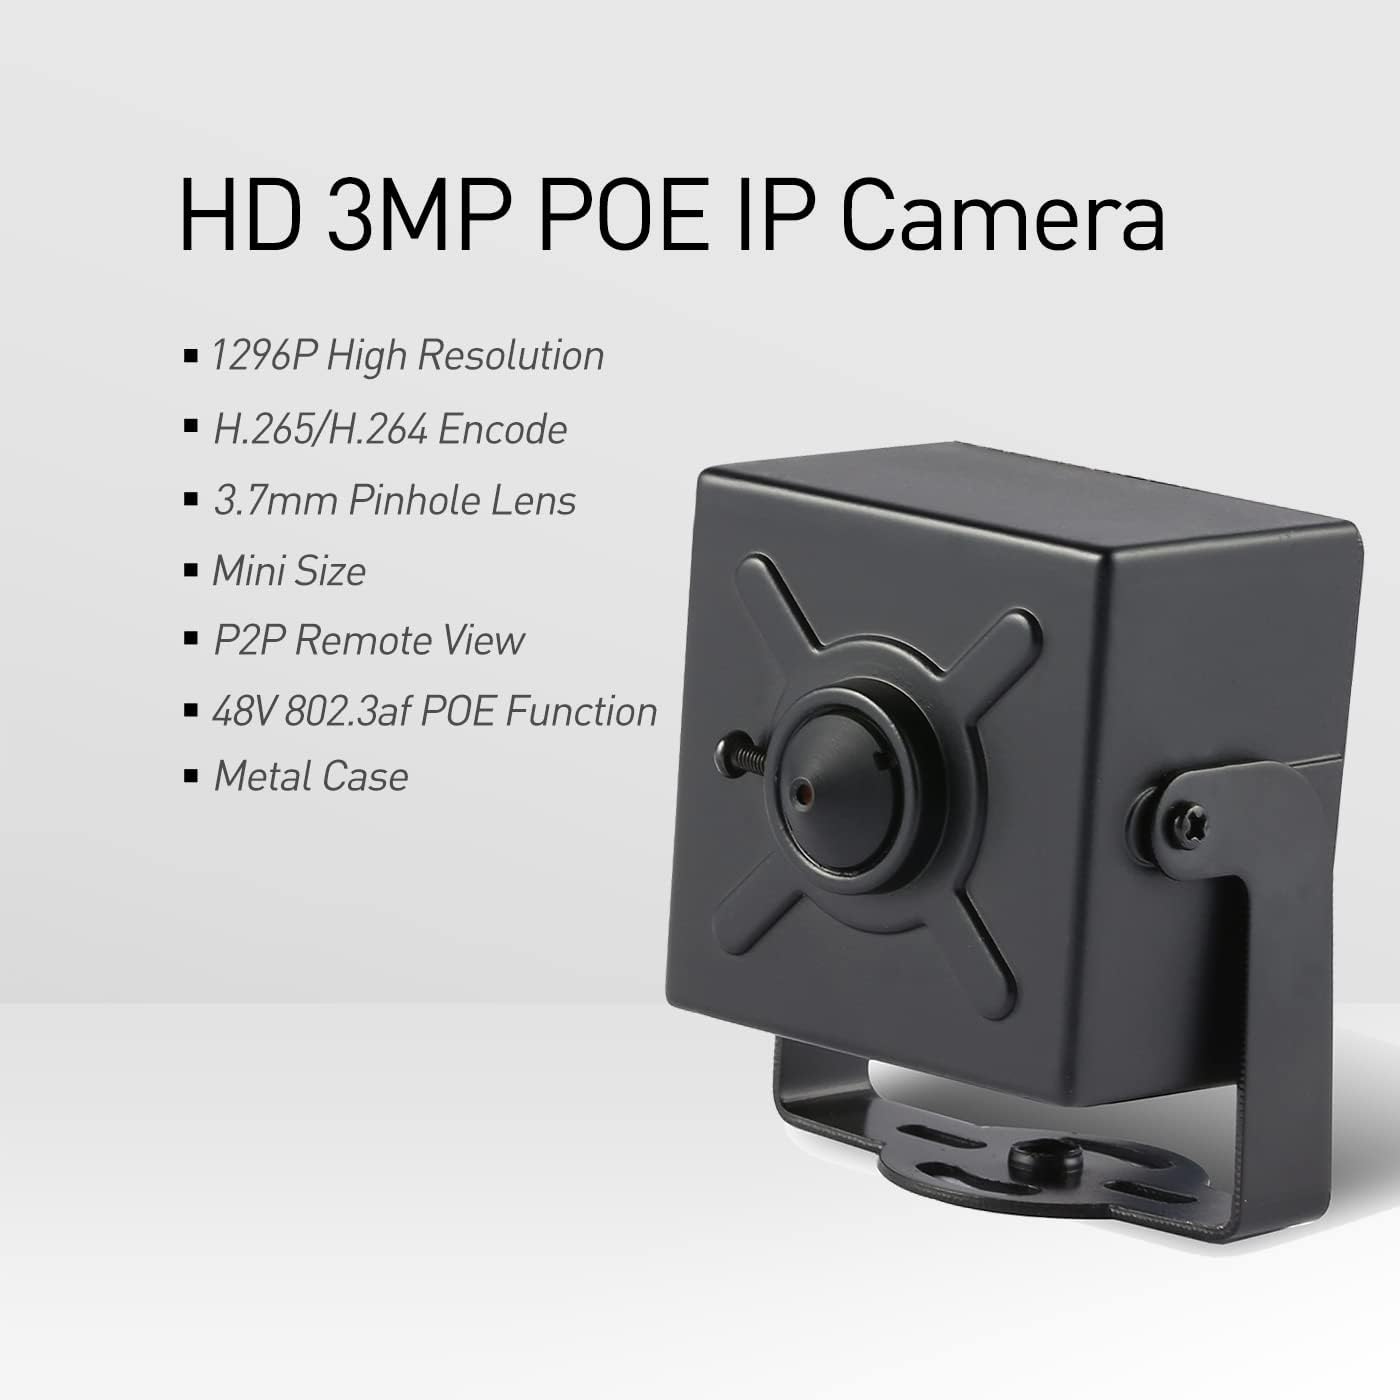
Figure 3: Key Features of the Camera
This graphic highlights the main features of the camera, including its 1296P high resolution, H.265/H.264 encoding, 3.7mm pinhole lens, mini size, P2P remote view, 48V 802.3af POE function, and metal case.
4.2 Component Identification

Figure 4: Camera Dimensions and Components
This diagram provides detailed dimensions of the camera (51mm height, 46mm width, 28mm depth) and labels its key components: the 3.7mm Pinhole Lens, adjustable Mounting Bracket, Screw Hole, Metal Shell, Camera Cable, Auxiliary Power Supply Port, and RJ45 Port (Support POE).
- Pinhole Lens: The small lens for video capture.
- Mounting Bracket: Adjustable bracket for secure installation.
- RJ45 Port: Ethernet port for network connection and POE power.
- Auxiliary Power Port: For optional 12V DC power supply.
5. Setup
5.1 Powering the Camera
The camera can be powered in two ways:
- Power Over Ethernet (POE): Connect the camera's RJ45 port directly to an 802.3af standard 48V POE switch or POE injector using an Ethernet cable. This method provides both power and data through a single cable.
- 12V DC Power Supply: If not using POE, connect a 12V 2A DC power adapter (not included) to the auxiliary power connector. Then, connect the RJ45 port to your network router/switch using an Ethernet cable for data transmission.

Figure 5: POE Connection Example
This image illustrates the concept of Power Over Ethernet (POE), showing a POE cable connection. The camera's built-in POE module allows it to receive power and data through a single Ethernet cable, adhering to the 802.3af standard for stable and reliable operation.
5.2 Network Connection and Initial Setup
After powering the camera, it will obtain an IP address dynamically (DHCP) by default. You will need to discover its IP address on your network to access its web interface or add it to surveillance software.
- Discover IP Address: Use a network scanner tool or check your router's connected devices list to find the camera's IP address. The device name might appear as "rtthread" or similar.
- Access Web Interface: Open a web browser and enter the camera's IP address. The default username is "admin" with no password initially. You will be prompted to set a new password for security.
- Configure Settings (Optional):
- Video & Audio: Adjust video codec (e.g., H.265 if your NVR supports it, otherwise H.264), resolution (3MP or 1080P/2MP), and frame rate.
- Network Settings: You can set a static IP address if desired, though dynamic is default.
- User Management: Create additional user accounts with different permissions.
- Physical Installation:
- Choose a suitable indoor location for mounting.
- Use the included screws to secure the camera's mounting bracket to a wall or ceiling.
- Adjust the camera's angle using the adjustable bracket to achieve the desired viewing area.
6. Operation
6.1 Remote Viewing via Mobile App (NVSEE Int 'I)
The camera supports P2P cloud functionality for remote viewing on smartphones.
- Download the "NVSEE Int 'I" app from your smartphone's app store (iOS or Android).
- Register an account and log in.
- Add your camera to the app by scanning the QR code (if available) or manually entering the device ID.
- Once added, you can view live footage, play back recordings (if connected to an NVR/storage), and receive motion detection alerts.

Figure 6: NVSEE App View
This image shows the user interface of the NVSEE mobile application, displaying live camera feeds and control options such as capture, record, intercom, PTZ (if supported by camera model), and playback.
6.2 Remote Viewing via CMS Software (Windows)
For Windows computers, you can use the CMS software for multi-camera management and viewing.
- Obtain the CMS software from the manufacturer's website or the provided download card. (Note: This software is not compatible with MAC OS or Linux).
- Install the CMS software on your Windows computer.
- Launch the software and add your camera using its IP address or by scanning the network.
- You can then view live feeds, configure settings, and manage recordings from multiple cameras.

Figure 7: CMS Software View
This screenshot displays the CMS (Central Management Software) interface, showing a multi-camera view with controls for PTZ, image adjustment, and various system settings like devices, settings, record, playback, snapshot, layout, and login.
6.3 Motion Detection and Email Alarm
Configure motion detection and email alerts through the camera's web interface or CMS software.
- Navigate to the alarm or event settings.
- Enable motion detection and define detection zones and sensitivity.
- Set up email parameters, including SMTP server details, sender, and recipient email addresses, to receive alerts when motion is detected.
7. Maintenance
- Cleaning: Regularly wipe the camera lens and body with a soft, dry, lint-free cloth to remove dust and smudges. Do not use harsh chemicals, solvents, or abrasive cleaners.
- Firmware Updates: Check the manufacturer's website periodically for firmware updates. Keeping the firmware updated ensures optimal performance and security.
- Environmental Conditions: Ensure the camera operates within its specified temperature and humidity ranges (-25°C~60°C, 10%~90% humidity).
- Cable Management: Periodically inspect all cables for any signs of wear or damage. Ensure connections are secure.
8. Troubleshooting
| Problem | Possible Cause | Solution |
|---|---|---|
| No video feed / Camera offline |
|
|
| Poor image quality |
|
|
| Cannot connect via mobile app/CMS |
|
|
| Camera feels hot |
|
|
9. Specifications
| Feature | Detail |
|---|---|
| Model | I706-2-POE-FHW |
| Resolution | 2304 x 1296P (3.0 Megapixels) |
| Sensor | FH8852+GC2053 (1/3'' CMOS) |
| Min Illumination | 0.1Lux @(F1.2,AGC ON) |
| Frame Rate | 20fps |
| Lens | 3.7mm Pinhole Lens |
| Viewing Angle | Approx. 80 Degrees |
| ONVIF Port | 6688 |
| Lens Interface Type | M12 |
| Compression Format | H.265/H.264 |
| Storage | NVR or Computer |
| IP Address | Dynamic (Default)/Static |
| Smart Alarm | Motion detection, Email alarm |
| Supported Protocols | ONVIF, HTTP, TCP/IP, ICMP, RTSP, RTP, RTCP, SMTP, DHCP, DNS, PPPoE, NTP |
| Ethernet | 10M/100M mbps Ethernet (RJ-45) |
| Operating Temperature | -25°C~60°C (-13°F~140°F) |
| Operating Humidity | 10%~90% |
| Power Supply | POE (802.3af) or 12V DC (Auxiliary) |
| Dimensions (L x W x H) | 5.7cm x 4.4cm x 3.9cm (2.24 x 1.73 x 1.54 inches) |
| Weight | 0.2kg (0.44 lbs) |
| Material | Metal |
| Indoor/Outdoor Usage | Indoor |
10. Warranty and Support
10.1 Warranty Information
This product comes with a standard manufacturer's warranty. Please refer to the warranty card included in your package or contact the seller for specific warranty terms and conditions. Keep your purchase receipt as proof of purchase for warranty claims.
10.2 Customer Support
If you encounter any issues or have questions not covered in this manual, please contact Revotech customer support or your retailer for assistance. For technical support, it is helpful to have your product model number (I706-2-POE-FHW) and a detailed description of the issue ready.
For additional resources, you may refer to the official user manual PDF available at: Revotech User Manual PDF


