
GEONFINO G5
GEONFINO G5 Keyless Entry Smart Deadbolt Lock User Manual
Model: G5 | Brand: GEONFINO
1. Introduction
This manual provides detailed instructions for the installation, operation, and maintenance of your GEONFINO G5 Keyless Entry Smart Deadbolt Lock. This smart lock offers multiple convenient and secure access methods for homes, apartments, offices, and hotels.
2. Product Components
The GEONFINO G5 Smart Deadbolt Lock package includes the following main components and accessories:
- Keypad (Exterior Assembly)
- Interior Assembly
- Latch
- Mounting Plate
- Strike Box
- Strike Plate
- 2 Physical Keys
- 2 IC Cards
- Installation Screws and Hardware

Image: All components of the GEONFINO G5 Smart Lock, including the exterior keypad, interior assembly, latch, mounting plate, strike box, strike plate, physical keys, and IC cards, laid out on a surface.
3. Installation Guide
Follow these steps carefully for proper installation. A screwdriver is the only tool required after preparing the door.
3.1. Door Preparation and Dimensions
Ensure your door meets the following specifications for compatibility:
- Backset: 2-3/8" (60 mm) or 2-3/4" (70 mm)
- Hole in door edge: 1" (25 mm)
- Door thickness: 1-3/5" to 2" (40 mm to 50 mm)
- Hole diameter: 1-1/2" (38mm) to 2-1/8" (54mm)

Image: Diagram illustrating the required door dimensions (backset, hole diameter, door thickness) for installing the smart lock.
3.2. Installing the Latch
Insert the latch into the door edge. Ensure the arrow on the latch is facing up. Secure it with screws. If your backset is 2-3/4" (70mm), rotate the latch 10 degrees to extend its length before fixing.
Video: An animated 3D installation guide for the GEONFINO Smart Door Lock, demonstrating the process of installing the latch into the door frame.
3.3. Installing the Strike Plate
Install the strike box and strike plate on the door frame, aligning them with the latch. Secure with screws.

Image: A diagram showing the correct placement and installation of the strike plate and strike box on the door frame.
3.4. Installing the Keypad (Exterior Assembly)
Insert the keypad assembly into the door, ensuring the tail bar passes through the latch mechanism.

Image: A hand using a screwdriver to install the exterior keypad of the GEONFINO Smart Lock onto a door.
3.5. Confirming Door Handing (Important)
Before installing the interior assembly, confirm the door's handing (left-hand or right-hand). Face the smart lock display directly and twist the key. If the lock is turned to the left and the door is closed, your door is a "Left Hand Door". If the lock is turned to the right and the door is closed, your door is a "Right Hand Door". Pull the small switch on the interior assembly to the correct L or R position as indicated by the arrows.

Image: A diagram illustrating how to distinguish between left-hand and right-hand doors and adjust the lock's internal switch accordingly.
3.6. Interior Assembly Installation
Connect the power cord from the exterior assembly to the interior assembly. Ensure the IC wire is not too long and is properly tucked away. Align the interior assembly with the mounting plate and secure it with screws.

Image: A close-up view of the interior assembly of the smart lock, showing the battery compartment and the internal mechanism.
3.7. Battery Installation
Install 4 AA batteries into the interior assembly's battery compartment. Ensure correct polarity. Replace the battery cover.
4. Operating Instructions
4.1. Unlocking Methods
4.1.1. Via Electronic Keypad (Passcode)
To unlock using a passcode, touch the keypad to activate it, then enter your registered passcode followed by the '#' key. The lock supports anti-peeping password entry, allowing you to enter random digits before or after your actual code for added security.
Video: Demonstration of setting and using a virtual passcode to unlock the smart door lock, including the anti-peeping feature.
4.1.2. Via IC Card
Simply tap your registered IC card on the keypad to unlock the door.

Image: A hand tapping an IC card on the smart lock's keypad to unlock the door.
4.1.3. Via Physical Key
In case of emergency or drained batteries, you can always use the provided physical keys to manually unlock the deadbolt.
4.1.4. Via Bluetooth App (TT Lock App)
Download the "TT Lock" app from your mobile app store. Turn on Bluetooth on your phone and add the lock within the app. You can then unlock/lock the door directly from the app.
Video: Demonstration of setting a passcode using the TT Lock app for the smart door lock.
The TT Lock app allows for advanced management features:
- Generate various types of passcodes: permanent, timed, one-time, or custom.
- Manage IC cards and eKeys.
- View real-time operation records.
- Authorize administrators.
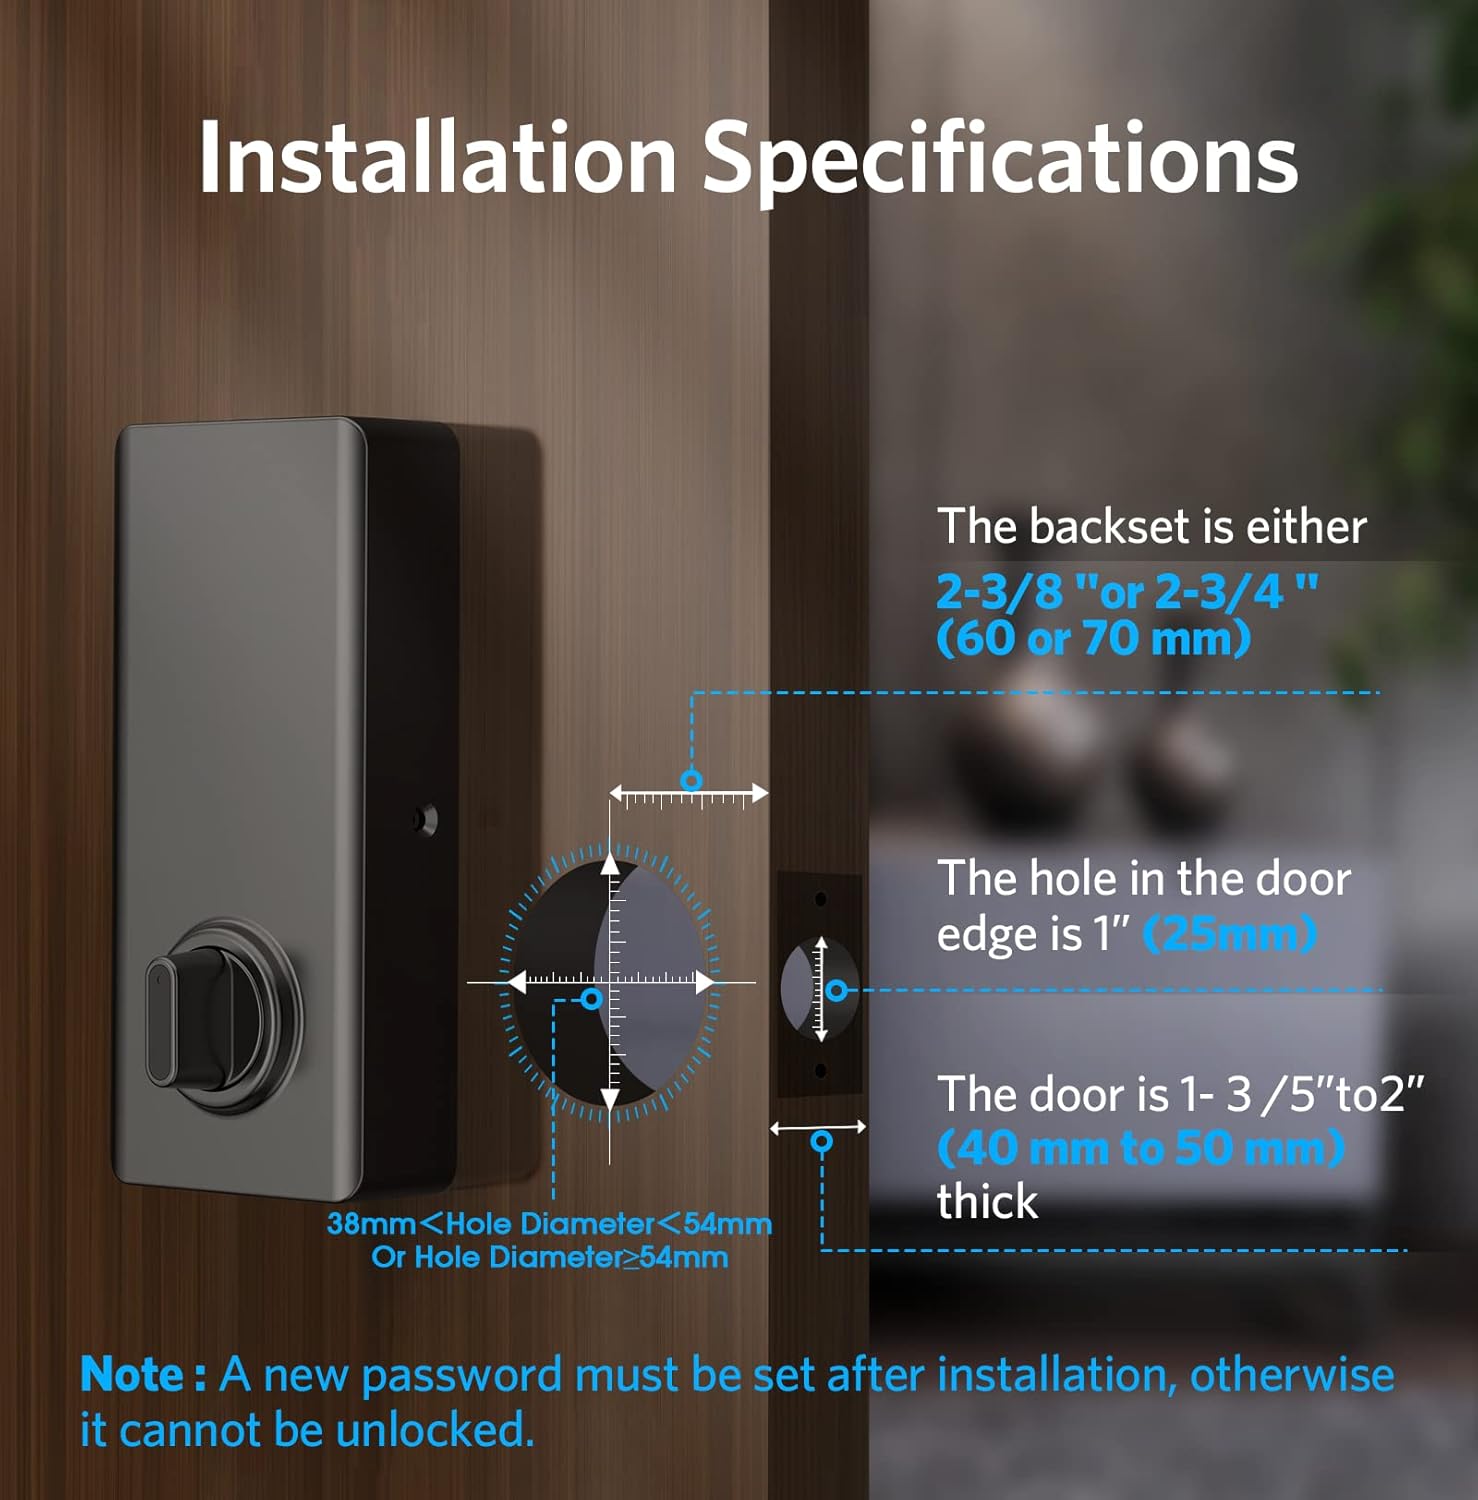
Image: A smartphone screen displaying the TT Lock app interface, highlighting features like keyless entry, operation records, passcode management, and eKey sharing.
Image: A person using the TT Lock app on a smartphone to share an eKey or passcode with another person, demonstrating remote access management.
Video: A short preview video demonstrating the virtual passcode feature of the smart door lock.
4.2. Locking Methods
4.2.1. One-Touch Locking
Simply press and hold the '#' key on the keypad for 3 seconds to lock the door from the outside.
4.2.2. Auto-Lock Function
The smart lock features an auto-lock function that automatically locks the door after a few seconds of being closed. This duration can be customized via the TT Lock app.

Image: A woman entering a house with the GEONFINO Smart Lock, illustrating the auto-lock feature that secures the door automatically after entry.
5. Maintenance
5.1. Battery Life and Alerts
The electronic keypad deadbolt has a long battery life, providing approximately 8000 unlocks (about 12 months). The smart door lock has a low battery alert function, and you can also check the battery power on the TT Lock app.

Image: A close-up of the smart lock's keypad with a low battery icon illuminated, indicating the low battery alert feature.
5.2. Weather Resistance
This deadbolt door lock is IP65 weatherproof, designed to withstand extreme weather conditions, making it suitable for outdoor daily use.

Image: The smart lock displayed with temperature ranges (120°F to -18.4°F) and an IP65 waterproof rating, highlighting its weather resistance.
6. Troubleshooting
6.1. Lock Not Responding to Passcode
After 5 unsuccessful attempts at entering a valid passcode, the unit will shut down for 5 minutes as a security measure. Wait for the lockout period to end before trying again. Ensure you are entering the correct passcode.
6.2. Lock Not Locking/Unlocking Properly
Verify that the tail bar on the interior assembly is correctly aligned and installed vertically. Check battery levels. Ensure the door dimensions meet installation specifications.
6.3. App Connectivity Issues
Ensure Bluetooth is enabled on your smartphone and you are within range of the lock. Restart the TT Lock app or your phone. If issues persist, try re-pairing the lock with the app.
7. Specifications
| Feature | Description |
|---|---|
| Brand | GEONFINO |
| Model Number | G5 |
| Lock Type | Keypad Deadbolt |
| Unlocking Methods | Bluetooth App, Electronic Keypad, IC Card, Physical Keys |
| Connectivity | Bluetooth |
| Material | Zinc |
| Weatherproof Rating | IP65 |
| Power Source | 4 x AA Batteries (not included) |
| Special Features | Alarm, Anti-Peeping Password, Auto-Lock, One-Touch Lock, Passcode Unlock |
8. Warranty and Support
GEONFINO provides a 12-month warranty for all products. If you encounter any problems or have questions, please contact our customer service team. We aim to reply within 24 hours.
For further assistance, visit the official GEONFINO store on Amazon: GEONFINO Store
Ask a question about this manual
Ask about setup, troubleshooting, compatibility, parts, safety, or missing instructions. Manuals+ will review the question and use this page’s manual context to help answer it.