1. Introduction
Thank you for choosing the Craig CAC378 Binoculars with Digital Camera. This device combines powerful 10x magnification binoculars with a built-in digital camera and a 1.5-inch LCD display, allowing you to observe distant objects and capture photos or videos simultaneously. This manual provides essential information for the safe and effective operation of your new binoculars.
2. Safety Information
- Do not look directly at the sun: Viewing the sun through binoculars can cause permanent eye damage.
- Keep out of reach of children: This device contains small parts and electronic components that could be a choking hazard or cause injury.
- Handle with care: Avoid dropping or subjecting the binoculars to strong impacts, which can damage optical and electronic components.
- Water resistance: This product is not waterproof. Avoid exposure to rain or moisture.
- Battery safety: Use only the provided charging cable. Do not attempt to open or replace the built-in rechargeable battery.
- Operating temperature: Operate and store the device within recommended temperature ranges to prevent damage.
3. Package Contents
Please verify that all items listed below are included in your package:
- Craig CAC378 Binoculars with Digital Camera
- Fabric Drawstring Carrying Bag
- 7-inch Tripod
- Micro USB to USB Charging Cable
- 8 GB Micro SD Card
- Micro SD Card Adapter

This image displays the complete set of items included with your Craig CAC378 Binoculars: the binoculars unit, a fabric drawstring carrying bag, a compact 7-inch tripod, a Micro USB to USB charging cable, an 8 GB Micro SD card, and a Micro SD card adapter.
4. Product Overview
Familiarize yourself with the main components of your Craig CAC378 Binoculars:

This image shows the Craig CAC378 Binoculars from a front-top perspective, with the 1.5-inch LCD display flipped open, revealing the digital camera controls. The binoculars feature a black and silver design with textured grips.
Key Components
- Objective Lenses: The large lenses at the front of the binoculars that gather light.
- Eyepiece Lenses: The lenses you look through.
- Focus Wheel: Located at the top center, used to adjust the focus for clear viewing.
- Diopter Adjustment: Typically on the right eyepiece, used to compensate for differences in vision between your eyes.
- 1.5-inch TFT LCD Display: Flip-up screen for camera operation and media playback.
- Digital Camera Lens: Integrated lens for capturing photos and videos.
- Control Buttons: (M) Mode button, Shutter/Record button, and navigation buttons for camera functions.
- Micro SD Card Slot: For inserting the memory card to store media.
- Micro USB Port: For charging the battery and connecting to a computer.
- Tripod Mount: Threaded hole at the bottom for attaching the included tripod.

This top-down image of the Craig CAC378 Binoculars highlights the central focus wheel, the 'M' (Mode) button, and the shutter/record button, which are used for operating the digital camera functions.

A detailed side view of the Craig CAC378 Binoculars, clearly showing the Micro USB charging port and the Micro SD card slot for memory expansion.
5. Setup
5.1. Charging the Battery
- Connect the small end of the Micro USB charging cable to the Micro USB port on the binoculars.
- Connect the standard USB end of the cable to a USB power adapter (not included) or a computer's USB port.
- The charging indicator light will illuminate. Allow the device to charge fully before first use.
- Do not leave the charger attached for more than 24 hours.
5.2. Inserting the Micro SD Card
The binoculars require a Micro SD card to store photos and videos. An 8 GB Micro SD card is included.
- Locate the Micro SD card slot on the side of the binoculars.
- Insert the Micro SD card with the gold contacts facing down (or as indicated by the slot diagram) until it clicks into place.
- To remove, gently push the card in until it clicks, then release, and it will spring out.
- The device supports Micro SD cards up to 32 GB.
5.3. Attaching the Tripod
For stable viewing and photography, especially at high magnification, use the included tripod.
- Locate the tripod mount at the bottom of the binoculars.
- Screw the binoculars onto the tripod's mounting screw until secure.
- Adjust the tripod legs for desired height and stability.
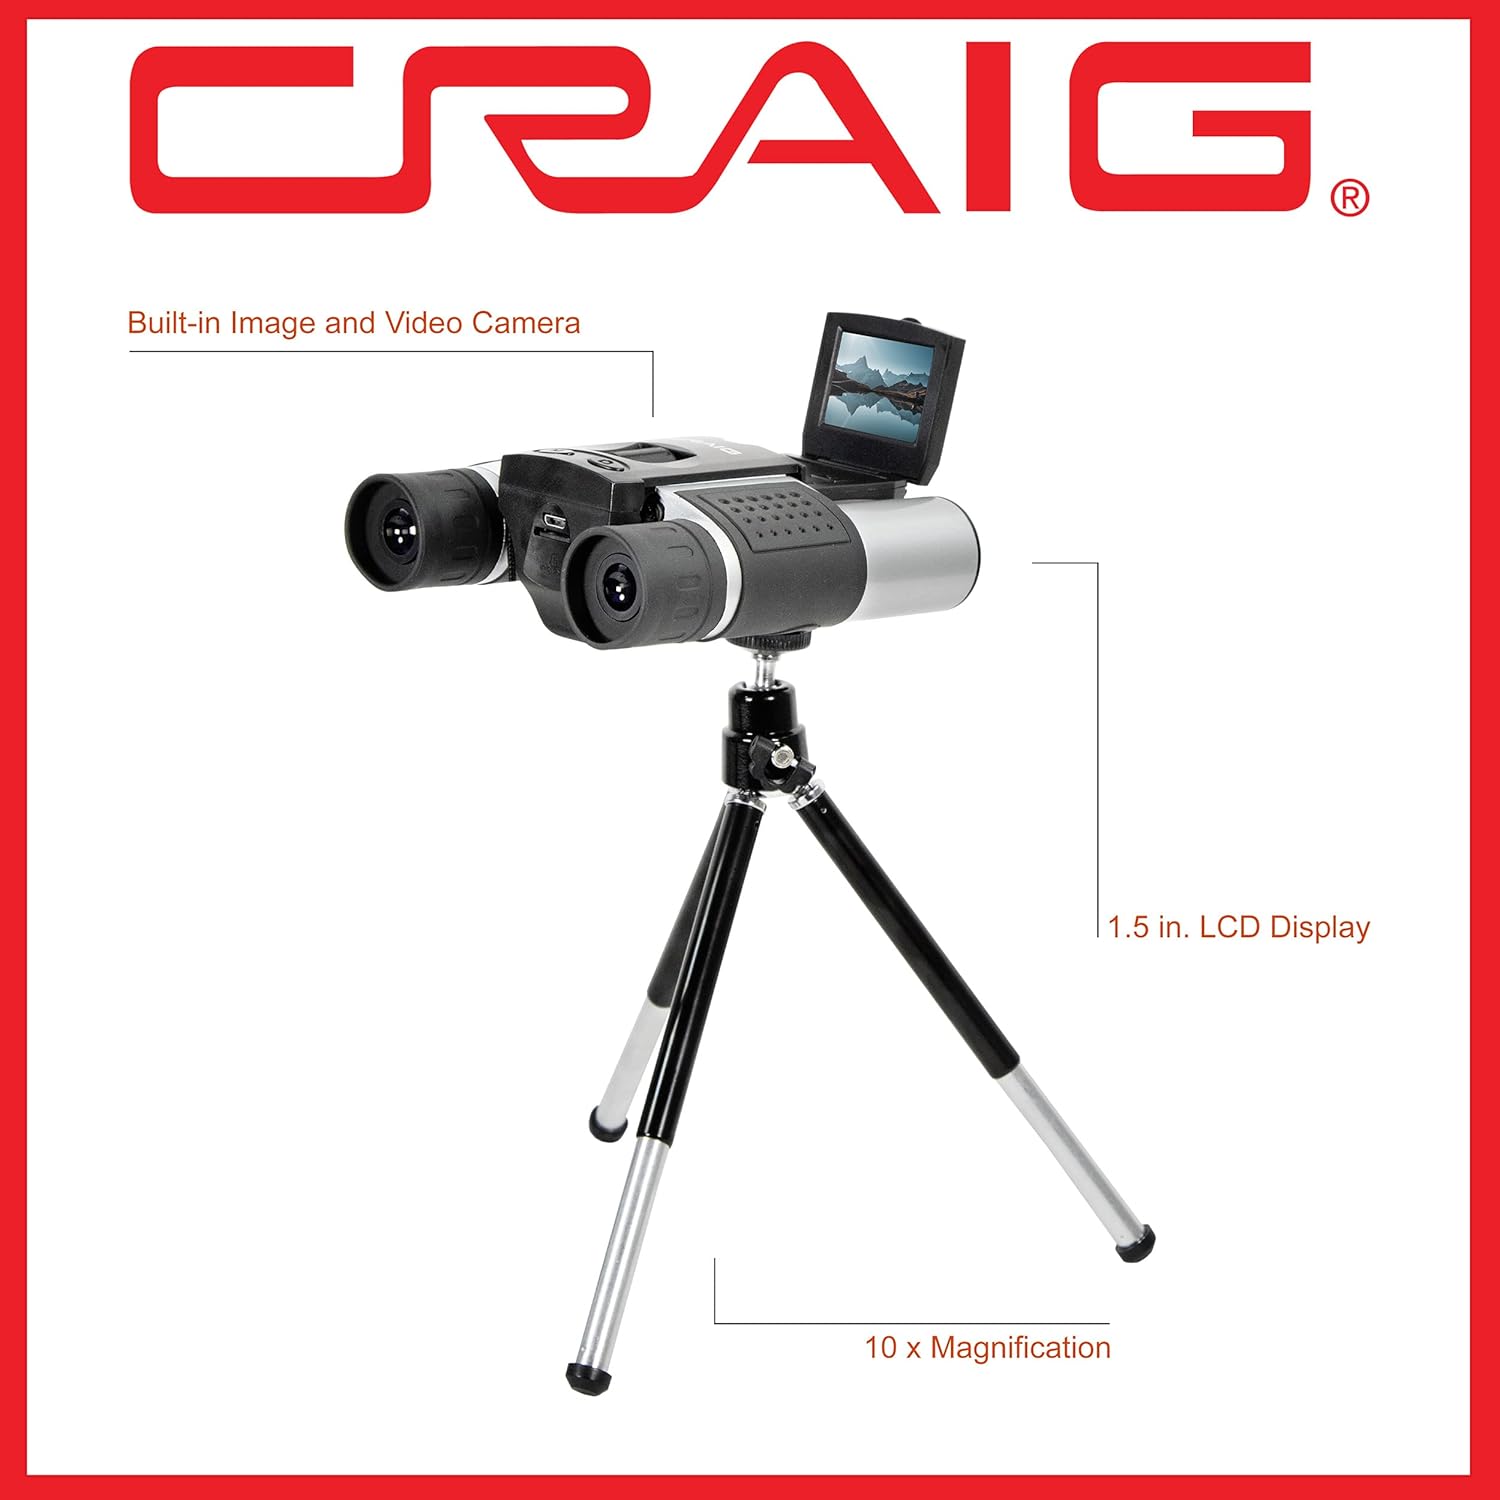
A side view of the Craig CAC378 Binoculars, demonstrating its use with the included tripod. Labels indicate the 1.5-inch LCD display and the 10x magnification capability.
6. Operating Instructions
6.1. Powering On/Off
- To Power On: Press and hold the Power button (usually integrated with the Shutter/Record button or a separate button) until the LCD screen illuminates.
- To Power Off: Press and hold the Power button again until the LCD screen turns off.
6.2. Adjusting Focus
- Hold the binoculars up to your eyes.
- Close your right eye and rotate the central focus wheel until the image in the left eyepiece is sharp and clear.
- Close your left eye and rotate the diopter adjustment ring (usually on the right eyepiece) until the image in the right eyepiece is sharp and clear.
- With both eyes open, the image should now be in focus. Use the central focus wheel for minor adjustments to different distances.
6.3. Using the Digital Camera
Flip open the 1.5-inch LCD display to access camera functions.
6.3.1. Taking Photos
- Press the 'M' (Mode) button repeatedly until the camera icon appears on the LCD, indicating photo mode.
- Frame your subject using the binoculars and the LCD screen.
- Press the Shutter button once to capture a photo. The image will be saved to the Micro SD card.
6.3.2. Recording Videos
- Press the 'M' (Mode) button repeatedly until the video camera icon appears on the LCD, indicating video recording mode.
- Frame your subject.
- Press the Shutter button once to start recording. A timer or recording indicator will appear on the LCD.
- Press the Shutter button again to stop recording. The video (720p resolution) will be saved to the Micro SD card.
- Video clips can be up to 10 minutes in length.
6.3.3. Viewing Media on LCD
- Press the 'M' (Mode) button repeatedly until the playback icon (usually a triangle) appears on the LCD.
- Use the navigation buttons (if available, often integrated with other controls) to scroll through your photos and videos.
- Press the Shutter button to play a selected video.
6.4. Transferring Files to a Computer
- Ensure the binoculars are powered on.
- Connect the binoculars to your computer using the Micro USB to USB charging cable.
- The binoculars should appear as a removable disk drive on your computer.
- Open the drive to access and copy your photos and videos.
- Alternatively, remove the Micro SD card and use the included adapter with a card reader to transfer files.
7. Maintenance
- Cleaning Lenses: Use a soft, lint-free cloth specifically designed for optical lenses. Do not use abrasive materials or harsh chemicals. Gently wipe the lenses to remove dust or smudges.
- Cleaning Body: Wipe the body of the binoculars with a soft, damp cloth. Avoid getting moisture into any openings.
- Storage: Store the binoculars in the included carrying bag in a cool, dry place away from direct sunlight and extreme temperatures.
- Battery Care: To prolong battery life, avoid fully discharging the battery frequently. Charge the device regularly, even if not in use for extended periods.
8. Troubleshooting
| Problem | Possible Cause | Solution |
|---|---|---|
| Device does not power on. | Battery is discharged. | Charge the battery using the Micro USB cable. |
| Cannot take photos or record videos. | No Micro SD card inserted or card is full/corrupted. | Insert a Micro SD card. Check if the card has free space. Format the card if necessary (this will erase all data). |
| Images/videos are blurry. | Focus is not adjusted correctly. | Adjust the central focus wheel and diopter for clear viewing. Ensure the camera lens is clean. |
| Cannot connect to computer. | Incorrect cable or driver issue. | Ensure the correct Micro USB cable is used. Try a different USB port on your computer. Restart both devices. |
9. Specifications
- Magnification: 10x
- Display: 1.5-inch TFT LCD
- Video Resolution: 720p
- Memory: Micro SD Card Slot (supports up to 32GB, 8GB card included)
- Battery: Built-in Rechargeable
- Dimensions: 6.5 x 2.5 x 7 inches
- Weight: 1.01 pounds
- Included Accessories: Fabric Drawstring Carrying Bag, 7-inch Tripod, Micro USB to USB Charging Cable, 8 GB Micro SD Card, Micro SD Card Adapter
10. Warranty and Support
For detailed warranty information and customer support, please refer to the product packaging or visit the official Craig website. Keep your proof of purchase for any warranty claims.


