Tenda HG9
Tenda HG9 AC1200 Dualband Wi-Fi GPON ONT Router User Manual
Model: HG9 | Brand: Tenda
1. Product Overview
The Tenda HG9 is an intelligent routing passive optical network terminal designed for Fiber-to-the-Home (FTTH) solutions. It integrates advanced features to provide high-speed internet, HD IPTV, and VoIP multi-service applications for residential and small office environments.
This device complies with the 802.11ac standard, offering dual-band Wi-Fi connectivity with speeds up to 1176Mbps (867Mbps at 5GHz and 300Mbps at 2.4GHz). Equipped with two 6dBi high-gain external antennas and Beamforming+ technology, the HG9 ensures superior Wi-Fi coverage and a high-quality wireless experience.
It features four Gigabit Ethernet ports for high-speed wired connections and a voice port for VoIP services. The HG9 is widely compatible with global mainstream OLT brands, supporting plug-and-play functionality, OMCI, and TR069 for remote maintenance.
2. Package Contents
Please verify that all items are present and in good condition upon opening the package:
- 1 x Tenda HG9 GPON ONT Router
- 1 x Power Adapter
- 1 x Quick Installation Guide
- 1 x RJ45 Ethernet Cable
- 1 x RJ11 Telephone Cable
3. Product Features
- Standard Compliance: Complies with ITU G.984.1, ITU G.984.2, ITU G.984.3, and ITU G.984.4 for GPON.
- AC1200 Dualband Wi-Fi: Delivers concurrent speeds of 867Mbps at 5GHz and 300Mbps at 2.4GHz.
- Gigabit Ethernet Ports: Four full Gigabit Ethernet ports for ultrafast wired data transfer speeds.
- High Access Speed: Supports extremely high access speeds up to 2.5Gbps Downstream and 1.25Gbps Upstream.
- Superior Wi-Fi Coverage: Features two 6dBi high-gain antennas and Beamforming+ technology for extended wireless range.
- IPTV Support: Built-in IGMP snooping and proxy combined with 802.1Q VLAN (Virtual LAN) for a smooth IPTV experience.
- VoIP Functionality: Includes a voice port to support Voice over IP services.
- USB Port: Supports file sharing and USB printer connectivity.
- Easy Management: OMCI and TR069 protocols enable easy remote management and maintenance.
- Security Protocol: Supports WPA2-PSK.
4. Hardware Overview
4.1 Front Panel Indicators (LEDs)
The front panel of the Tenda HG9 features several LED indicators that provide real-time status information about the device's operation.
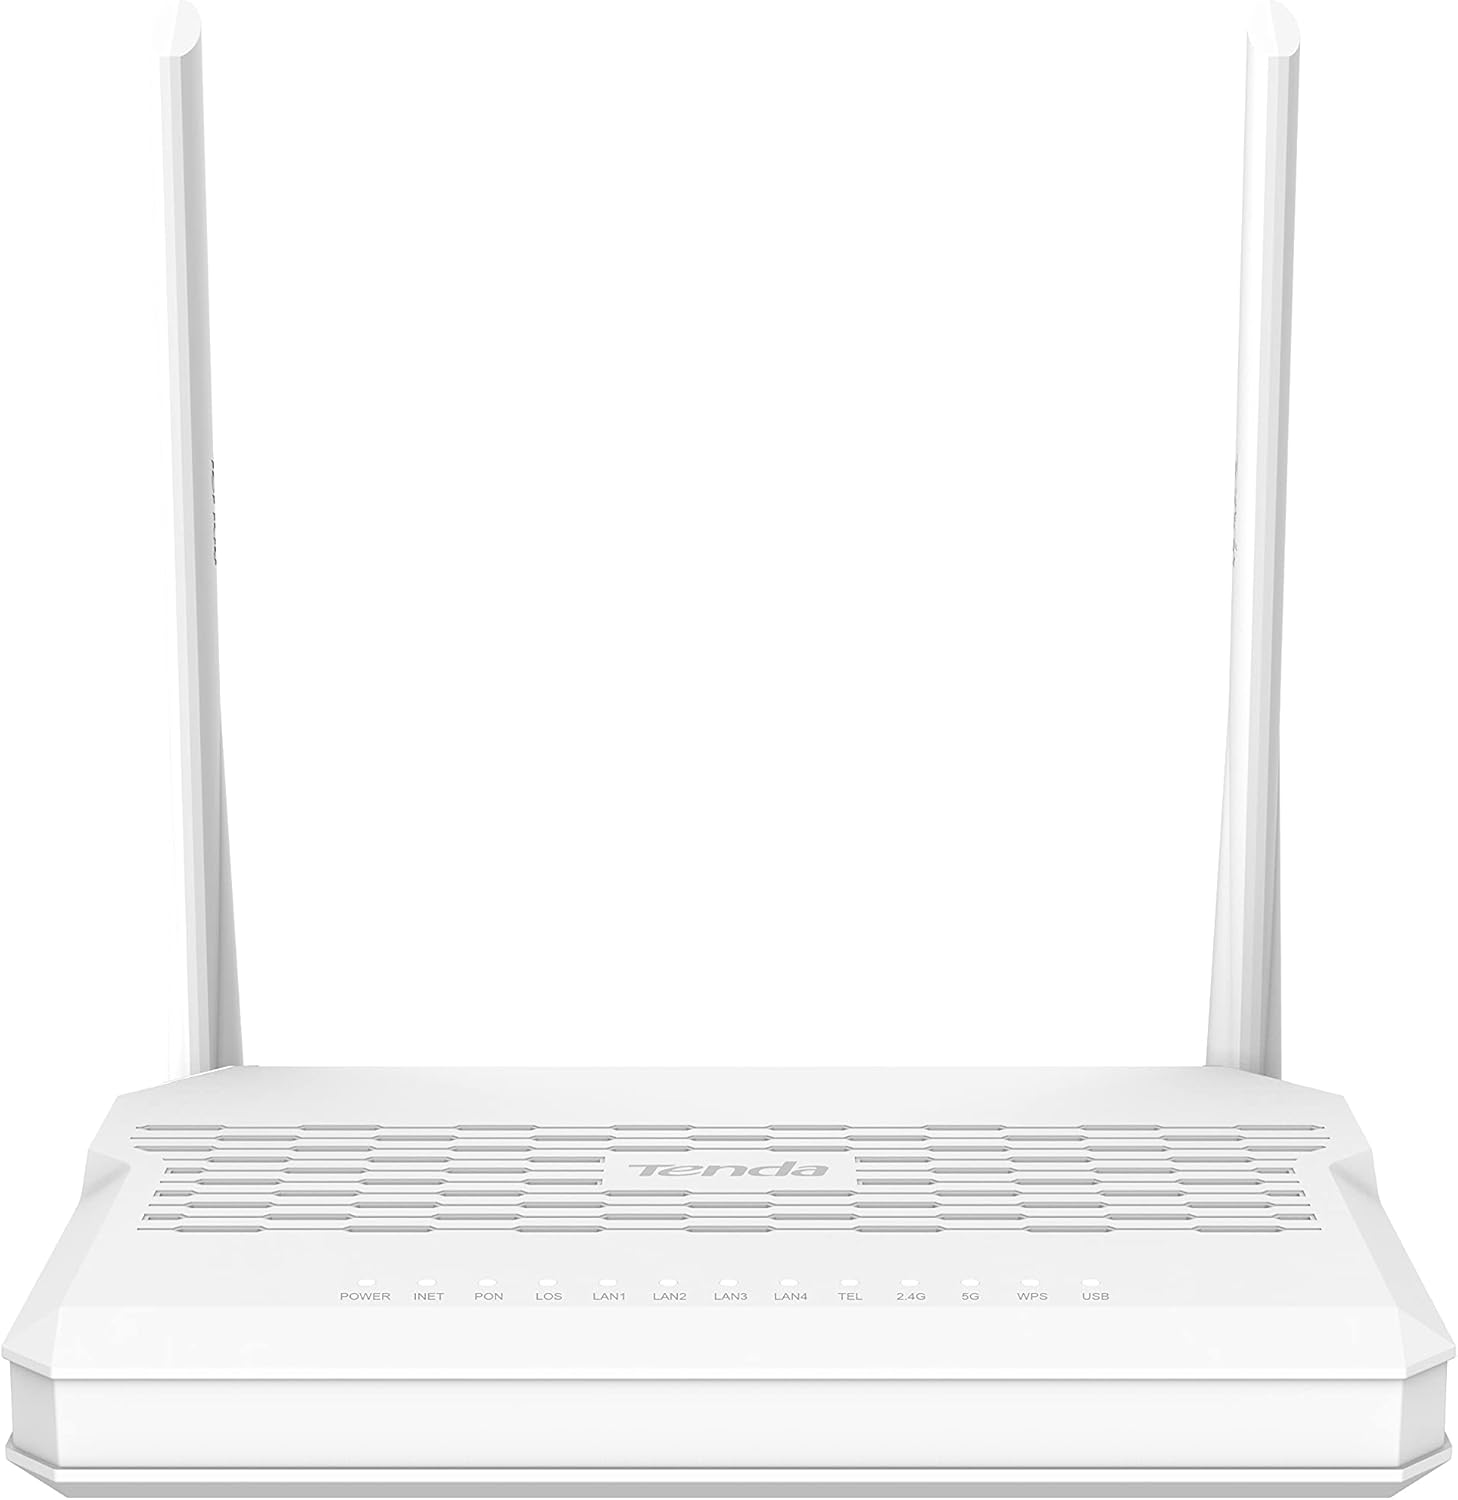
Image: Front view of the Tenda HG9 router, showing the LED indicators for Power, INET, PON, LOS, LAN1-4, TEL, 2.4G, 5G, WPS, and USB.
| LED Indicator | Status | Description |
|---|---|---|
| POWER | Solid Green | The device is powered on. |
| INET | Solid Green | Internet connection is active. |
| PON | Solid Green | Optical signal is detected and registered. |
| LOS | Solid Red | Loss of optical signal. Check fiber connection. |
| LAN1-4 | Solid Green | A device is connected to the corresponding LAN port. |
| TEL | Solid Green | VoIP service is active. |
| 2.4G | Solid Green | 2.4GHz Wi-Fi is enabled. Blinks when data is transmitted. |
| 5G | Solid Green | 5GHz Wi-Fi is enabled. Blinks when data is transmitted. |
| WPS | Blinking Green | WPS pairing is in progress. |
| USB | Solid Green | USB device is connected and recognized. |
4.2 Rear Panel Ports and Buttons
The rear panel provides all the necessary ports for connecting the router to your network and devices.
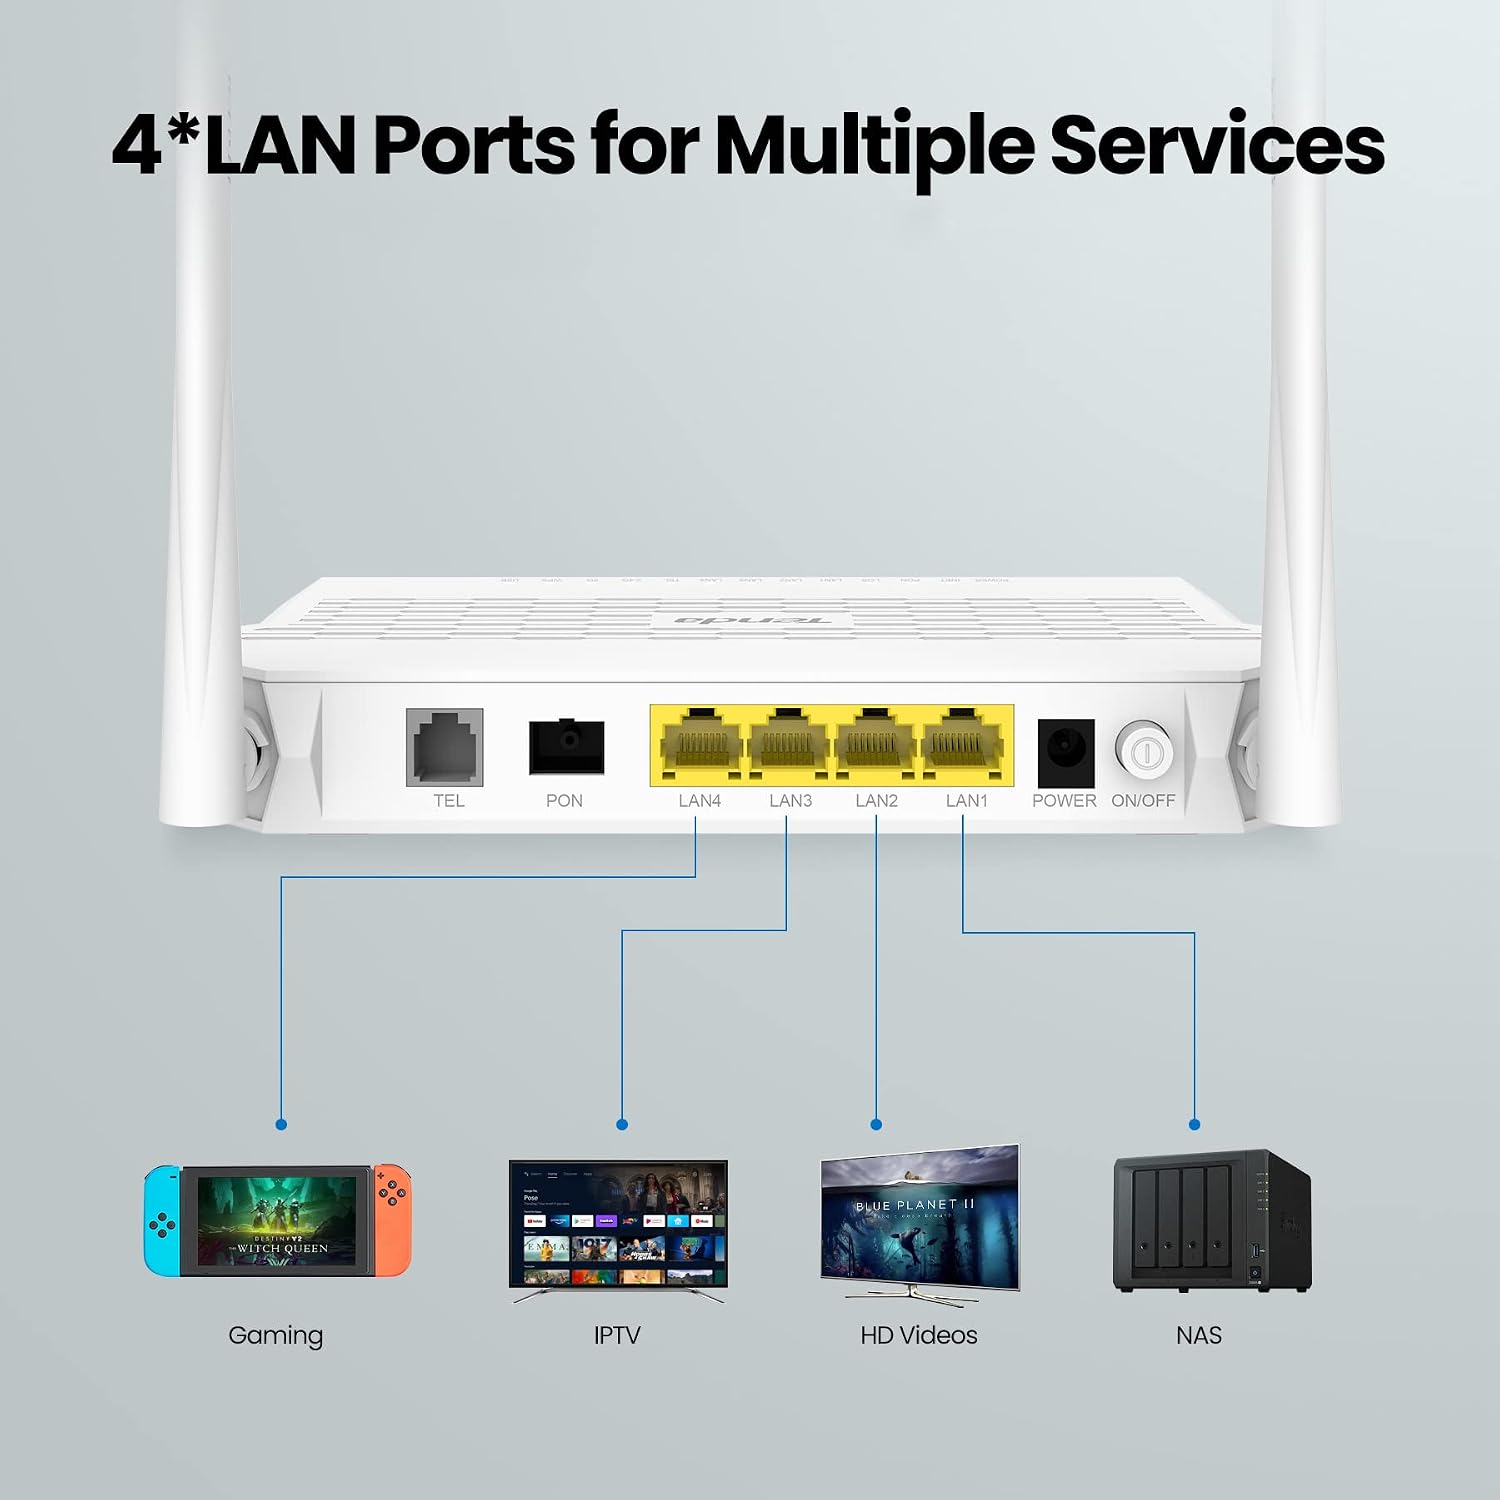
Image: Rear view of the Tenda HG9 router, illustrating the TEL, PON, LAN1-4, Power, and On/Off button. This image also shows example connections for Gaming, IPTV, HD Videos, and NAS devices.
- TEL Port: Connects to a telephone for VoIP services.
- PON Port: Connects to the optical fiber cable from your Internet Service Provider (ISP).
- LAN1-4 Ports: Gigabit Ethernet ports for connecting wired devices such as computers, gaming consoles, smart TVs, or Network Attached Storage (NAS).
- POWER Port: Connects to the included power adapter.
- ON/OFF Button: Powers the device on or off.
- RESET Button: A small pinhole button. Press and hold for 8-10 seconds to restore factory default settings.
- USB Port: For connecting USB storage devices for file sharing or USB printers.

Image: A close-up view of the Tenda HG9 router's side, highlighting the USB port with a USB flash drive connected, indicating support for file sharing and USB printers.
5. Setup Guide
5.1 Initial Connection
- Power Off: Ensure the Tenda HG9 router is powered off before making any connections.
- Connect Fiber Optic Cable: Carefully connect the fiber optic cable from your ISP's optical network terminal (ONT) or wall outlet to the PON port on the Tenda HG9. Ensure the connector is clean and properly seated.
- Connect Power Adapter: Plug the power adapter into the POWER port of the router and then into a power outlet.
- Power On: Press the ON/OFF button to power on the router.
- Observe LEDs: Wait for the POWER, PON, and INET LEDs to turn solid green. The LOS LED should be off. If the LOS LED is red, there is an issue with the fiber optic connection.
- Connect Devices (Optional):
- For wired devices, connect an Ethernet cable from your computer or other network device to any of the LAN1-4 ports on the router.
- For VoIP services, connect your telephone to the TEL port using an RJ11 cable.
5.2 Web Interface Configuration
After initial connection, you can access the router's web interface for detailed configuration.
- Connect to Router: Connect your computer to the router via an Ethernet cable (to a LAN port) or wirelessly using the default Wi-Fi SSID and password printed on the router's label.
- Open Web Browser: Open a web browser (e.g., Chrome, Firefox, Edge).
- Enter IP Address: In the address bar, type the default IP address of the router (usually
192.168.1.1or192.168.0.1) and press Enter. Refer to the label on the bottom of your router for the exact IP address and default login credentials. - Login: Enter the default username and password. It is highly recommended to change the default login password for security reasons after your first login.
- Follow Setup Wizard: The web interface typically provides a setup wizard to guide you through the initial internet connection settings, Wi-Fi configuration, and other essential parameters.
The Tenda HG9 supports both GPON and EPON fiber connections, ensuring broad compatibility with various ISP setups. Configuration for specific ISP parameters may be required and can usually be found in the web interface's WAN settings.

Image: A graphic illustrating the Tenda HG9 router's capability to support both GPON and EPON fiber connection modes, highlighting its superior working mode and compatibility.

Image: The Tenda HG9 router displayed alongside logos for Airtel, Jio, and BSNL, emphasizing its comprehensive compatibility with major Internet Service Providers' fiber connections.
6. Operating Instructions
6.1 Wi-Fi Configuration
The Tenda HG9 provides dual-band Wi-Fi (2.4GHz and 5GHz) for flexible and high-speed wireless connectivity.

Image: The Tenda HG9 router positioned in a living room, with a graphic overlay indicating "1200Mbps Dual-band Wi-Fi" and its suitability for gaming and HD video streaming, showing 2.4G and 5G bands.
- Changing SSID and Password: Access the web interface (refer to Section 5.2). Navigate to the Wireless settings. Here you can change the Wi-Fi network name (SSID) and password for both the 2.4GHz and 5GHz bands. It is recommended to use strong, unique passwords.
- Guest Network: The router may support a guest Wi-Fi network. This allows visitors to access the internet without gaining access to your main network resources. Configure this feature in the web interface if available.
- WPS (Wi-Fi Protected Setup): For quick connection of WPS-compatible devices, press the WPS button on the router and then activate WPS on your device within two minutes.
- Wi-Fi Coverage: The HG9's 6dBi antennas and Beamforming+ technology enhance Wi-Fi coverage. For optimal performance, place the router in a central location, away from obstructions and interference sources.

Image: The Tenda HG9 router on a table with a traditional telephone connected to its TEL port, visually confirming its support for Voice over IP (VoIP) services.

Image: A cross-section diagram of a multi-story house, illustrating the excellent Wi-Fi coverage provided by the Tenda HG9 router, with arrows showing signal propagation across different rooms and floors.
6.2 LAN and USB Port Usage
- LAN Ports: Use the four Gigabit LAN ports to connect wired devices for stable and high-speed network access. This is ideal for devices requiring consistent bandwidth, such as gaming PCs, smart TVs for 4K streaming, or NAS devices.
- USB Port: The USB port can be used for:
- File Sharing: Connect a USB storage device (e.g., flash drive, external hard drive) to share files across your network. Configure sharing settings in the web interface.
- USB Printer: Connect a USB printer to the router to make it accessible to all devices on your network.
7. Maintenance
7.1 Firmware Update
Regularly updating the router's firmware can improve performance, add new features, and enhance security. Check the official Tenda website for the latest firmware version for your HG9 model.
- Download the correct firmware file from the Tenda support website.
- Access the router's web interface.
- Navigate to the "System Tools" or "Firmware Upgrade" section.
- Upload the downloaded firmware file and follow the on-screen instructions. Do not power off the router during the update process.
7.2 Resetting to Factory Defaults
If you forget your login password or encounter persistent issues, you can reset the router to its factory default settings.
- With the router powered on, locate the RESET pinhole button on the rear panel.
- Use a paperclip or a similar pointed object to press and hold the RESET button for approximately 8-10 seconds until all LEDs flash.
- Release the button. The router will restart with factory default settings. You will need to reconfigure your internet and Wi-Fi settings.
7.3 Cleaning and Placement
- Cleaning: Use a soft, dry cloth to clean the router's exterior. Do not use liquid cleaners or aerosols.
- Placement: Place the router in a well-ventilated area, away from direct sunlight, heat sources, and moisture. Avoid placing it near large metal objects or other electronic devices that may cause interference.
8. Troubleshooting
This section addresses common issues you might encounter with your Tenda HG9 router.
8.1 No Internet Access
- Check LED Status: Ensure the POWER, PON, and INET LEDs are solid green. If LOS is red, there's a fiber optic issue; contact your ISP.
- Cable Connections: Verify all cables (fiber, Ethernet) are securely connected.
- ISP Configuration: Confirm that the router's WAN settings in the web interface are correctly configured according to your ISP's requirements.
- Reboot: Power off the router, wait 10 seconds, then power it back on.
8.2 Wi-Fi Connection Issues
- Check Wi-Fi LEDs: Ensure the 2.4G and 5G LEDs are solid green.
- Correct Password: Verify you are entering the correct Wi-Fi password.
- Signal Strength: Move closer to the router to check if signal strength is an issue.
- Interference: Reduce interference from other electronic devices (e.g., microwaves, cordless phones).
- Channel Selection: In the web interface, try changing the Wi-Fi channel to a less congested one.
8.3 Cannot Access Web Interface
- IP Address: Ensure you are using the correct IP address (e.g.,
192.168.1.1). - Wired Connection: Try connecting your computer directly to a LAN port on the router with an Ethernet cable.
- IP Settings: Ensure your computer's network adapter is set to obtain an IP address automatically (DHCP).
- Reset Router: If all else fails, perform a factory reset (refer to Section 7.2).
9. Specifications
| Feature | Detail |
|---|---|
| Model Name | HG9 |
| Brand | Tenda |
| Product Dimensions | 19 x 13 x 3 cm |
| Weight | 350 g |
| Wi-Fi Standard | 802.11ac (AC1200) |
| Frequency Band Class | Dual-Band (2.4 GHz & 5 GHz) |
| Wi-Fi Speed | Up to 1176Mbps (300Mbps at 2.4GHz, 867Mbps at 5GHz) |
| Antennas | 2 x 6dBi High Gain External Antennas |
| Ethernet Ports | 4 x Gigabit LAN Ports |
| PON Standard | ITU G.984.x (GPON) |
| Downstream Speed | Up to 2.5Gbps |
| Upstream Speed | Up to 1.25Gbps |
| Voice Port | 1 x TEL (RJ11) |
| USB Port | 1 x USB |
| Special Features | Remote Access (OMCI, TR069), Beamforming+, IGMP Snooping/Proxy, 802.1Q VLAN |
| Security Protocol | WPA2-PSK |
| Compatible Devices | Laptop, Desktop, TV, Tablet |
| Recommended Uses | Home, Office |
10. Warranty and Support
The Tenda HG9 AC1200 Dualband Wi-Fi GPON ONT Router comes with a 3-year warranty provided by the manufacturer from the date of purchase.
For technical support, firmware updates, or further assistance, please visit the official Tenda support website or contact their customer service. Ensure you have your product model (HG9) and purchase details ready when seeking support.
Manufacturer: Shenzhen Tenda Technology Co., Ltd.
Related Documents - HG9
 |
Tenda PON ONT User Guide This comprehensive user guide from Tenda provides detailed instructions for setting up and configuring Tenda PON ONT devices (models HG1, HG6, HG7, HG7c, HG9). Learn about device features, network configuration, wireless settings, WAN/LAN setup, and troubleshooting for your Fiber to the Home (FTTH) connection. |
 |
Tenda AC1200 Wave2 Gigabit Access Point i24 Quick Installation Guide Quick installation guide for the Tenda AC1200 Wave2 Gigabit Access Point (model i24). Learn how to set up your network device with instructions on topology, mounting (ceiling/wall), and configuration via hardware controller or Web UI. Visit tendacn.com for full details. |
 |
Tenda AX1500 Wi-Fi6 VoIP XPON ONT HG15 Quick Installation Guide A quick installation guide for the Tenda AX1500 Wi-Fi6 VoIP XPON ONT HG15, covering package contents, LED indicators, ports, connection, registration, internet configuration (router and bridge modes), and troubleshooting. |
 |
Tenda AC10/AC10U AC1200 Dual Band Gigabit WiFi Router Quick Installation Guide Quick installation guide for Tenda AC10 and AC10U AC1200 MU-MIMO Dual Band Gigabit WiFi Routers, including setup instructions, LED indicators, and troubleshooting. |
 |
Tenda AC11 Dual Band Gigabit WiFi Router Quick Installation Guide A quick installation guide for the Tenda AC11 Dual Band Gigabit WiFi Router, covering package contents, connection steps, setup, LED indicators, ports, and FAQs. |
 |
Tenda AC8 Gigabit Dual-Band Router Quick Installation Guide A quick installation guide for the Tenda AC8 Gigabit Dual-Band Router, covering setup, internet connection, and wireless network configuration in multiple languages. |
Ask a question about this manual
Ask about setup, troubleshooting, compatibility, parts, safety, or missing instructions. Manuals+ will review the question and use this page’s manual context to help answer it.