
1. Introduction
This manual provides detailed instructions for the setup, operation, and maintenance of your Coolife H953 940nm Trail Camera. Please read this manual thoroughly before using the camera to ensure optimal performance and longevity.

Image 1.1: The Coolife H953 Trail Camera is designed to capture wildlife moments.
2. Product Overview
2.1 Key Features
- High-Resolution Imaging: Captures 20-megapixel photos and 2.7K/1520P videos with clear audio.
- Fast Trigger Speed: 0.1-second trigger speed and up to 25-meter (82 feet) detection distance.
- Enhanced Night Vision: Equipped with 46 no-glow 940nm infrared LEDs for clear night recordings without disturbing wildlife.
- Extended Memory Support: Supports Micro SD cards up to 512GB (a 32GB card is included).
- Continuous Shooting: Capable of capturing up to 10 continuous photos per trigger event.
- Durable Design: IP66 waterproof and dustproof rating ensures reliable operation in various outdoor conditions.
- Multi-functional: Features include shot delay, target recording, timelapse, loop recording, audio recording, and password protection. Displays time, date, serial number, and temperature.
2.2 Package Contents
Verify that all items are present in your package:
- Coolife H953 Trail Camera
- Mounting Strap
- Quick User Guide
- Wall Mount Bracket
- Mounting Screws (3 pcs)
- 32GB Micro SD Card
- USB Cable
- AV Cable

Image 2.1: Contents of the Coolife H953 Trail Camera package.
3. Setup
3.1 Battery Installation
- Open the camera's casing by unlatching the side clips.
- Locate the battery compartment. The camera requires 6 Volts (typically 4 or 8 AA batteries).
- Insert the batteries, ensuring correct polarity (+/-).
- Close the battery compartment securely.
3.2 Micro SD Card Installation
- With the camera casing open, locate the Micro SD card slot.
- Insert the provided 32GB Micro SD card (or another compatible card up to 512GB) into the slot until it clicks into place.
- To remove, gently push the card in until it springs out.

Image 3.1: The H953 supports Micro SD cards up to 512GB.
3.3 Mounting the Camera
The camera can be mounted using the included strap or wall mount bracket.
Using the Mounting Strap:
- Thread the strap through the slots on the back of the camera.
- Secure the camera to a tree or pole at the desired height and angle.
- Ensure the camera is stable and pointed towards the area you wish to monitor.
Using the Wall Mount Bracket:
- Choose a suitable mounting surface.
- Use the included screws to attach the bracket to the surface.
- Attach the camera to the bracket and adjust the angle as needed.

Image 3.2: Coolife H953 Trail Camera ready for mounting.
4. Operating Instructions
4.1 Powering On/Off
- To power on, slide the power switch to the "ON" position. The LCD screen will illuminate.
- To power off, slide the power switch to the "OFF" position.
4.2 Menu Navigation
Use the control buttons (usually located near the LCD screen) to navigate through the camera's menu options. Common buttons include:
- MENU: Accesses the main settings menu.
- UP/DOWN: Navigates through menu options.
- LEFT/RIGHT: Changes settings values or navigates sub-menus.
- OK/SHOT: Confirms selections or manually takes a photo/video.
4.3 Basic Settings Configuration
Access the menu to configure essential settings:
- Mode: Select between Photo, Video, or Photo+Video mode.
- Photo Resolution: Set to 20MP for highest quality.
- Video Resolution: Set to 2.7K/1520P for highest quality.
- PIR Sensitivity: Adjust for desired motion detection range (e.g., High for distant subjects, Low for close-up).
- Trigger Interval: Set the delay between consecutive captures after a trigger event.
- Time & Date: Set the current time and date for accurate timestamps on recordings.
- Loop Recording: Enable or disable this feature. When enabled, the camera will overwrite the oldest files when the memory card is full.
- Password Protection: Set a password to prevent unauthorized access.

Image 4.1: Example of photo and video quality from the camera.
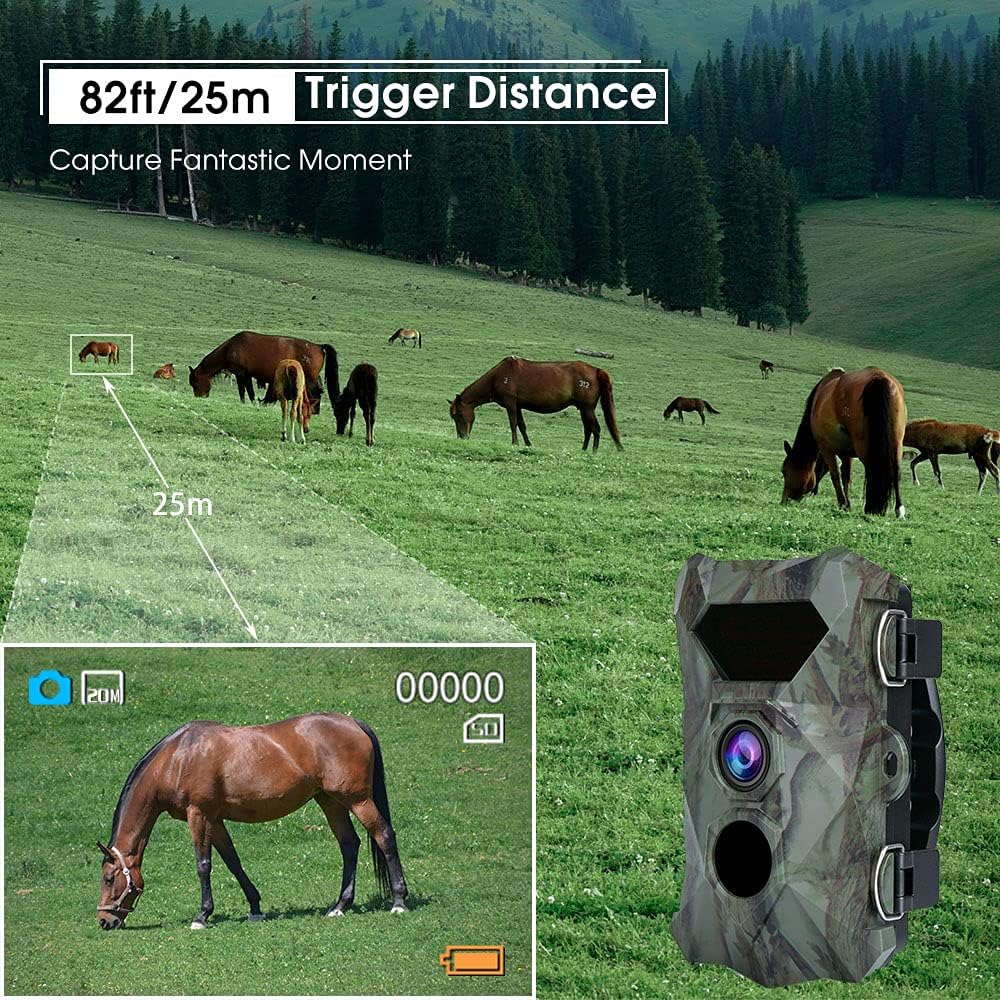
Image 4.2: The camera's 25-meter trigger distance.

Image 4.3: The camera's 0.1-second trigger speed for capturing fast-moving subjects.

Image 4.4: Advanced night vision capabilities with 940nm LEDs.

Image 4.5: Examples of wildlife captured by the H953 camera.

Image 4.6: The camera supports loop recording.
5. Maintenance
5.1 Cleaning the Camera
- Wipe the camera's exterior with a soft, damp cloth.
- Use a lens cleaning cloth to gently clean the camera lens and PIR sensors. Avoid abrasive materials.
- Ensure no dirt or debris obstructs the lens, sensors, or IR LEDs.
5.2 Battery Care
- Replace batteries when the low battery indicator appears on the screen.
- Remove batteries if the camera will not be used for an extended period to prevent leakage.
- Use high-quality alkaline or rechargeable AA batteries for best performance.
5.3 Storage
- Store the camera in a cool, dry place away from direct sunlight.
- Ensure the camera is clean and dry before storage.

Image 5.1: The camera's IP66 rating ensures durability in harsh weather.
6. Troubleshooting
6.1 Camera Not Powering On
- Check Batteries: Ensure batteries are inserted correctly with proper polarity and are not depleted. Replace if necessary.
- Battery Type: Verify that you are using the recommended battery type (AA).
6.2 Poor Image/Video Quality
- Clean Lens: Ensure the camera lens is clean and free from dirt or smudges.
- Lighting Conditions: For night vision, ensure no obstructions are blocking the IR LEDs.
- Resolution Settings: Check that photo and video resolutions are set to their highest quality in the camera menu.
6.3 Camera Not Triggering
- PIR Sensitivity: Adjust PIR sensitivity settings. High sensitivity is suitable for open areas, while low sensitivity might be better for areas with dense foliage to avoid false triggers.
- Obstructions: Ensure no branches or tall grass are moving in front of the PIR sensor, causing false triggers or blocking detection.
- Battery Level: Low batteries can affect sensor performance.
6.4 Memory Card Errors
- Card Compatibility: Ensure the Micro SD card is compatible and formatted correctly (FAT32 is common).
- Card Capacity: While the camera supports up to 512GB, ensure the card is not full. Enable loop recording if continuous recording is desired.
- Reinsert Card: Remove and reinsert the Micro SD card to ensure proper contact.
7. Specifications
| Feature | Detail |
|---|---|
| Model Name | H953 940nm |
| Photo Resolution | 20 Megapixels |
| Video Resolution | 2.7K / 1520p |
| Trigger Speed | 0.1 seconds |
| Trigger Distance | Up to 25 meters (82 feet) |
| IR LEDs | 46 pcs 940nm No-Glow Infrared LEDs |
| Memory Card Support | Micro SD up to 512GB (32GB included) |
| Water Resistance | IP66 Waterproof |
| Power Source | Battery Powered (6 Volts, batteries not included) |
| Material | Plastic |
| Dimensions (L x W x H) | 14 x 10 x 6.5 cm (5.5 x 3.9 x 2.6 inches) |
| Weight | 320 grams (0.7 lbs) |
| Recommended Use | Motion detection, Night vision, Wildlife monitoring |
8. Warranty and Support
For any questions, technical assistance, or warranty claims, please contact Coolife customer support. Refer to the contact information provided with your product packaging or visit the official Coolife website for support details.
Please retain your proof of purchase for warranty purposes.


