Download PDFFree PDF. The Save button below keeps a bookmark and private notes in your account.
CULMKARI Carburetor Kit Instruction Manual
Model: YW-191
Brand: CULMKARI
1. Introduction
This manual provides detailed instructions for the CULMKARI Carburetor Kit, designed for specific Kawasaki and Gravely engines. It covers product overview, compatibility, installation, operation, maintenance, and troubleshooting to ensure optimal performance and longevity of your engine.
The kit includes a carburetor, gaskets, fuel filter, fuel shut-off valve, and hose clamps.
2. Product Overview
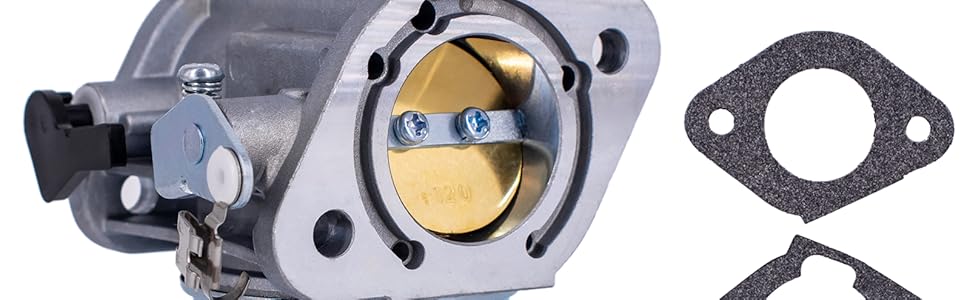
Image 2.1: Complete Carburetor Kit components.
Image 2.2: Carburetor unit with replacement part numbers.
The CULMKARI Carburetor Kit is a replacement assembly designed to restore proper fuel-air mixture to your engine. It includes the main carburetor unit, essential gaskets for a secure seal, a fuel filter to prevent contaminants from reaching the carburetor, a fuel shut-off valve for controlling fuel flow, and hose clamps for securing fuel lines.
3. Compatibility
This carburetor kit is compatible with the following Kawasaki and Gravely engines. Please verify your engine model and part numbers before installation to ensure proper fitment.
Replaces Part Numbers:
15004-0986
15004-0828
15004-7062
Fits Specific Engine Models:
Kawasaki FR651V
Kawasaki FS651V
Kawasaki FR691V
Kawasaki FS691V
23 HP Gravely ZT 42 XL Engines
Detailed Compatible Models:
Kawasaki FR651V-AS18
Kawasaki FR651V-AS19
Kawasaki FR651V-AS29
Kawasaki FR651V-BS13
Kawasaki FR651V-BS18
Kawasaki FR651V-CS06
Kawasaki FR651V-CS08
Kawasaki FR651V-CS09
Kawasaki FR651V-CS17
Kawasaki FR651V-DS09
Kawasaki FR651V-DS10
Kawasaki FR651V-DS13
Kawasaki FR651V-FS00
Kawasaki FS651V-AS10
Kawasaki FS651V-AS12
Kawasaki FS651V-AS15
Kawasaki FS651V-AS17
Kawasaki FS651V-CS07
Kawasaki FS651V-CS09
Kawasaki FS651V-DS07
Kawasaki FS651V-DS09
Kawasaki FS651V-DS11
Kawasaki FR651V-AS31
Kawasaki FS651V-DS10
Kawasaki FS651V-ES09
Kawasaki FS651V-ES10
Kawasaki FS651V-FS09
4. Setup and Installation
The CULMKARI Carburetor Kit is designed for easy installation, often described as 'Plug and Play', requiring no special tools. However, it is recommended to consult your engine's service manual for specific removal and installation procedures for your particular model.
General Installation Steps:
Safety First: Ensure the engine is cool and disconnect the spark plug wire to prevent accidental starting.
Drain Fuel: Turn off the fuel supply and drain any fuel from the carburetor and fuel lines.
Remove Old Carburetor: Carefully disconnect fuel lines, throttle linkage, and mounting bolts from the old carburetor. Note the orientation of all components.
Clean Mounting Area: Thoroughly clean the engine's carburetor mounting surface to ensure a proper seal with the new gaskets.
Install New Gaskets: Place the new gaskets in their correct positions.
Mount New Carburetor: Install the new CULMKARI carburetor, ensuring all linkages and fuel lines are connected correctly. Use the provided hose clamps for secure connections.
Install Fuel Filter and Shut-off Valve: If replacing, install the new fuel filter and shut-off valve in the fuel line according to the original setup.
Reconnect: Reconnect the spark plug wire and refill the fuel tank.
Initial Start-up: Start the engine and check for any fuel leaks or abnormal operation. Adjust idling if necessary.
Video 4.1: This video demonstrates the components of the carburetor kit and provides a visual overview of the installation process. It shows the fuel filter, gaskets, and the carburetor unit from various angles, highlighting key features and how they fit together.
5. Operating Instructions
The carburetor's primary function is to mix air and gasoline in the correct ratio for combustion. After proper installation, the engine should start and run smoothly. The carburetor allows for adjustment of idling to maintain stable engine speed when not under load.
Ensure the fuel shut-off valve is in the 'ON' position before attempting to start the engine. If your engine has a choke, use it as per your engine manufacturer's instructions for cold starts.
Image 5.1: Carburetor in operation on a lawn mower engine.
6. Maintenance
Regular maintenance of your carburetor and fuel system components is crucial for consistent engine performance and longevity.
Recommended Maintenance:
Fuel Filter: Inspect the fuel filter periodically for debris or discoloration. Replace it if it appears dirty or clogged to ensure clean fuel delivery to the carburetor.
Gaskets: Check gaskets for signs of wear, cracking, or leaks. Worn gaskets can lead to air leaks and improper fuel-air mixture. Replace as needed.
Carburetor Cleaning: If the engine experiences performance issues, the carburetor may need cleaning. This involves disassembling the carburetor and cleaning jets and passages with a carburetor cleaner.
Fuel Quality: Always use fresh, clean fuel. Stale or contaminated fuel can cause deposits and clog carburetor passages.
7. Troubleshooting
If your engine is not performing optimally after carburetor installation, consider the following common issues and solutions:
Common Issues:
Engine Not Starting:
Check fuel supply and ensure the fuel shut-off valve is open.
Verify spark plug connection and condition.
Inspect fuel filter for clogs.
Rough Idling or Stalling:
Adjust the idle screw on the carburetor.
Check for air leaks around carburetor gaskets.
Ensure fuel is clean and fresh.
Loss of Power or Poor Acceleration:
Carburetor jets may be partially clogged; cleaning may be required.
Verify proper throttle linkage operation.
Fuel Leaks:
Tighten all fuel line connections and hose clamps.
Inspect gaskets for proper seating and damage.
8. Specifications
Feature
Detail
Brand
CULMKARI
Model Number
YW-191
Vehicle Service Type
ATV
Flange Type
Bolt On
Fuel Type
Gasoline
Recommended Uses
Lawn Mower
Replaces Part Numbers
15004-0986, 15004-0828, 15004-7062
9. Support
For any inquiries, technical assistance, or support regarding your CULMKARI Carburetor Kit, our experienced customer service team and professional technicians are available to provide prompt assistance. Please refer to the retailer's contact information for support channels.
Ask a question about this manual
Ask about setup, troubleshooting, compatibility, parts, safety, or missing instructions. Manuals+ will review the question and use this page’s manual context to help answer it.