1. Introduction
Thank you for choosing the ORIA Digital LED Alarm Clock. This clock features a 6.5-inch large display, adjustable brightness, multiple display modes, and convenient USB charging ports. This manual provides detailed instructions to help you set up and operate your new alarm clock effectively.

Image: The ORIA Digital LED Alarm Clock with a clear, large white digital display against a black case.
2. Setup
2.1 Power Supply
The ORIA Digital LED Alarm Clock supports two power supply methods: USB power and AAA batteries. For continuous display, USB power is recommended.
- USB Power Supply (Included): Connect the provided USB cable to the clock's USB port and plug the other end into a USB power adapter (not included) or a powered USB port. The display will remain continuously on.
- AAA Batteries (Not Included): Insert 3 AAA batteries into the battery compartment. When powered by batteries alone, the screen will automatically turn off after 10 seconds to conserve energy. You can wake up the display by tapping the clock or making a sound.

Image: Illustration of the two power modes for the alarm clock, showing the battery compartment and USB port.
2.2 Initial Power-on
Once connected to a power source, the clock will power on. If using batteries, the display will show for 10 seconds and then turn off. If using USB, the display will remain on.
3. Operating Instructions
Familiarize yourself with the buttons on the top of the clock:
- DOWN (DST): Adjusts settings downwards; activates/deactivates Daylight Saving Time.
- UP (12/24H): Adjusts settings upwards; switches between 12-hour and 24-hour format.
- LIGHT/SNOOZE: Adjusts brightness; activates snooze function during alarm.
- MODE: Cycles through display modes (Time, Date, Temperature); enters setting mode.
- ALARM: Enters alarm setting mode.
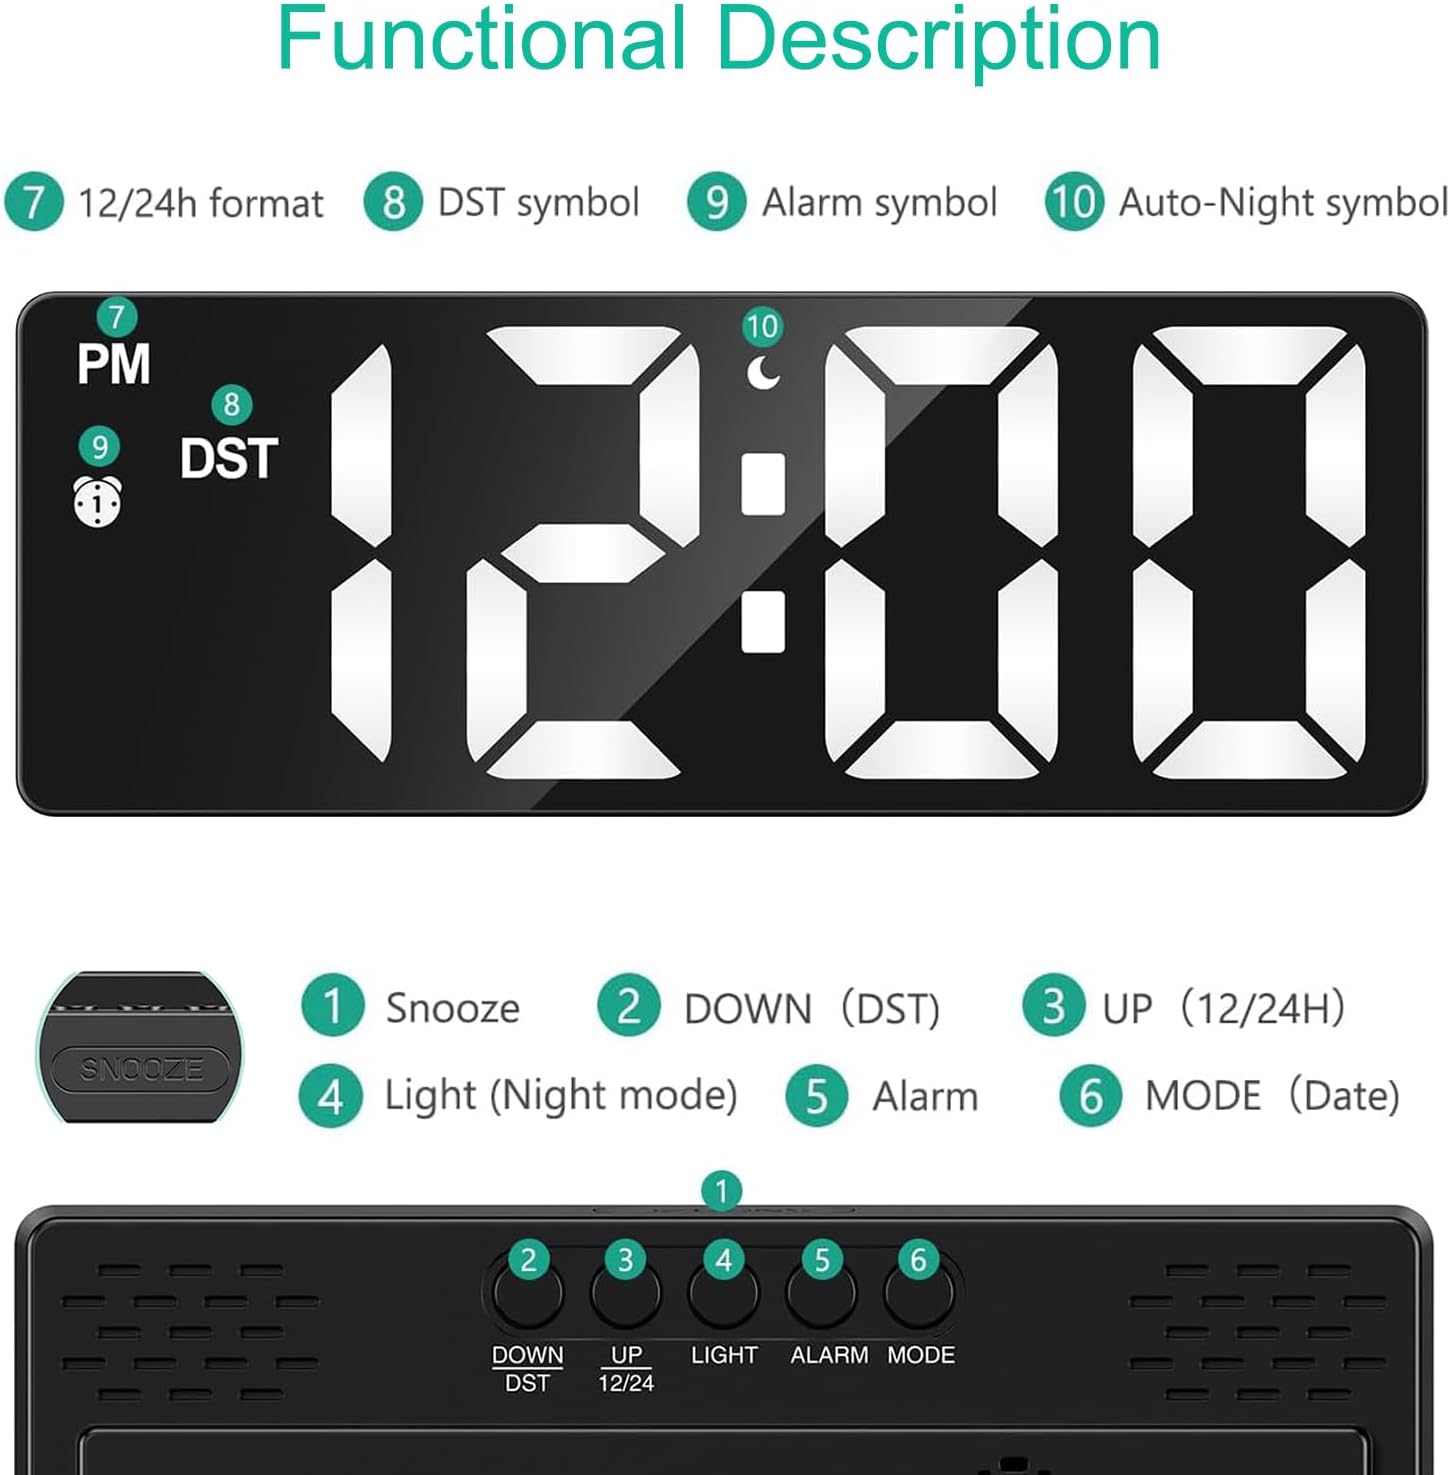
Image: Detailed view of the clock's top buttons and corresponding display indicators for various functions.
3.1 Setting Time and Date
- Press the MODE button once to enter Time setting mode. The hour digits will flash.
- Use the UP or DOWN buttons to adjust the hour.
- Press MODE again to set the minutes, then use UP or DOWN.
- Continue pressing MODE to cycle through setting Year, Month, and Day, adjusting each with UP or DOWN.
- Press MODE one last time to exit setting mode.
3.2 Setting Alarm
- Press the ALARM button once to enter Alarm setting mode. The alarm hour digits will flash.
- Use the UP or DOWN buttons to adjust the alarm hour.
- Press ALARM again to set the alarm minutes, then use UP or DOWN.
- Press ALARM one last time to exit alarm setting mode. The alarm icon will appear on the display, indicating it is active.
- To deactivate the alarm, press the ALARM button again until the alarm icon disappears.
3.3 Brightness Adjustment
The clock offers 3 levels of brightness. Press the LIGHT/SNOOZE button repeatedly to cycle through High, Medium, and Low brightness settings. There is also an auto-night brightness mode (19:00-06:59) which automatically dims the display.

Image: Visual representation of the clock's display at different brightness levels, from low to bright.
3.4 Display Modes
The clock has 5 display modes:
- Clock Mode: Displays current time.
- Alarm Mode: Displays set alarm time.
- Date Mode: Displays current date.
- Temperature Mode: Displays current ambient temperature.
- Night Mode: Automatically dims the display during specified hours (19:00-06:59).
Press the MODE button to cycle through these display modes. To set the clock to display only the time, long press the MODE button in temperature mode until you hear a beep, then long press it again.
3.5 Snooze Function
When the alarm sounds, press the LIGHT/SNOOZE button to activate the snooze function. The alarm will pause for 5-60 minutes (adjustable) and sound again after the snooze period.
3.6 Intelligent Voice Control (Battery Mode Only)
When powered by AAA batteries, the LED display will turn off after 10 seconds. You can wake up the display by a slight tap, snap, or clap. This feature helps conserve battery life.

Image: Visual guide demonstrating how to activate the clock display using touch or sound when in battery-saving mode.
3.7 Function Details Video
Watch this official video for a visual guide on setting up and using various functions of your ORIA Digital LED Alarm Clock, including time, date, alarm, and night mode settings.
Video: ORIA Digital Alarm Clock - Function Details. This video demonstrates how to set the time, date, alarm, and night mode, as well as the smart voice control feature.
4. Maintenance
To ensure the longevity and optimal performance of your ORIA Digital LED Alarm Clock, follow these simple maintenance guidelines:
- Clean the clock with a soft, dry cloth. Do not use abrasive cleaners or solvents.
- Avoid exposing the clock to extreme temperatures, direct sunlight, or high humidity.
- If using batteries, replace them when the display becomes dim or the clock malfunctions.
5. Troubleshooting
5.1 Display is off or dim
- Check Power Source: Ensure the USB cable is securely connected to both the clock and a working power adapter/port.
- Battery Mode: If using AAA batteries, the display turns off after 10 seconds to save power. Tap the clock or make a sound to activate the display. Replace batteries if they are low.
- Brightness Setting: Adjust the brightness level using the LIGHT/SNOOZE button.
5.2 Time is incorrect or not holding
- Re-set Time: Follow the instructions in Section 3.1 to re-set the time and date.
- Power Interruption: If the clock is powered by USB only, it does not have a memory function after a power off. Consider using AAA batteries as a backup for time memory.
5.3 Alarm not sounding
- Alarm Activated: Ensure the alarm icon is visible on the display, indicating the alarm is active. If not, follow Section 3.2 to activate it.
- Alarm Time: Verify the alarm time is set correctly.
6. Specifications
| Feature | Detail |
|---|---|
| Brand | ORIA |
| Model Number | ORAU-WA33 |
| Color | Black Case+white Digit |
| Display Type | Digital |
| Product Dimensions | 6.3"W x 1"H (160x60x18-25mm) |
| Power Source | Corded Electric (USB) / 3 AAA batteries (not included) |
| Special Features | Large Display, Alarm, Adjustable Brightness, Snooze, USB Charging Ports, Temperature Display, Night Mode, Voice Control |
| Material | Acrylonitrile Butadiene Styrene |
| Item Weight | 5.6 ounces |
7. Warranty and Support
ORIA is committed to providing high-quality products and excellent customer service.
- Lifetime Support: We offer lifetime support for our products.
- 12-Month Replacement: Enjoy a 12-month replacement policy for any manufacturing defects.
- 7/24 Online Customer Service: Our customer service team is available 24/7 to assist you with any questions or concerns.
For support, please contact us through the ORIA Store on Amazon or refer to the contact information provided with your product packaging.

Image: Icons illustrating the support and warranty provided by ORIA.


