
1. Introduction
Thank you for choosing the PowerLocus Bluetooth Headphones Model pwl-p2. These headphones are designed to provide a high-quality audio experience with versatile connectivity options. This manual will guide you through the features, setup, and operation to ensure optimal performance.

Image 1.1: PowerLocus Bluetooth Headphones Model pwl-p2 and its protective carry case.
2. Product Overview
2.1 Package Contents
- PowerLocus Bluetooth Headphones (Model pwl-p2)
- USB Charging Cable
- 3.5mm Audio Cable
- Protective Carry Case
- User Manual (this document)

Image 2.1: The package includes the headphones, charging cable, audio cable, and a protective case.
2.2 Headphone Features
- Bluetooth 5.0: For stable and fast wireless connection.
- Built-in Microphone: For hands-free calls.
- Foldable Design: For portability and easy storage.
- Soft Memory Foam Earmuffs: Designed for comfort and sound isolation.
- Multi-Mode Support: Bluetooth, 3.5mm AUX wired, Micro SD/TF card, and FM Radio.
- 40mm Audio Drivers: Delivering Hi-Fi stereo sound with deep bass.
- Long Battery Life: Up to 22.5 hours of playtime.
- Quick Charging: Fast battery replenishment.

Image 2.2: Overview of the headphone's key features including Bluetooth, multiple playback modes, and design elements.
2.3 Controls and Ports
Familiarize yourself with the buttons and ports on your headphones:
- Power Button: On/Off, Play/Pause, Answer/End Call.
- Volume Up (+): Increase volume, Next track (long press).
- Volume Down (-): Decrease volume, Previous track (long press).
- Mode Button (M): Switch between Bluetooth, FM Radio, and Micro SD modes.
- Micro USB Charging Port: For charging the headphones.
- 3.5mm AUX Port: For wired audio connection.
- Micro SD/TF Card Slot: For playing music directly from a memory card.
- LED Indicator: Displays connection and charging status.
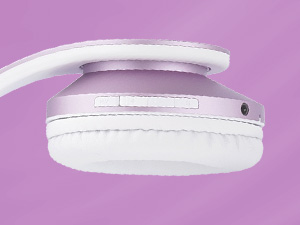
Image 2.3: Detailed view of the control buttons and ports on the headphone earcup.
3. Setup
3.1 Charging the Headphones
- Connect the small end of the USB charging cable to the Micro USB port on the headphones.
- Connect the larger end of the USB charging cable to a USB power source (e.g., computer USB port, wall adapter).
- The LED indicator will illuminate during charging. It will change color or turn off once fully charged (approximately 2.5 hours).
Note: Ensure the headphones are fully charged before first use for optimal battery life.
3.2 Power On/Off
- To Power On: Press and hold the Power Button for approximately 3 seconds until the LED indicator flashes.
- To Power Off: Press and hold the Power Button for approximately 3 seconds until the LED indicator turns off.
3.3 Bluetooth Pairing
- Ensure the headphones are powered off.
- Press and hold the Power Button for about 5-7 seconds until the LED indicator flashes blue and red alternately, indicating pairing mode.
- On your device (smartphone, tablet, PC), enable Bluetooth and search for available devices.
- Select 'PowerLocus pwl-p2' from the list of devices.
- Once paired, the LED indicator will flash blue slowly.
Note: The headphones will automatically attempt to reconnect to the last paired device when powered on.

Image 3.1: Visual representation of connecting the headphones via Bluetooth to a mobile device.
3.4 Wired Connection (AUX Mode)
If the battery is depleted or you prefer a wired connection:
- Connect one end of the 3.5mm audio cable to the AUX port on the headphones.
- Connect the other end of the 3.5mm audio cable to the audio output jack of your device.
- The headphones will automatically switch to wired mode.

Image 3.2: The headphones can be used in wired mode with the included 3.5mm audio cable.
4. Operating Instructions
4.1 Basic Audio Controls
- Play/Pause: Short press the Power Button.
- Volume Up: Short press the '+' button.
- Volume Down: Short press the '-' button.
- Next Track: Long press the '+' button.
- Previous Track: Long press the '-' button.
4.2 Phone Call Controls
- Answer/End Call: Short press the Power Button.
- Reject Call: Long press the Power Button.
- Redial Last Number: Double press the Power Button.
4.3 Switching Modes
Press the 'M' (Mode) button to cycle through the available modes:
- Bluetooth Mode
- FM Radio Mode
- Micro SD/TF Card Mode
4.4 Micro SD/TF Card Mode
- Insert a Micro SD/TF card (with MP3 audio files) into the card slot.
- Switch to Micro SD/TF Card Mode using the 'M' button.
- Playback will begin automatically. Use the basic audio controls for playback.
4.5 FM Radio Mode
- Switch to FM Radio Mode using the 'M' button.
- Long press the Power Button to automatically scan and save available FM stations.
- Use the '+' and '-' buttons to navigate between saved stations.

Image 4.1: The headphones support multiple playback options including Bluetooth, wired, Micro SD, and FM radio.
5. Maintenance
5.1 Cleaning
- Wipe the headphones with a soft, dry cloth.
- Do not use abrasive cleaners or solvents.
- Keep the charging port and audio jack free of dust and debris.
5.2 Storage
- When not in use, store the headphones in the provided protective carry case.
- Avoid exposing the headphones to extreme temperatures, humidity, or direct sunlight.
- Store in a cool, dry place.

Image 5.1: The foldable design and included carry case make the headphones easy to store and transport.
6. Troubleshooting
| Problem | Possible Cause | Solution |
|---|---|---|
| Headphones do not power on. | Low battery. | Charge the headphones fully. |
| Cannot pair via Bluetooth. | Headphones not in pairing mode; device Bluetooth off; too far from device. | Ensure headphones are in pairing mode (flashing blue/red). Turn on device Bluetooth. Move headphones closer to device (within 36 feet). |
| No sound. | Volume too low; incorrect mode; wired cable not fully inserted. | Increase volume. Check if headphones are in the correct mode (Bluetooth, AUX, SD, FM). Ensure 3.5mm cable is fully inserted in both devices. |
| Microphone not working. | Not connected via Bluetooth; device settings. | Ensure headphones are connected via Bluetooth. Check microphone settings on your connected device. |
| FM Radio not receiving stations. | Poor signal; stations not scanned. | Move to an area with better FM reception. Long press the Power Button in FM mode to auto-scan and save stations. |
7. Specifications
| Feature | Specification |
|---|---|
| Model Number | pwl-p2 |
| Connectivity Technology | Wireless (Bluetooth 5.0), Wired (3.5mm Jack) |
| Audio Driver Size | 40 mm |
| Frequency Range | 20 Hz - 20,000 Hz |
| Impedance | 32 Ohm |
| Sensitivity | 105 dB |
| Bluetooth Range | Up to 36 feet (12 meters) |
| Battery Life | Up to 22.5 hours |
| Charging Time | Approximately 2.5 hours |
| Weight | 5.1 ounces |
| Special Features | Foldable, Built-in Microphone, Micro SD/TF Card Slot, FM Radio, Sound Isolation |
| Compatible Devices | iOS, Android, PC, Laptops, TV, Tablets, devices with 3.5mm audio jack or Bluetooth connectivity |
8. Warranty and Support
8.1 Warranty Information
PowerLocus provides a 24-month full warranty for the Model pwl-p2 headphones. This warranty covers manufacturing defects and ensures your smooth purchase experience. Please retain your proof of purchase.
8.2 Customer Support
For any questions, concerns, or warranty claims regarding your PowerLocus Bluetooth Headphones, please contact our friendly support team. Refer to the contact information provided in your product packaging or visit the official PowerLocus website for assistance.


