1. Introduction
This manual provides detailed instructions for the installation, operation, and maintenance of your ZYXU Electric Bike Conversion Kit. Please read this manual thoroughly before attempting installation or operation to ensure proper function and safety. This kit is designed to convert a standard bicycle into an electric bicycle, offering pedal assistance and throttle control.
2. Safety Information
Always prioritize safety when working with electrical components and operating an electric bicycle. Failure to follow safety guidelines can result in injury or damage to the product.
- Professional Installation Recommended: If you are unsure about any step, seek assistance from a qualified bicycle mechanic or electrician.
- Power Disconnection: Always disconnect the battery before performing any installation, maintenance, or troubleshooting.
- Water Exposure: While components are designed to be waterproof, avoid submerging the motor or controller in water. Do not wash with high-pressure water jets.
- Component Compatibility: Use only components provided with the kit or approved replacements. Incompatible parts can cause damage or malfunction.
- Brake System Check: Ensure your bicycle's brake system is in excellent working condition before and after conversion. Test brakes thoroughly after installation.
- Road Safety: Always wear a helmet and follow all local traffic laws and regulations when operating your electric bicycle.
- Battery Handling: Handle the battery (not included) according to its manufacturer's instructions. Avoid short-circuiting or damaging the battery.
3. Package Contents
Carefully unpack the box and verify that all items listed below are present and undamaged. If any items are missing or damaged, contact your seller immediately.

Image: All components included in the ZYXU Electric Bike Conversion Kit, laid out for inspection.
- 48V 500W Front Wheel (motorized) x1 (tire not included)
- 48V 22A Controller x1
- LCD8H Display x1
- Thumb Throttle x1
- Power-off Brake Levers x1 pair
- Bolts and Nuts (for installation)
- PAS (Pedal Assist Sensor) x1
- Cable Ties and Protection Wire x1 set
- Motor Extension Cord x1
4. Setup and Installation
The ZYXU Electric Bike Conversion Kit is designed for straightforward installation, typically completable within 1-2 hours by one person. Follow these steps carefully.
4.1. Component Identification
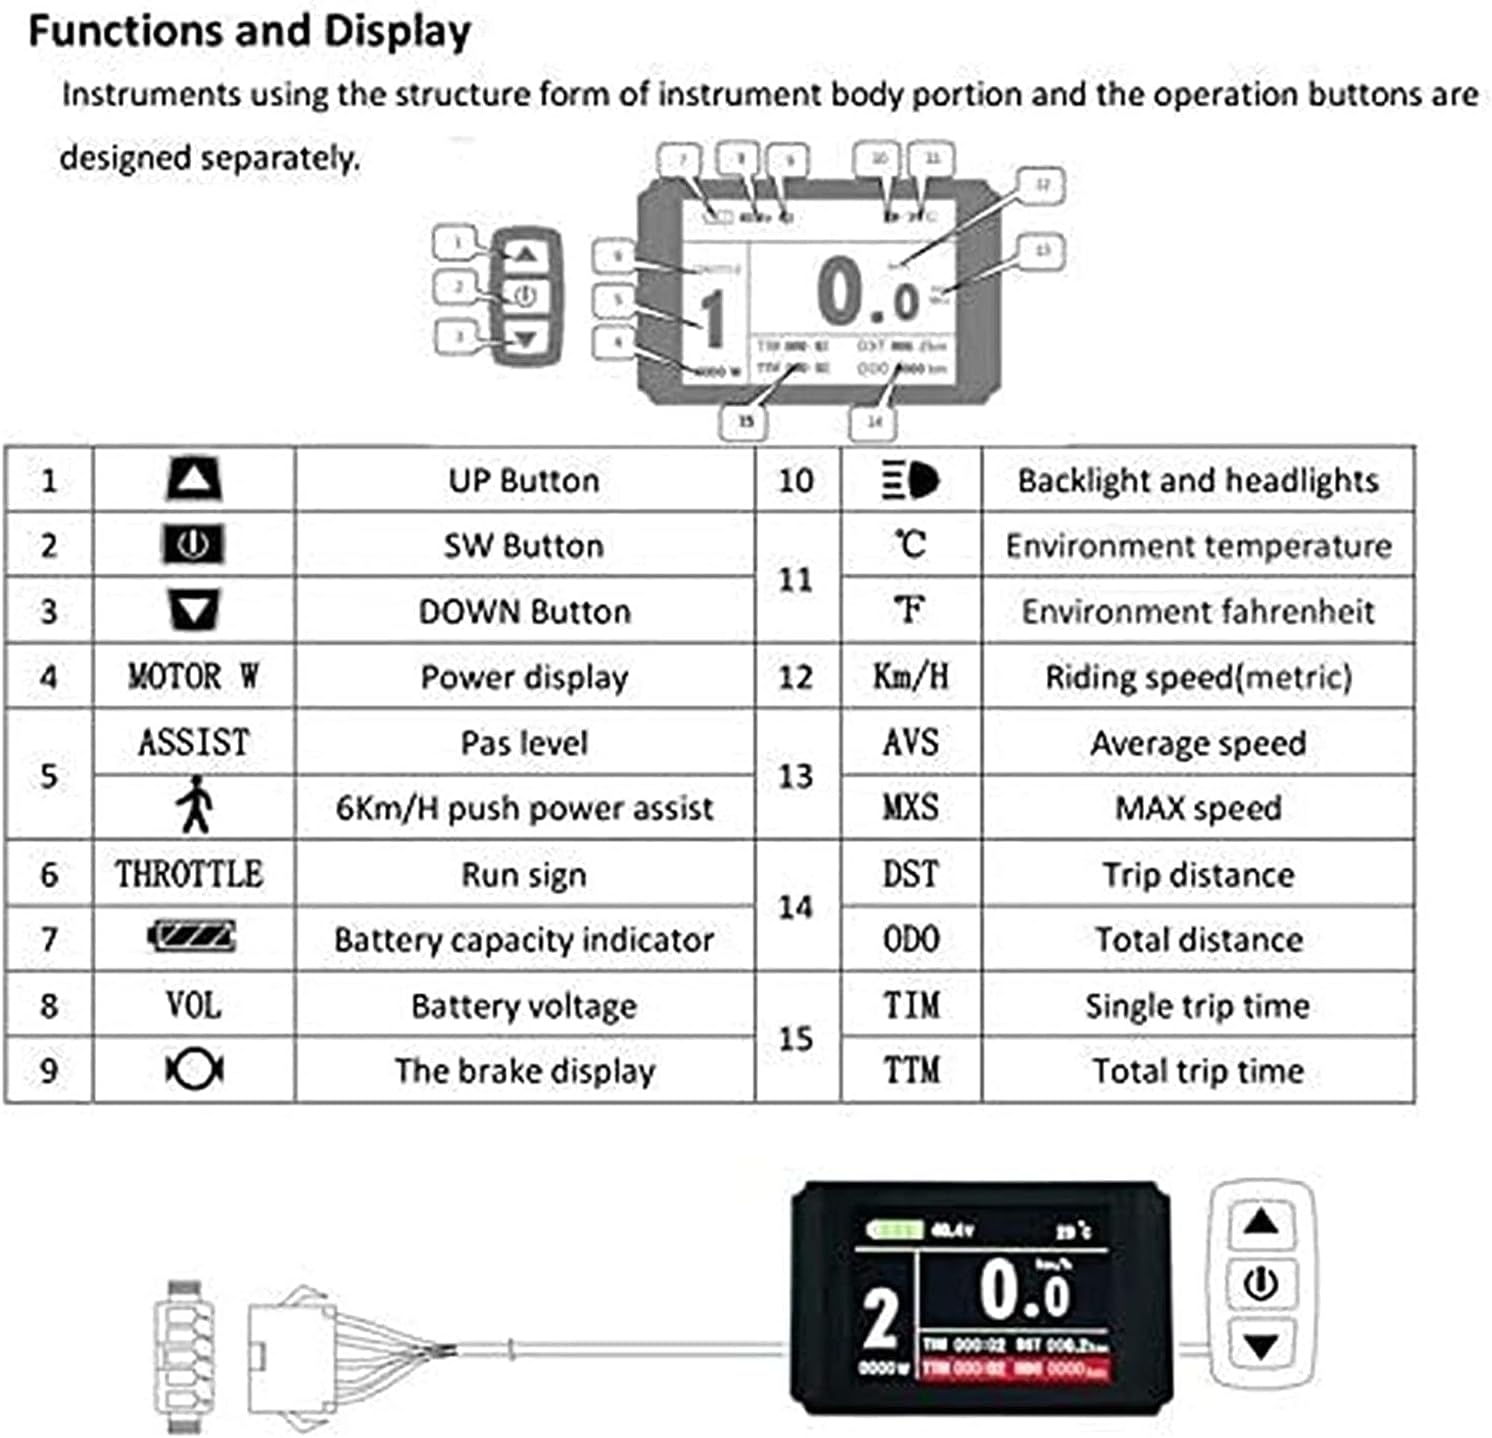
Image: The controller unit showing various labeled ports for connecting the PAS sensor, throttle, brake levers, motor, display, and power supply.
Familiarize yourself with the main components and their connections:
- Motor Wheel: The front wheel with the integrated 48V 500W brushless gear motor.
- Controller: The central electronic unit that manages power distribution and motor control.
- LCD8H Display: Provides operational data and allows setting adjustments.
- Thumb Throttle: Controls motor speed directly.
- Brake Levers: Equipped with power-off sensors to cut motor power when brakes are applied.
- PAS Sensor: Detects pedal rotation to provide pedal assistance.
4.2. Installation Steps
- Prepare the Bicycle: Remove the existing front wheel from your bicycle. Ensure the front fork opening is 100 mm.
- Install the Motor Wheel: Mount the new 48V 500W front motor wheel into the bicycle's front fork. Secure it firmly with the provided bolts and nuts.
- Install Brake Levers: Replace your existing brake levers with the provided power-off brake levers. Ensure they are securely fastened and the brake cables are properly connected and adjusted.
- Install Thumb Throttle: Mount the thumb throttle on the handlebar in a comfortable and accessible position.
- Install LCD8H Display: Attach the LCD8H display to the handlebar.
- Install PAS Sensor: Install the pedal assist sensor on the bicycle's bottom bracket, ensuring the magnet disc is correctly aligned with the sensor.
- Mount the Controller: Find a suitable location on the bicycle frame (e.g., under the seat, on the downtube) to mount the controller. Use cable ties to secure it.
- Connect Wiring: Connect all components to the controller according to the labels (Motor, PAS, Throttle, Brake, Display, Power). Ensure all connections are secure and waterproof. Use the motor extension cord if needed.
- Cable Management: Use the provided cable ties and protection wire to neatly route and secure all cables, preventing them from interfering with moving parts or getting damaged.
- Battery Connection: Connect your 48V battery (not included) to the power input of the controller. Ensure correct polarity.
4.3. Motor Internal Structure
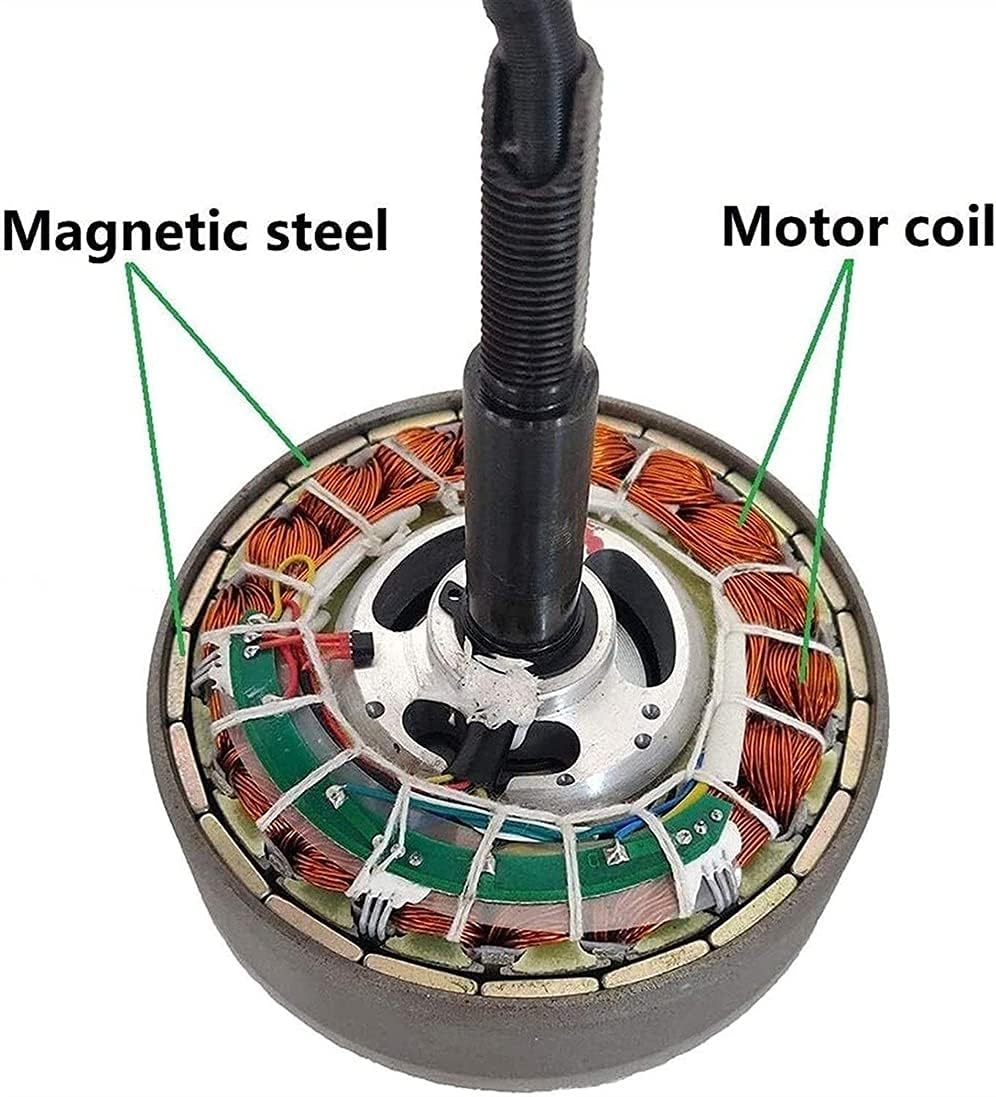
Image: An internal view of the motor, highlighting the magnetic steel components and the motor coils, which are essential for generating power.

Image: A detailed view of the high-speed nylon gears within the motor, showing the application of lubricating grease for smooth operation and durability.

Image: Multiple views of the motor in various stages of disassembly, illustrating the internal structure, including the gear mechanism and other components.
The motor features a brushless gear design with magnetic steel and motor coils for efficient power delivery. High-speed nylon gears, lubricated for smooth operation, contribute to the motor's performance and durability. These internal components are designed for reliability and minimal maintenance.
5. Operating Instructions
Once the kit is fully installed and checked, you can begin operating your electric bicycle.
5.1. LCD8H Display Functions

Image: A close-up view of the KT-LCD8 display, illustrating its interface with readouts for battery charge, voltage, ambient temperature, current speed, and various trip metrics.

Image: A comprehensive table outlining the various functions and display indicators of the KT-LCD8 unit, including button actions and data readouts like speed, distance, and battery status.
The LCD8H display provides essential information and allows you to control various aspects of your e-bike. Refer to the table below for a detailed explanation of its functions:
| No. | Icon/Button | Description | No. | Icon/Display | Description |
|---|---|---|---|---|---|
| 1 | ▲ | UP Button | 10 | ≡ | Backlight and headlights |
| 2 | Ⓞ | SW Button (Switch/Mode) | 11 | °F | Environment Fahrenheit |
| 3 | ▼ | DOWN Button | 12 | Km/H | Riding speed (metric) |
| 4 | MOTOR W | Power display | AVS | Average speed | |
| 5 | ASSIST 🚶 | Pas level (Pedal Assist Level) | 13 | MXS | MAX speed |
| 6 | THROTTLE | Run sign (Throttle active) | DST | Trip distance | |
| 7 | 🔋 | Battery capacity indicator | 14 | ODO | Total distance |
| 8 | VOL | Battery voltage | TIM | Single trip time | |
| 9 | Ⓞ | The brake display | 15 | TTM | Total trip time |
5.2. Basic Operation
- Power On/Off: Press and hold the SW button on the display to turn the system on or off.
- Pedal Assist (PAS): Once powered on, the system defaults to a pedal assist level. Pedal the bicycle, and the motor will provide assistance. Use the UP (▲) and DOWN (▼) buttons to adjust the PAS level (1-5, or as configured). Higher levels provide more assistance.
- Throttle Control: Gently press the thumb throttle to engage the motor directly. The throttle can be used independently or in conjunction with pedal assist. Release the throttle to stop motor assistance.
- Braking: Applying the brake levers will cut power to the motor, ensuring safe stopping.
- 6km/h Push Assist: Some displays may feature a 6km/h push assist function (often activated by holding the DOWN button), useful for walking the bike.
6. Maintenance
Regular maintenance ensures the longevity and optimal performance of your ZYXU Electric Bike Conversion Kit.
- Cleanliness: Keep the motor, controller, and display clean. Wipe with a damp cloth; avoid harsh chemicals or high-pressure water.
- Cable Inspection: Periodically check all cables and connectors for wear, damage, or loose connections. Ensure all connections are secure and waterproof.
- Brake System: Regularly inspect brake pads, cables, and levers. Ensure the power-off function of the brake levers is working correctly.
- Motor Inspection: Listen for unusual noises from the motor. While the internal gears are lubricated, severe impacts or prolonged heavy use might require professional inspection.
- Wheel Spokes: Check spokes for tension and damage. Ensure the wheel remains true.
- Battery Care: Follow the battery manufacturer's guidelines for charging, storage, and maintenance.
7. Troubleshooting
This section addresses common issues you might encounter. For problems not listed here, contact customer support.
| Problem | Possible Cause | Solution |
|---|---|---|
| Motor not engaging | Battery low or disconnected Loose motor cable connection Brake lever sensor engaged PAS sensor misalignment/fault | Check battery charge and connection Secure motor cable Ensure brake levers are fully released Check PAS sensor alignment and connection |
| Display not turning on | Battery low or disconnected Loose display cable connection | Check battery charge and connection Secure display cable |
| Inconsistent pedal assist | PAS sensor misalignment Damaged PAS sensor cable | Realign PAS sensor and magnet disc Inspect and replace damaged cable if necessary |
| Throttle not working | Loose throttle cable connection Faulty throttle unit | Secure throttle cable Test with a known good throttle if available; contact support |
| Unusual motor noise | Loose motor mounting Internal motor issue | Check motor mounting bolts Contact support for internal motor inspection |
8. Specifications
Key technical specifications for the ZYXU Electric Bike Conversion Kit (48V 500W Front Wheel, 20-inch model):
- Motor Type: 48V 500W Brushless Gear Motor
- Wheel Size: 20 Inches
- Fork Opening: 100 mm (front wheel)
- Controller: 48V 22A (Max current: 22±1A, Rated current: 11A)
- Rated Voltage: DC36V / 48V (auto-detect)
- Low Voltage Protection: DC30 / 40±0.5V
- Display: KT-LCD8H
- Pedal Assist Sensor: 1:1 Smart Pedal Assist System (8P magnet point)
- Brake Levers: Aluminum alloy, compatible with disc brake / V brake, with power-off function
- Top Speed: Approximately 32 km/h
- Speed (RPM): 265-325
- Torque (N.M): 60-63
- Maximum Load Capacity: 150-250 kg (bicycle dependent)
- Rims: Double-layer aluminum alloy
- Spokes: 12g / 13g stainless steel
9. Warranty and Support
For warranty information, please refer to the documentation provided with your purchase or contact your seller directly. Keep your proof of purchase for any warranty claims.
If you encounter any issues or have questions not covered in this manual, please contact ZYXU customer support or your authorized dealer for assistance.


