
1. Introduction
The SYNLETT Wireless Calling System is designed to provide efficient and reliable communication for various environments such as healthcare facilities, restaurants, and homes. This manual provides detailed instructions for setting up, operating, maintaining, and troubleshooting your system to ensure optimal performance.
2. What's Included
Your SYNLETT Wireless Calling System package includes the following components:
- 1 x Central Monitoring Unit
- 10 x Call Buttons
- 10 x Call Button Mount Brackets
- 1 x AC Adapter
- 1 x User Manual
- Call Button Accessories (lanyards, adhesive tape, screws)
- 10 x 12V Batteries (for call buttons)

Figure 2.1: Components included in the SYNLELETT Wireless Calling System package.
3. Setup
3.1 Powering the Monitoring Unit
The monitoring unit can be powered either by the provided AC adapter or by four C-type batteries (not included for main unit, recommended for backup). Do not use both simultaneously.
- AC Adapter: Connect the AC adapter to the DC 12V input port on the side of the monitoring unit and plug it into a power socket.
- Batteries: Open the battery compartment on the back of the unit and insert four C-type batteries, ensuring correct polarity.
- Switch the 'POWER' toggle on the back of the unit to 'ON'.

Figure 3.1: Battery compartment and power switch on the monitoring unit.
3.2 Extending the Antenna
Fully extend the antenna located on the top of the monitoring unit to ensure the best possible signal reception for all components.

Figure 3.2: Fully extend the antenna for optimal range.
3.3 Call Button Battery Installation
Each call button requires one 23A 12V battery (included). Ensure correct polarity when inserting the battery.

Figure 3.3: Inserting battery into a call button.
4. Functions of the Monitoring Unit
The monitoring unit features several buttons and switches for comprehensive control:
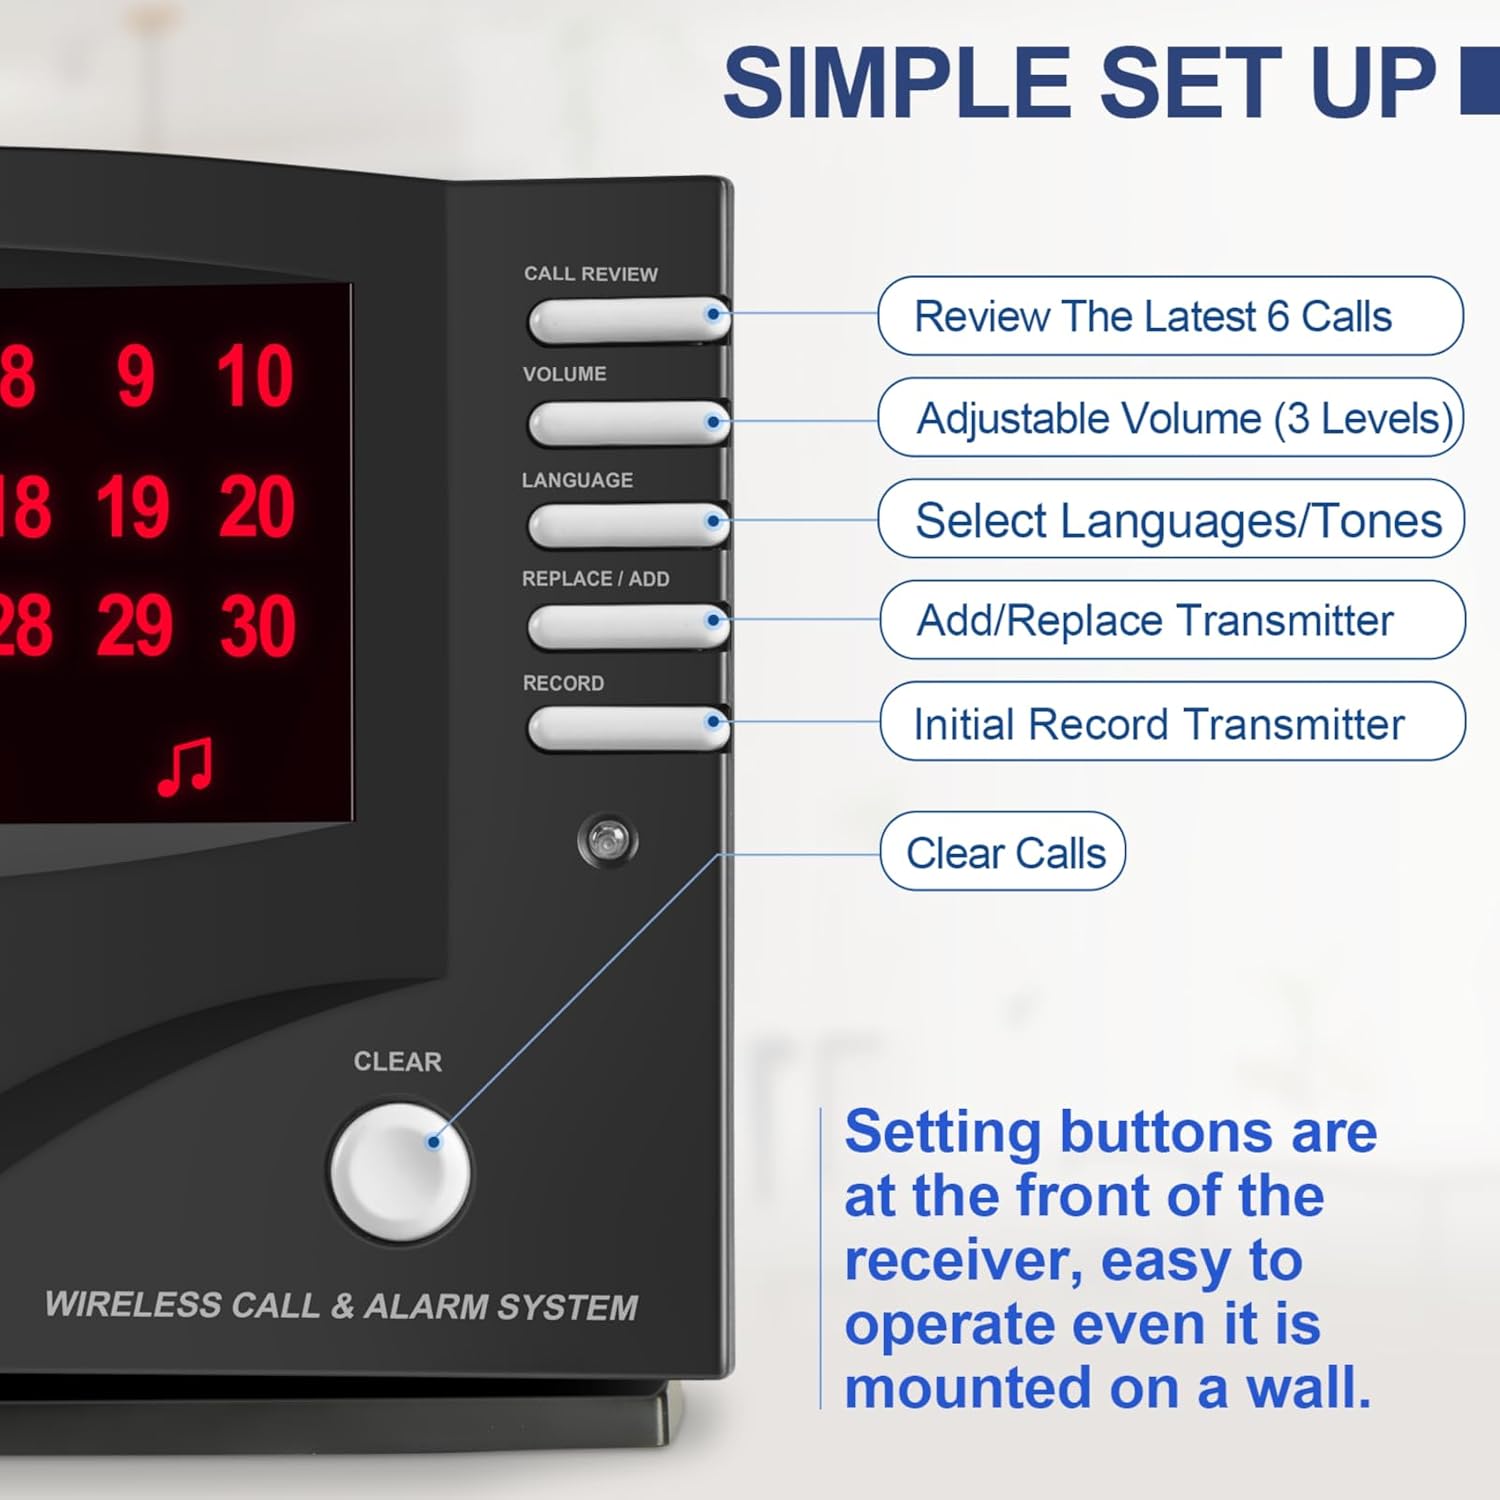
Figure 4.1: Monitoring Unit Control Panel.
- CALL REVIEW Button: Press once to silence an active alert without erasing call memory. Press repeatedly to review the last 6 calls received.
- VOLUME Button: Scrolls through three volume levels for alerts.
- LANGUAGE Button: Scrolls through 7 language options and 8 different alert tones.
- REPLACE/ADD Button: Used to add new components or replace existing ones.
- RECORD/ADD Button: Used for initial programming of components.
- CLEAR Button: Clears all call memory from the unit and silences any active alarms.
4.1 Side Switches
- UNLOCK/LOCK Switch: Puts the unit into programming position (UNLOCK) or normal operating mode (LOCK).
- SPEAKER Slot: Used to silence the unit's internal speaker if external pagers are being used.
- CALL/ALARM Switch: Toggles between call notification mode and alarm mode.
Video 4.1: Detailed explanation of monitoring unit functions and controls.
5. Programming Instructions
Before programming, ensure the monitoring unit is powered on and in 'UNLOCK' mode. If numbers are scrolling across the screen, the unit is unprogrammed. You can program up to 255 call buttons.
5.1 Initial Programming (New Unit or Unprogrammed)
- Place the call buttons or components in the order you wish to program them.
- Press and hold the 'RECORD/ADD' button for two beeps and a closing melodic tone.
- Press the first call button you wish to program. The monitoring unit will display 'Number 1' and ring out the number. Wait for the closing melodic tone.
- Repeat step 3 for all subsequent call buttons (e.g., press the second button for 'Number 2', etc.).
- Once all desired buttons are programmed, press the 'RECORD/ADD' button again to complete the programming.
- Test the programmed call buttons to ensure they are working correctly.
Video 5.1: Detailed initial programming steps for the monitoring unit.
5.2 Adding Components on Next Available Number
- Press and hold the 'RECORD/ADD' button for two beeps and a closing melodic tone.
- Activate the additional call button/component by pressing its button. The unit will assign it the next available number. Wait for the closing melodic tone.
- Press the 'RECORD/ADD' button again to complete the programming.
- Test the newly programmed call button to ensure it is working correctly.
5.3 Replacing a Component in an Existing Number
- Press and hold the 'REPLACE/ADD' button for two beeps and a closing melodic tone.
- Keep pressing the 'CALL REVIEW' button until the desired number (the one you want to replace) is called out and shown on the screen.
- Quickly activate the new call button/component to replace the existing number. The unit will confirm the replacement.
- Press the 'REPLACE/ADD' button again to complete the programming.
- Test the new call button/component to ensure it is working correctly.
- Test the call button/component which has been replaced to ensure it is erased from the system.
- Press and hold the 'RECORD/ADD' button for two beeps and the melodic tone.
- Then press the 'RECORD/ADD' button again to restore the system back to ex-factory mode. You will see numbers scrolling across the screen when it is on ex-factory mode.
5.4 Resetting to Ex-Factory Setting
To clear all programmed components and restore the unit to its original factory settings:
6. Operating Instructions
6.1 For Caregivers and Patients
Patients can press the call button if they need help. The monitoring unit will call out the number in the selected language and display it on the screen. Caregivers will be alerted immediately.
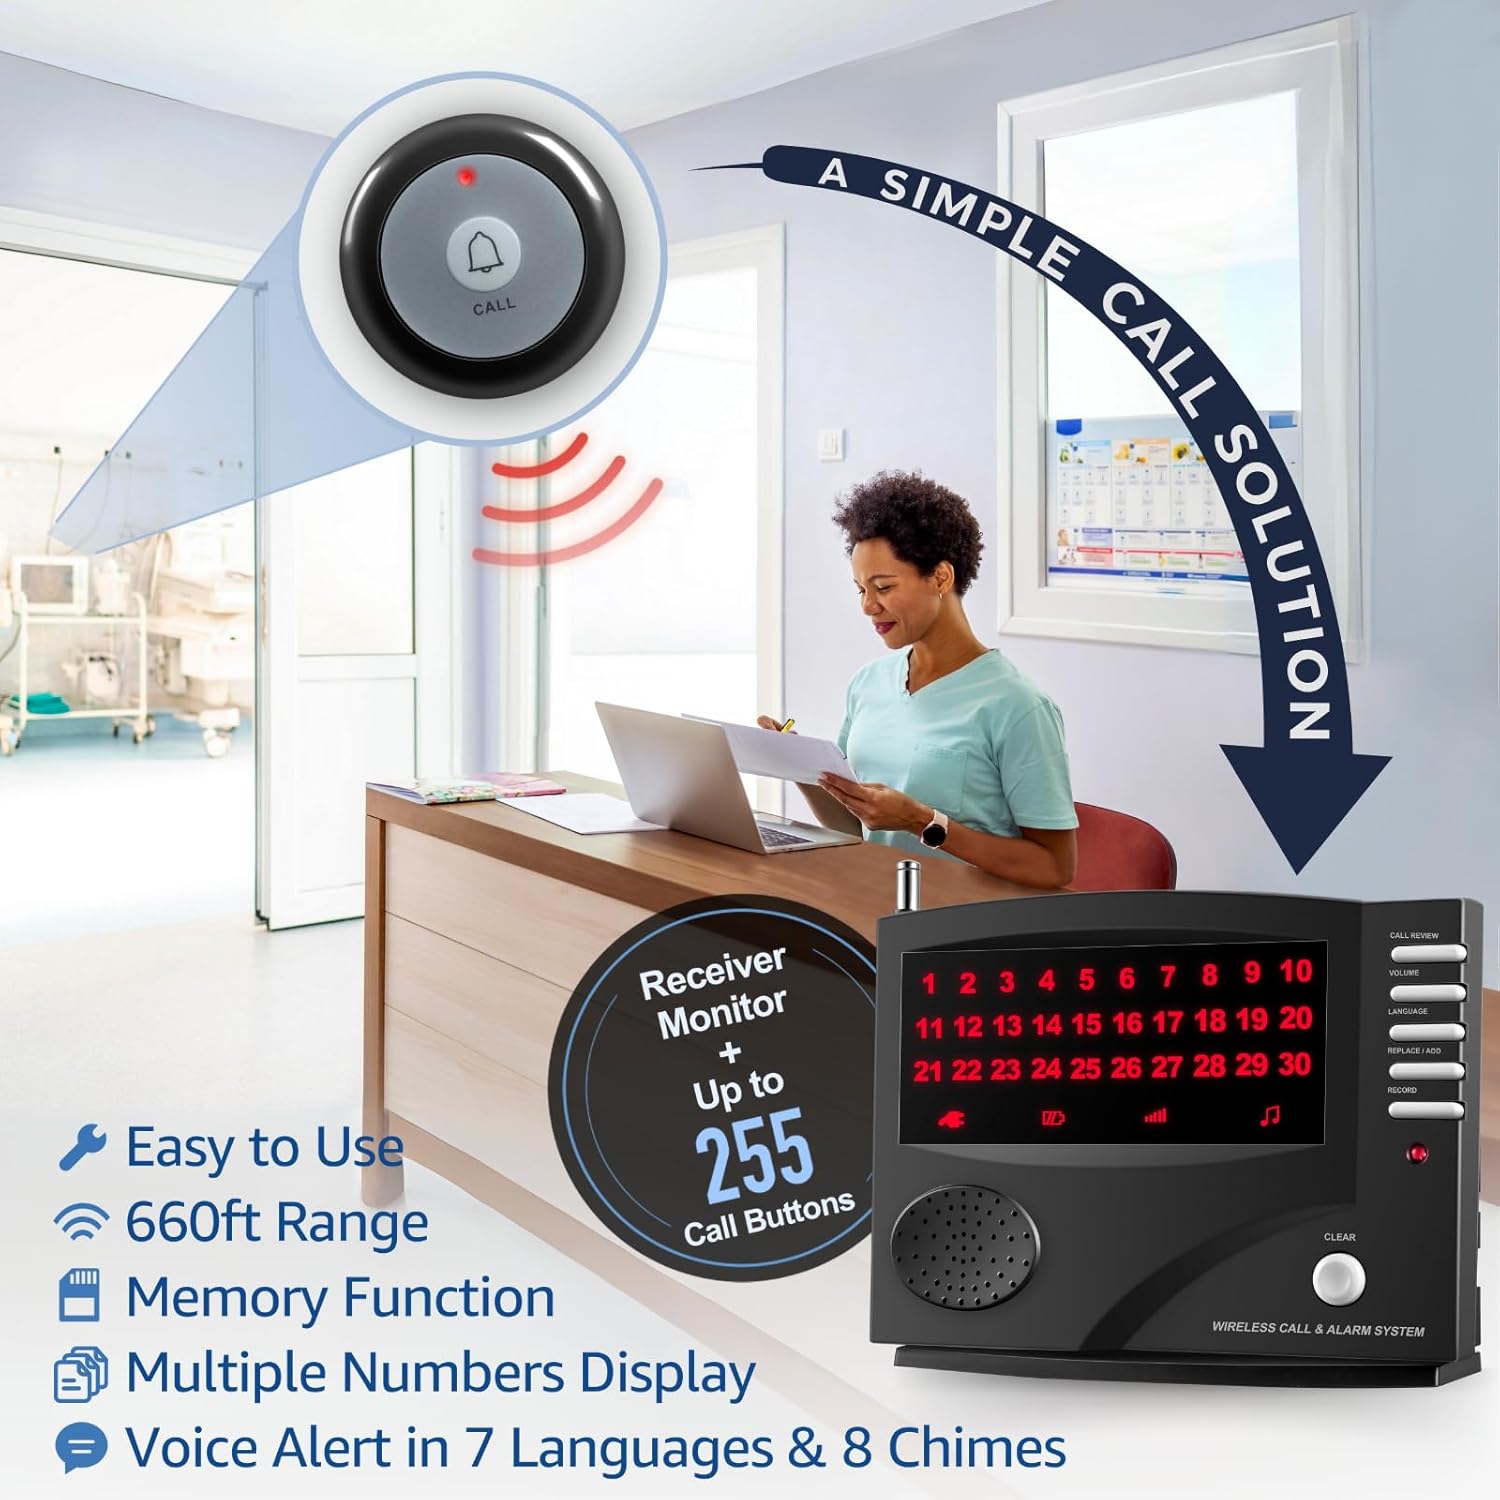
Figure 6.1: Patient activating a call button.
Call buttons can be worn around the neck with a lanyard, mounted on a wall with adhesive tape, or screwed into a wall for permanent installation.

Figure 6.2: Flexible attachment methods for call buttons.
6.2 For Hospitality and Service Staff
Customers can press the service bell if they need assistance. Staff will be served right away. The monitoring unit calls out the number in the selected language and displays it on the screen.

Figure 6.3: Applications of the SYNLETT Wireless Calling System.
Video 6.1: Overview of wireless call system for caregiver and restaurant owner.
7. Maintenance
- Keep the unit and call buttons clean by wiping with a soft, dry cloth.
- Avoid exposing the devices to extreme temperatures, direct sunlight, or moisture.
- Replace call button batteries when the LED indicator no longer lights up or the signal range decreases.
8. Troubleshooting
| Problem | Possible Cause | Solution |
|---|---|---|
| Monitoring unit not powering on | No power from AC adapter or dead batteries. | Check AC adapter connection or replace batteries. Ensure power switch is ON. |
| Call buttons not triggering alert | Button not paired, out of range, or dead battery. | Ensure button is paired (see Programming). Check range (max 660ft open area). Replace button battery. |
| Poor signal range | Antenna not fully extended, metal obstructions, or interference. | Fully extend antenna. Relocate unit away from metal walls or other electronic devices. |
| Unit continuously rings/flashes | Call memory not cleared. | Press the 'CLEAR' button to clear all calls. |
9. Specifications
| Feature | Detail |
|---|---|
| Model Number | Q034G-F007B |
| Power Source | Battery Powered (4 C-type for main unit, 10 12V for buttons) |
| Connectivity Technology | Wireless |
| Maximum Range | 660 Feet (open areas) |
| Expandability | Up to 255 call buttons/components |
| Languages | 7 programmed languages |
| Alert Tones | 8 different alert tones |
| Volume Levels | 3 adjustable volume levels |
| Dimensions (L x W x H) | 11.02 x 7.09 x 3.54 inches |
| Item Weight | 2.51 pounds |
| Material | Metal |
| Color | Black |
10. Warranty & Support
Warranty: This SYNLETT Wireless Calling System comes with a 1-year warranty from the date of sale.
Support: For further assistance or troubleshooting not covered in this manual, please refer to the official SYNLETT store or contact customer support.
Note: Product information is subject to change. Always refer to the latest documentation provided by the manufacturer.

